Using the Auto-Validation Tool to Automatically Run Data Against the Edit Checks Built in the eCRF
Traditionally, after building a study, builders had to enter test data by hand. Auto-validation, unique to TrialKit, provides study builders a tool to enter test data in a simulator for each form. The system will then automatically run that data against the edit checks (validation conditional actions) on the corresponding form being validated. It then records where the edit checks fired and where they didn't.
The system keeps a history of these validations, also regarded as test case scripts with results, for documenting validated test results of each eCRF. These results can be exported via excel and stored in a testing audit trail for future reference.
Web Browser:
The auto-validation tool is accessed from within the Form Builder as shown below.

Validating a CRF is a three-step process culminating in a detailed report, complete with a validation status for each field being saved to the database.
- Once a CRF has been validated, a validated tag can be attached to the CRF. This validated tag will stay with the CRF as long as the CRF is not changed.
- The user can export a validated form to the Form Library and import it into other studies.
- Once a form is changed, the validated tag will be cleared and the form must be re-validated.
- TrialKit identifies which forms are validated and which forms are not in the Form Builder and Import Form Library.
Step 1 – Creating Test Data Scripts
- Before running validation data through a CRF test data can be automatically created by TrialKit.
- To begin the process of CRF validation by creating Test Data Sets, select the "Form Builder..." link from the Study menu.
- When the Form Builder application is open, the user will see a link named "Auto-Validate Subject CRF" in the right column.
- When the "Auto-Validate Subject CRF" link is selected, the Manage Test Data application opens.
The following steps show how to create test data and prepare to run the test data through the form:
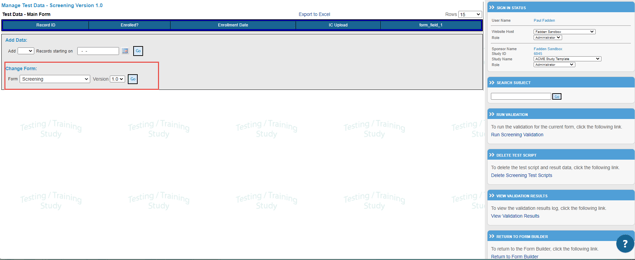
- Select the Form and Version to be tested in the Change Form section. Once the form and protocol version are selected, click the Go button shown highlighted in the figure below. The Go button will load the form field names into the data table(s) located above the form (not visible but loads up that form for validation in other words).
-
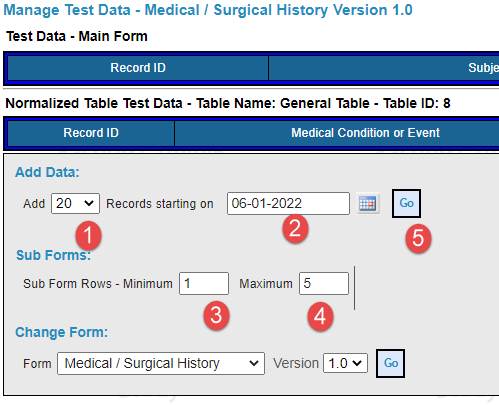
In the Add Data section, select the desired number of records for which test data will be tested and the starting date for the test data. The figure below shows the parameters that need to be completed to generate test data. Clicking the "Go" (5) button will generate the number of test records (1) with the date (2) selected and the system will build your test script automatically.
If there are any Sub Forms (3 and 4), test data will be generated for each of them as well. Simply enter the information in the fields to generate the test data.
-
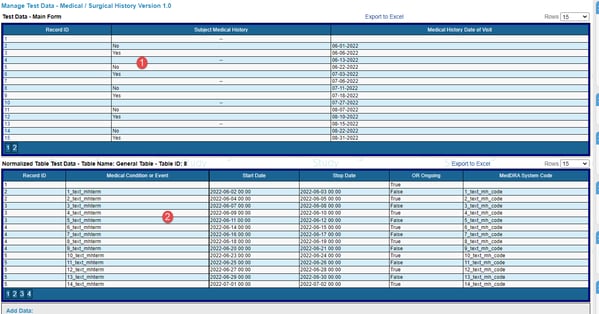
After clicking the “Go” button the Test Data loads into the Test Data – Main Form data table (1) as shown below. If there are any Sub Forms (2), the test data will populate in a table below the Test Data - Main Form data table as well.
- Review the Test Data Set in the Test Data table for the Main Form (and for any Sub Forms if present).
If there are subforms, the user can review the generated test data in their corresponding data tables. The generated test data will contain the desired combinations of data entered into the fields, including if fields are left blank.
Step 2 – Running the CRF Validation Test Data Sets
Once the test data is generated, the user can run the Test Data Set through the form by clicking the link in the Run Validation box located in the right column.
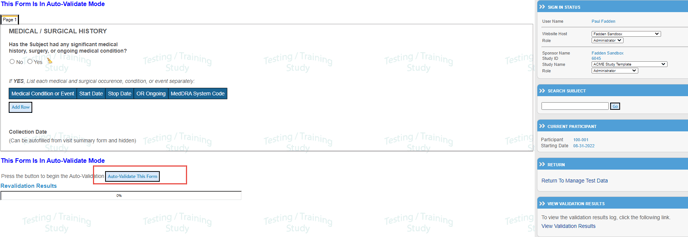
When the “Run Validation” link from the Manage Test Data page is selected, the CRF is displayed in "Auto-Validate Mode". To run the validation, click the "Auto-Validate This Form" button. When the validation is complete a message stating the validation was successful will be displayed.
 The following steps take place during the running of the validation for each record:
-
For each field, the data is read from the test data set and the corresponding field control is populated with the value.
-
Once the entire record has been read, the Save Button is clicked. In this case, the form is saved in Insert Mode.
-
When the form is saved, the exact same process occurs for the auto validation as would occur for the user manually entering data.
-
The system goes through the edit check process. Each time an edit check fires an error, the system logs that information.
-
Now that the form has been saved and checked for errors, the system goes and clicks the save button again. At this stage, the subforms are populated with values and they go through the exact same process as the main form.
-
This second save forces the database to do an update which is required for doing true CRF validation.
Every step of the process for each form is posted to the validation log table that is stored in the database. When the process is done, the final step is to review the validation log and declare the form validated which will change the version number to green.
Step 3 – Review Validation Log and Declare the Form Validated
Review the validation results from this page using the "View Validation Results" link located in the right column or from the"View Validation Results" link located in the right column of the Manage Test Data page.
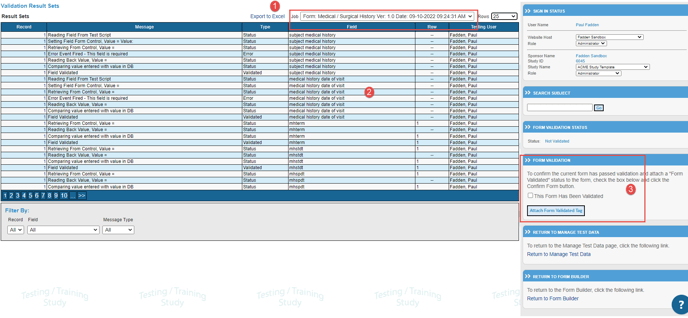
After the "View Validation Results" link is clicked, the Validation Result Sets page is displayed. This page allows the user to review the Validation Log and declare the form Validated. It also allows the user to undo a validated form.
Be sure to pick the correct job from the list of completed test scripts (1) below. This is a historical record of all test results for your quality system.
Reviewing the Validation Results
The Result Sets data table contains every item logged during the form validation process including any subform data that may exist. The Results Sets data form allows the user to filter the results.
There are six columns in the Result Sets data table:
-
Record - The Record column displays the current record and allows the user to drill into the form and see the form in its completed state. All edit check messages will be displayed just like the data was entered into the form manually.
-
Message - The Message column describes exactly what the auto validation process was doing when the event was logged for the current record.
-
Type - The Type column assigns a log type to each event (2). This allows the user to search the results by type. For example, if the user wants to see all errors for a given field in a given record, they can select “Error” in the Message Type field in the Filter By form and then select the desired Record and Field. Each log type is described below:
- Status - indicates the normal status during the validation process to alert the user to what the system is doing at any given time. This is the most common type of event.
-
- Validated - indicates the field in question has passed validation. Passing validation indicates that the values stored in the database are exactly the same as the values in the test script.
-
- Failed - indicates the field did not pass validation. The data in the test script is different from the data in the database. The user will probably never see this option. It is only available if a given field did not validate as described above.
-
- Error - indicates an edit check was fired and it produced an error. These errors are helpful when checking to be sure that edit checks and conditional actions are fired properly and produced the desired result.
-
-
Field - This column displays the field for which the event was logged. The user can filter by any given field and see all the events for that field using the Filter By form.
-
Row -This column displays the row for which the event was logged in the subform if the form contains Sub Forms.
-
Testing User - This column displays the name of the user who ran the validation check.
-
Saving Validation Results
Validation results can be saved outside the system by exporting the results to a spreadsheet. This is done by clicking the "Export to Excel" link located in the data table header.
Declaring the Form Validated
Once the user has reviewed the results and has determined the form is validated, the user can declare the form "validated" by attaching a validated tag to the form (3). The validated tag is displayed in both the Form Builder and Form Library. This tag can also be removed the same way.
NOTE: the validation tag is automatically removed when any change is made to the form in the form builder.
Once the validation tag has been attached, the form will appear as "Validated" in both the Form Builder and Form Library. In the Form Builder table, the version number will appear in green text for validated forms and red text for non-validated forms. In addition, the green text “Validated” will appear in the Version Selection Window. If the form is not validated the text will be displayed in red and read “Not Validated”.