Importing Data Into a Study Using CSV or SAS7bdat Files
TrialKit has the ability to import data records or data from external data sources which can save time and avoid potential errors that may occur during manual entry.
For example:
- Move / copy data from another platform into TrialKit, e.g. copy Medical History, Demographics, Concomitant Medications, etc. into a roll-over study being built in TrialKit
- Bulk data from an external source to avoid manual/hand-entry
- Lab values
- Adding study Participants (ePRO studies)
Prerequisites:
- User has access to Import Manager
- Forms have been created to accept the applicable data being imported
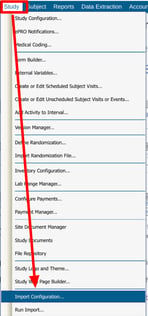
Import Configuration is located under the Study menu on the web.
Web Browser:
Use the links below to jump to other sections.
Setting up an import configuration
Testing and importing the data
Importing Participant Users for an ePRO study
Preparing the Study Database for Importing Data
To import data, the database needs the destination form(s) created that include the fields to which the data will be imported. It is important to build the form in a way that can hold all the required data that will get imported from the source file. This section describes how this is done.
If your forms have already been built and you are adding/updating data, open the form in the form builder and export an annotated PDF. This will serve as an easy reference when configuring the import. Also, take note of which field on the form is the visit transaction date. Once you have that information, you are ready to configure the import.
If you are importing new sets of data that the study has not been set up yet, follow one of these routes:
Import the forms and the visit schedule configurations - Please work with a CDS Representative to provide guidance when taking this route.
or Manually setup the study database
- Create a new form.
- Insert the necessary field types that correspond with the data formats being imported. For example, a column in the data source that exists as numbers would need a number or text field on the form.
- After all needed fields exist to match up with the source data needed, save the form.
- Set the form up in the study, either as a log form, a scheduled form, or an unscheduled form.
Lastly, Prepare the import source file.
Imported source data files must be in CSV format or SAS7bdat
Preparing Source Data
Before importing data into a study, the source file must be set up in a way that can be read by the system. This is done by arranging data in columns within a spreadsheet.
The file formats that can be imported are CSV and SAS7bdat.
All rows/records in a source file must have data that correspond to the form in TrialKit where it will be imported. One file must correspond to a single form.
Importing must be done one form at a time. However, it's okay if there are extra columns of data that don't apply. These columns won't be mapped in the configuration.
Every data file must have a minimum of four columns: Site, Subject, Visit, and Date.
Each of these columns is described below. Note, using these exact column header names is not required.
Site: Use the site name that corresponds to each record. The site name must match what is found in the Site Manager
Subject: Each record must have a subject ID that matches the current subjects registered in the study.
If the subject IDs in this column do not already exist in the study, they must be imported before subsequent data can be imported. That is done by importing data on whichever form is serving as the Registration form.
Visit: Each record must have a visit name identified. The visit interval map is where these visit names are defined. It is important to use the same names that are mapped.
If the records being imported are log forms or the subject registration form, the visit should contain "-1"
Date: This column is required because every record in TrialKit must have a date. This will be the column that corresponds to the visit transaction date that was set when the form was built.
Review all other columns in the file to ensure the formats are consistent within each column. These data formats will need to match up with the data field they are being imported into.
Setting Up the Import Configuration
Select menu Study / Import Configuration. The New Configuration button will be on the right side of the screen. This is also where past configurations can be accessed. By saving each configuration, the mapping does not need to be redone with every import iteration.
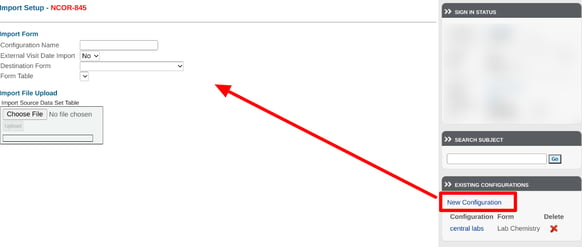
Give the import a name and select the destination form. Imports must be done one form at a time.
Optional items:
- External visit Date Import - This is normally "No". It is only used if importing normalized tables where the data is imported into a parent record containing a different date.
- Form Table - Only if the source data is being imported into a normalized table within a form - select the table name from the destination form.
Lastly, upload a sample dataset file (CSV format) containing the columns that need to be mapped. Once saved, the following screen will appear with all the mapping options.
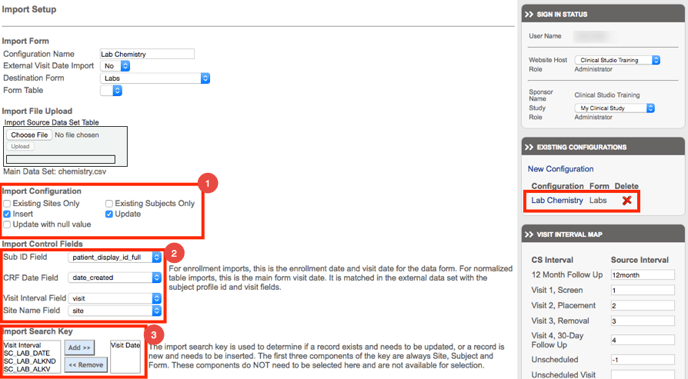
1. Import Configuration Basics
Select one or more options on how the import should be run. All imports will be recorded in the corresponding records' audit trails. The options selected above simulate a common example where records will be created if they don't already exist. The system determines what already exists based on the Import search key parameters details further below.
Here are some useful notes on this particular configuration:
- If the system finds a record already in place, whatever data is mapped will be overwritten - unless 'Update' is not checked.
NOTE: Normalized table data will only perform data Inserts, not updates. - If the source file contains a blank value for a given data point, any existing record data will NOT be overwritten - unless 'Update with null value' is checked.
- Any sites found under the source file's 'Site' column will automatically be created if they don't exist already.
- Any subjects found in the Sub ID column will be automatically created.
2. Import Control Fields
Identify the source file column headers that correspond to:
- Subject ID - If the subject ID in the source file does not already exist, the system will create that subject and insert a blank registration form.
- Date field - All subject records must have a date/transaction field. If the source data does not contain one, it must be created. Be sure the date field on the form that is defined as the transaction date is what is used here. This helps the system identify unique records, along with the search key in item 3 below.
- Visit Interval - This is what was mapped in the visit interval map on the right side of the page to correspond with the visit column from the source file. The "Unscheduled" option should be left blank if log form records are being imported.
- Site Name - If sites already exist in the study, use the same site names in the source file. Otherwise, the system will automatically create a new site.
3. Import Search Key
Identify which data point(s) the system should use to identify unique records. In most cases, this will be the visit date and visit interval that is defined in the Import control fields from item 2 above. The important thing here is to be sure to identify as many items that are necessary to differentiate a record so the system can determine if it is previously existing or not.
If every record in the source file is unique, but most of the data matches, it may be necessary to add a new column to number each row, which can then be used as a sole item in the search key. This will ensure that updates to these records are updating the appropriate record.
The last step is the mapping of the data fields on the form specified above as the destination form. Map each field from the form in TrialKit to the corresponding column header from the source file. Mapping each field is NOT required. Any item not mapped will simply not be imported. If the data already exists in TrialKit for a specific field and that field is not mapped, the data will be ignored.
Consider the different Field Types in the destination form:
- Choice Fields (dropdown or radio) - Ensure the choices are accurately identified based on what the source file contains. These are case sensitive when using text matching.
- Checkboxes - The source file must contain 1's and 0's OR TRUE and FALSE. These correspond to checked and unchecked respectively.
- Date fields - The system is able to parse dates correctly, so don't worry about separating dates from times.
- Normalized table fields - If importing into a FIXED table, the first column will be used by the system as a search key to determine whether or not to update date in a given table row. This requires mapping the CODED values for each of the choices in the first column of the fixed table. In other words, the source data must use the coded values based on how the destination form is configured. If importing into a non-fixed table, the system will only insert data - it will not perform updates on existing rows. What happens in this case is, during the import the system will archive the entire form and subtable rows. It will then reinsert them on the new main record and then insert the rows from the CSV file.
Don't forget to Save the configuration at the bottom of the screen.
4. Visit Mapping
On the right side of the screen, the visit names need to be mapped based on what the visit name is within the data source file. For example, if the 3 month followup visit in TrialKit is named "3MFU" in the source file, this is where to indicate that name.
The "Unscheduled" visit is for log forms and should be left blank. The source data for those records should have a visit of "-1".
Testing and Importing the Data
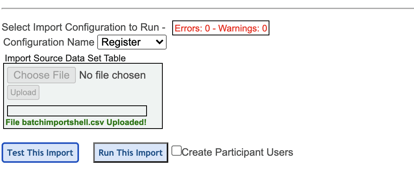
After configuring the import, open the page titled 'Run Import' located under the Study menu.
- Choose the configuration you wish to run the import for. The study will save all past configurations, so future imports can easily be run here without needing to re-create the configuration.
- Upload the same source file used for the configuration mapping.
- Test the import. This will check for any mapping errors with regard to the current data in the source file.
After the test is run, results will be displayed with any errors that were caught based on mapping discrepancies.
If any errors are found, scroll down the page to reference where the errors were seen. Then return to the Import Configuration to fix the issues, or select to Force Run the Import via the checkbox shown above. Forcing the import will bypass any records where errors were seen.
Edit Checks: When data is imported, any validation checks or computations which exist in the form design will be processed. In other words, if a field is required, but data is not imported on that field, a query will be opened when the import is run.
Imports run very quickly and a confirmation message will be displayed at the top. Once complete, open the Subject Manager or Data exports to see the data.
Creating Participant Users From Batch Import
During the import test process discussed above, If the study is an ePRO study and the form being imported is the study’s defined Registration form, there will be an option to Create Participant Users:
The system will run the routine checks when creating participant users - verifying duplicate subject emails, ensuring the user is not already a non-participant user, etc. However, it will NOT process any conditional actions, such as sending participant sign in notifications.