Understanding and Using eMail Notifications and Distribution Lists
This article covers how to configure email notifications for use within conditional actions.
Table of contents:
Defining or Editing Email Notifications
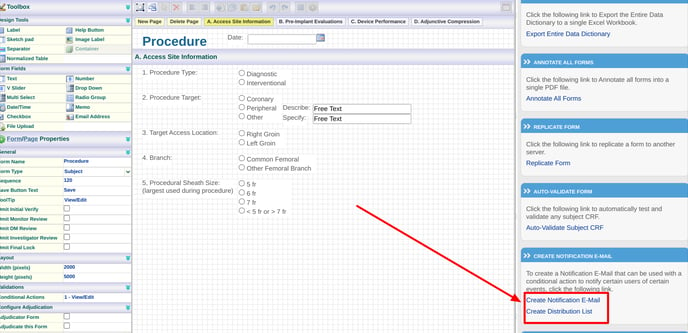
Within the Form Builder, select the “Create Notification E-Mail” link (only available in the web form builder). When the link is clicked, a table of currently available notifications will display.
Web Browser:
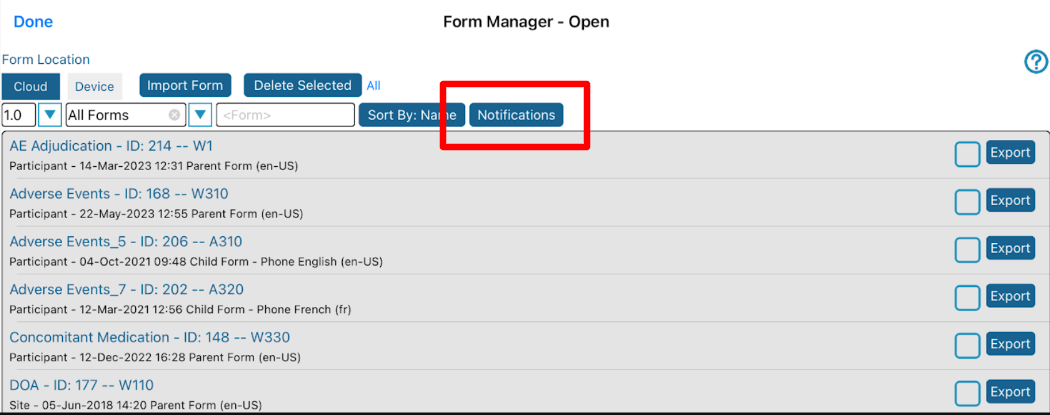
On the Mobile App, the same can be found within the Forms Manager screen.
On the table that results, select an existing notification to modify it, or tap the button to create a new one.
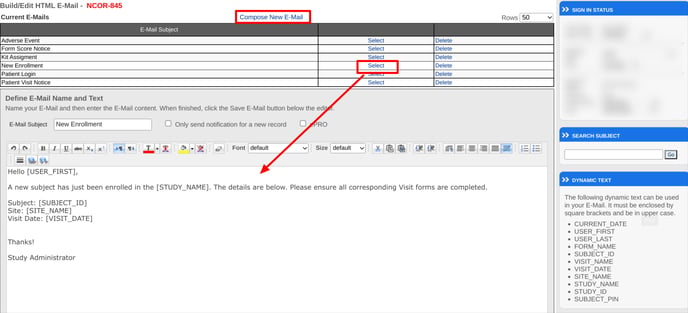
The Message area can be used to set up the body of the email message.
Including Dynamically Populated Content
Dynamic Text can be embedded in the message body to pull data from the source of the notification. The Dynamic Text must be enclosed with a square bracket and typed in upper case letters - [LIKE THIS]. The available text is as follows:
USER_FIRST – First Name of the E-Mail recipient (Admin, PI, etc.)
USER_LAST – Last Name of the E-Mail recipient
FORM_NAME – Subject Event Form Name
SUBJECT_ID – Subject ID associated with the Event occurrence
VISIT_NAME – Visit Interval in which the Event occurred
VISIT_DATE – The date on which the Visit was completed/occurred
SITE_NAME – Site Name associated with the enrolled Subject
STUDY_NAME - Study name associated with the site and use
STUDY_ID - Study ID of the study
SUBJECT_PIN - Subject PIN for TrialKit - Participant (ePRO) log in
Additional dynamic options:
- Any field name on the form where the email is being triggered can also be used as dynamic text. Example: [FIELDNAME]
- A record ID can also come in useful to communicate an exact record that should be referenced. For example, in adverse events where several records may exist for a given subject. To include that ID, use [TRANS_ID]
- [SAVE_TYPE] will let the recipient know if the message was triggered by a new record or one that is being re-saved.
HTML Editor
To get more control over the appearance, there is also an HTML editor available:
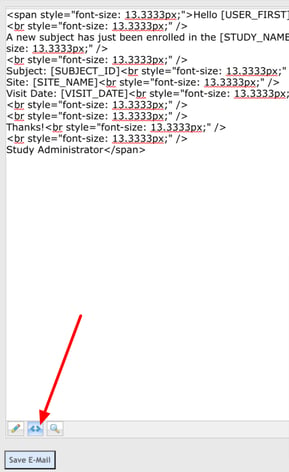
Tap the “Save Email” button at the bottom of the page as shown in the figure above.
HTML should only be used if the message will only be expected to be delivered via email. If Push notifications are included, the message will only be sent via email.
To verify if an HTML is present, use the HTML editor shown above. It can be deleted to strip the message down to plain text.
Defining When the Notification Should be Sent
Notifications are sent based on two parameters:
-
The condition is defined within the conditional action where the notification is applied
-
The checkbox located above the notification message area, “Only send notification for a new record”
Assuming the condition is being met and the notification is processed if the record is being saved for the very first time, the message will always be sent. If the checkbox to only send for new records is enabled, the message will not be sent on subsequent saves of that same record even if the condition is met.
If a record is saved as DRAFT, the system will not process notifications. The first FINAL save will be what triggers the notifications.
Distribution Lists
This is the area where recipient lists must be defined prior to being utilized within conditional actions.
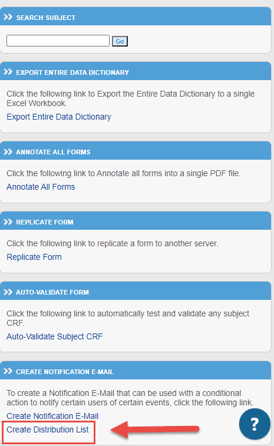
To Create an Email and/or Push Notification Distribution List elect the “Create Distribution List” link as shown in the figure below from within the Form Builder Application, on the right-hand side column.
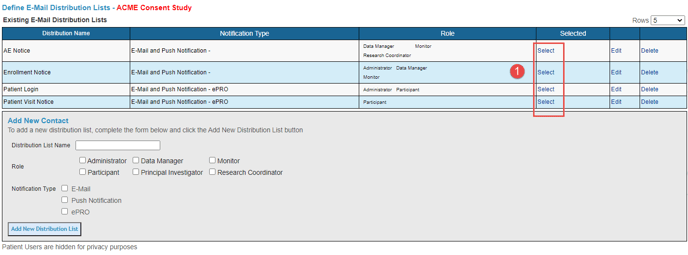
When the link is clicked the Existing Notification lists data table is displayed along with the Add New Contact form. Clicking the link will open the Define Notification Distribution Lists page like that shown in the figure below.

1. Select the study roles that the distribution list should apply. Anytime the distribution list is used in a conditional action, the message will be sent to the users with the selected roles.
If the selected role is a site-type role, the notifications will only go to the users at the site where the corresponding conditional action was triggered. Admin-type users will get all notices regardless of the site(s) they directly belong to.
If your role allows toggling to lower roles as a special dual role purpose user, the last role you were at will get an email notice. So if the role you are at when an email is produced, is not on the distribution list - YOU WILL NOT GET EMAIL.
2. Select the notification type. One or both (email and/or text messages) can be selected. Text messages are only supported if the user's phone number is saved in their preferences
If the notification needs to be available for ePRO mail merge at the study sites, select the "ePRO" checkbox. This will allow the site users to access and manually send a notification to patients individually.
Lastly, save the distribution list at the bottom of the screen.
It will now be available for use within conditional actions.
The same is available on the iOS mobile app, within the form builder> form manager screen:

Notification Distribution List – Editing
To Edit the Distribution List:
Click the Edit control in the Existing Notification Distribution Lists data table as shown in the figure below.


E-Mail Distribution List – Viewing the Recipients of the Distribution List
To View the Recipients of the Distribution List, click the Select control in the Existing E-Mail Distribution Lists Data Table as shown in the figure below.
The E-Mail Distribution Lists Recipients will be displayed in the E-Mail Distribution List data table located below the Add New Contact form as shown in the following figure.
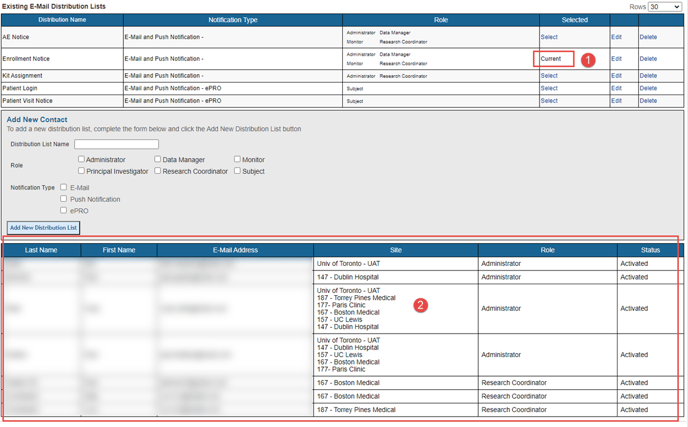
Remember, for this example, the Role selected to receive the email was anyone designated as an Administrator. The Site(s) they are administrators for (set up in Study Configurations - Sites and Users) will receive the email.
Due to constraints of 3rd party email providers, distribution lists that exceed 50 users will be split into groups when the email is sent out. If 75 users are set to receive a message, 50 will be on one email and 25 will be on the next. Keep this in mind if viewing the TO or CC fields on the email message - only up to 50 users will be listed in the email.