Defining the Flow of Data Through Review and Signatures
This article describes the study workflow process and how it can be configured for various requirements that a study or registry needs for record review and sign off.
Table of Contents
General Workflow Configuration
Defining Field Level Source Verification (FLSV)
Configuring Risk Based Monitoring
Workflow Basics
As records are entered into a database, they progress through a defined workflow. By default all records will apply to these rules, with the exception of the following scenarios:
- The form is omitted from one or more review levels. Read more about this in form building properties.
- The user's role at a given workflow level has permissions to bypass their review.
Configuring Workflow
Prerequisite: For the steps covered in this article related to configuring workflow, the user must have access to Study Configuration, Workflow
For steps related to conducting review of records on a given workflow, users must have the assigned role for the level being executed.
Workflow configuration is found under the Study Configuration menu.
Web Browser:
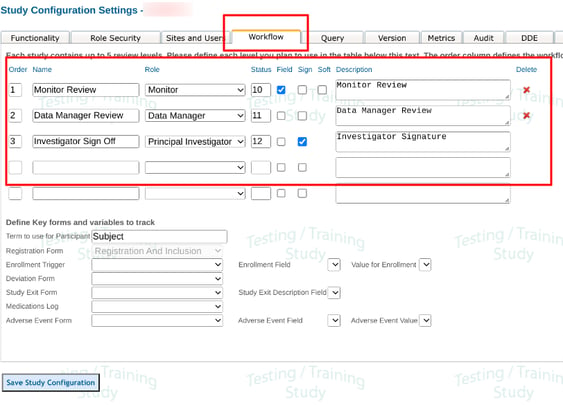
Set an Order of sequence that should be followed for the workflow, up to 5 levels.
For each level provide a name and assign the user role responsible for that level.
Status - This is a value that will be used by the system to set the status of a record as it passes through that workflow level. These will be seen in the data exports. Any value 10-19 can be used. Normally it makes sense to start at 10 and go sequentially as shown in the image above.
The status value should not be changed when a study is live. This can alter the meaning of records which have already progressed through review levels.
Field - Check this if the workflow level is responsible for field-level source verification. Read more below.
Sign - Check this if the user needs to provide electronic signature when applying their review.
Soft - This is only available at the first workflow level. It allows the user to 'Tag' records as reviewed even if open queries still exist. Without this, records are not available to enter that first workflow level until all queries are resolved.
Configure a Study for Partial Monitoring - Field Level Source Verification (FLSV)
Partial Monitoring allows Monitors (or any needed review level) to review/lock fields individually on records. This prevents any data changes on specific fields of a form but leaves the remainder of the form available for a site to complete data entry.
To configure a study for partial record review, follow the points below:
- Check the "Field" checkbox next to the applicable review level as described above. This is typically done for the first reviewer.
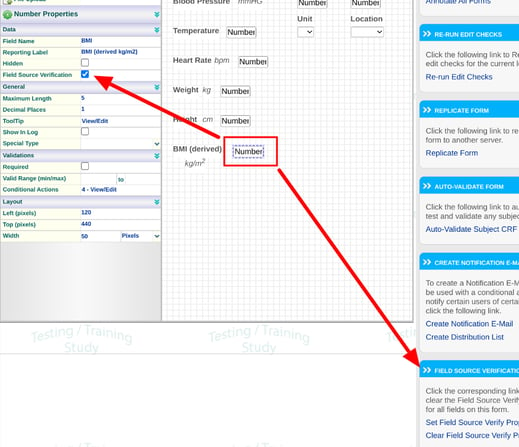
- In the Form Builder, define which fields on the forms will support partial review for the role selected above. Any field that should be capable of being individually locked on a form needs to have the property selected.
Alternatively all fields on the form can be enabled or disabled for this property.
As records are entered into the forms, they progress to the corresponding review level. The reviewer will see a 'lock' icon next to those fields. Read more on Monitoring and Data Review to learn more about that process.
Configuring Risk Based Monitoring
FLSV described above is used to define fields that need to be SDV'd across the entire study. Sometimes it's necessary that fields only get SDV'd for a given site, visit, or subject. This section covers how to more precisely define that.
TrialKit can support any risk-based monitoring (RBM) models that are created outside the system in analytical or biostatistics reporting. This takes Field Source Verification to a more site/subject-specific level, rather than applying the same rules throughout an entire study. In other words, a study manager may want Monitors to verify specific data points that need review, but those requirements may vary by site, visit, or subject.
This can be done through a built-in tool for defining Monitoring requirements on the fly, or via TrialKit's API if an external RBM tool is driving those decisions. This article covers how to accomplish it through the built-in tools.
Prerequisite:
- User has access to Configure Risk Based Monitoring
- The form has at least one field defined by the form builder with FLSV
Access to risk based monitoring on its own will only allow users to view the existing rules. Configuring those rules and saving new ones is a separate permission.

To define a new rule, open an applicable subject record that will need to be monitored. Tap the workflow settings icon indicated below.
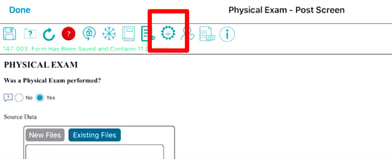
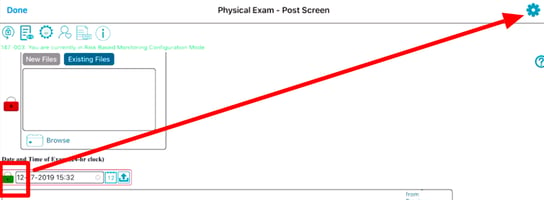
This will open configuration mode where a lock icon displays next to each field on the form. Tap the lock icons next to all of the fields on the form that need to be Monitored. Green = enabled for SDV.
Once the desired fields are set, tap the icon in the upper right corner. This is where the rule will be defined and saved.
On the next screen, define the parameters of the field(s) which require SDV. The first factor will be the starting date that the rule should begin to be enforced in the study for Monitors.
The starting date for the rule is enforced based on the visit/transaction date on the form, not the current date when Monitoring takes place.
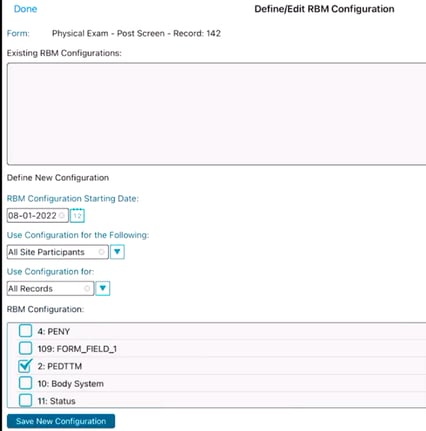
The following are the rules that can be applied:
- All participants in the study
- All participants at the current site only
- Just the participant currently open
- All visits where the current form is collected
- Only the record that is currently open
The list of fields displayed will be automatically checked based on when the 'lock' icons were enabled on the form in the previous step.
In the example above, the Physical exam form needs to have the PEDTTM field monitored for all subjects at the current site. Other subjects at other sites will not require SDV on that field.
To edit an existing rule, tap it in the Existing configurations table and change any of the parameters listed above. Then tap Save.