Defining Lab Normal Ranges and Units for Local Labs
Forms can be set up to automatically check lab test results against a site's own local lab(s) ranges. During data entry, when a result is entered and saved, the system will check the result mark it as in/out of range, and populate the Units.
Lab values and units can be specified separately for each lab used (if different) and can be based on any number of stratifications and any time period. For example, the system can make sure that any value entered for Glucose between March 2017 and December 2017 from Acme Labs Incorporated where the patient is between ages 45 and 65 with a weight above 130 lbs must be a glucose value of 3.9 to 5.5, with a measurement unit of mmol/L.
Table of Contents
Enable Lab Range Functionality
Create a form or set of forms to collect lab data
Configure the lab sites and range mapping
Enable Lab Range Functionality

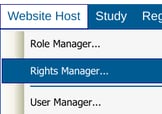
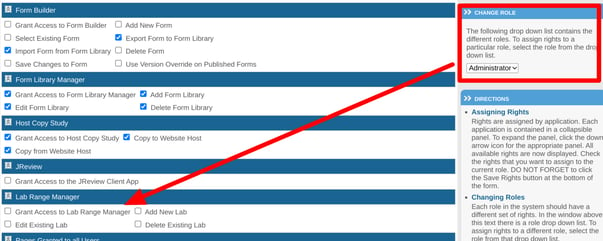
Next, the appropriate user roles will need the right permissions. Since labs are tied to sites, and a site can be part of multiple studies, access to lab configuration is a host-level function. For this reason, access is host-level permission as shown below.
Create a Form or Set of Forms to Collect Lab Data
This section will cover all the aspects of a lab form that need to be set for it to run lab normals checks. For convenience, there is a public form library available to use as a lab form example that is already set up as outlined in the steps below.
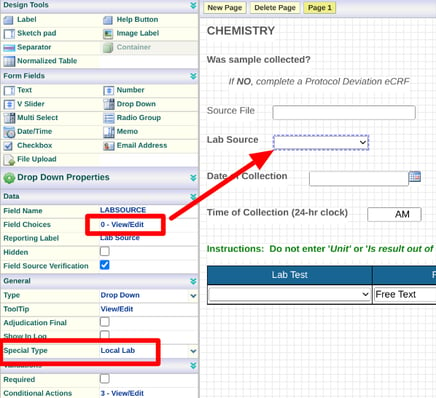
First, identify the form as a Lab Form in the form properties, and ensure the visit transaction date is the date the labs were collected. This date will be what the system evaluates if the lab ranges are only applicable in a specified time period (as seen during lab range mapping).

Use a dropdown field for the site to identify which lab was used, but do not create any choices within it. The lab sites are related to the study sites later on within the Site Document Manager. The lab sites specified there will be what ends up populating these choices for the user entering data.
Once a dropdown field is in place, select the special property titled "Local Lab" as shown below.
Lastly, use a fixed normalized table to collect the lab tests required. Fixed tables will pre-populate the first column based on the choices (lab tests) used in the dropdown field.
The table field types and names should individually match what is shown below, but depending on the information you want to populate the table, not all of these fields are required.
Additional columns/fields can be used as well but will not be part of the lab range checks.
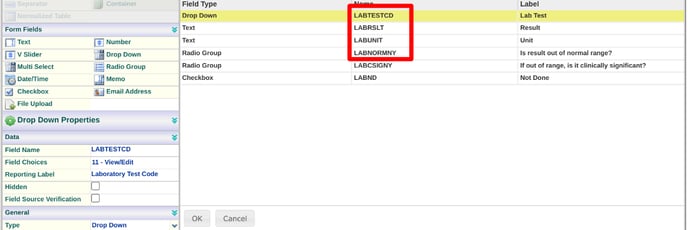
The choices included in the first column (dropdown field) need to match the names of the lab tests that will be used in the range source file.
In other words, if a lab test is named in the choices, it also needs to be present in the lab ranges file detailed below, even if it will not be checked.
The Radio group for checking the normal range shown above (field name: LABNORMNY) needs to have the choices No and Yes in that order, where No has a database value of 1 and Yes has a database value of 2.
Configure the Lab Sites and Range Mapping
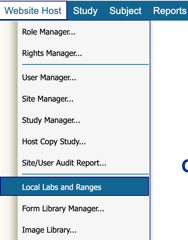
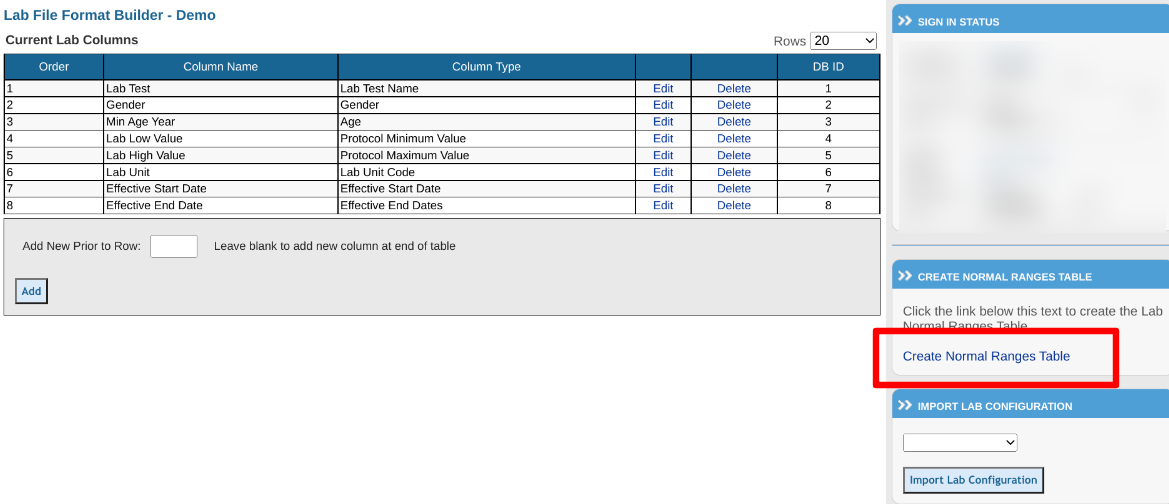
The Lab Range Manager is used to set up lab range files based on the various dependencies that may exist in the study. This is located under found under the Website Host menu as shown below.
Once open, use the form highlighted below to populate the table above it with the various lab sites that will apply across the entire study. Lab sites will be associated with study sites in the next step. There is no limit to the number of lab sites you can create.
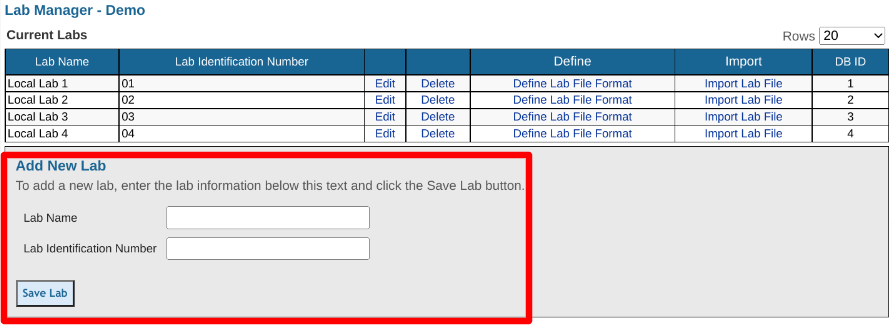
Labs are entities similar to sites that can be utilized across various studies within the same host account. If making changes to existing labs, be sure those labs are not part of another study on the account. If they are, making a change to it would affect both studies.
Mapping a CSV File
A CSV formatted file will be needed to import the ranges and dependencies. Most local labs will have the following columns, but the ones with * are minimum requirements:
- Lab Test*
- Gender
- Min Age
- Max Age
- Lab low value*
- Lab high value*
- Lab unit*
- Effective start date*
- Effective end date*
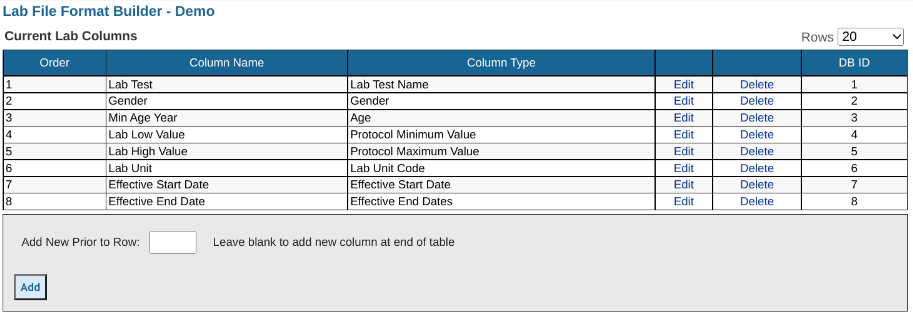
Use the Define Lab File Format button to map the columns based on the CSV file containing the local ranges:
Adhere to the Following rules when mapping the CSV
- The Lab Test Name must be the first column and the source data in the CSV must match the text used within the lab form test choices. If checks will not be done on a certain lab test, it's okay to still include them in the file but not enter any values for the min/max.
- Within the CSV, the Biological Gender can use "M" or "F" for Male and Female respectively. The system assumes "B" is for Both, but Both do not need to be an actual choice in the study.
- Age is two columns in the source file, but only accounted for in one row of the mapping configuration (shown above). This is because for any number/value dependencies like Age, Weight, or BMI, for example, the system assumes it must be a range where the low range column is first and the high range column is the right of that. If a range overlaps with another range of the same population, the system will account for both simultaneously. For example, if 19-year old female subjects are part of two separate ranges for the same lab test, the system will consider the subject for both ranges at the same time.
- Effective start and end date columns must both be present
- Use only the Protocol min/max to map the lab range columns
- Include All columns of the source file - even if they will not be used. In such cases, the column type will simply be mapped to the type "Filler (Ignore)".
- Column names do not need to match the source file, but order does
If Age and Gender external variables are being used, and the lab will be used on multiple studies, it's important that those external variable IDs match on all studies where the lab is being used. If there's a chance they won't, create a copy of the lab for use in the other study. The site documents are where you will determine which labs are available for which studies.
Stratification Variables
Since lab ranges vary based on data about the given subject, the mapping will depend on external variables first being made available. In the image above, "Gender" and "Age" are external variables in the study.
If configuring multiple labs, there is no need to manually remap each one if the file upload format remains the same. Instead, copy the format from one that is already done:
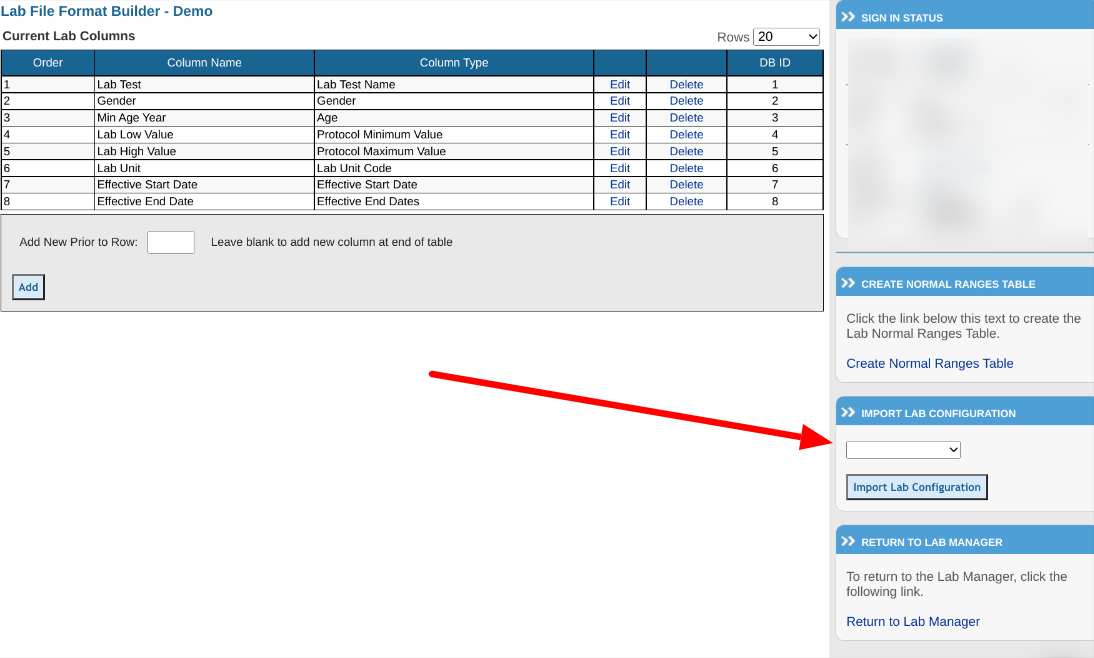
Create the Range Tables
After each lab is configured, use this button to create the backend tables:
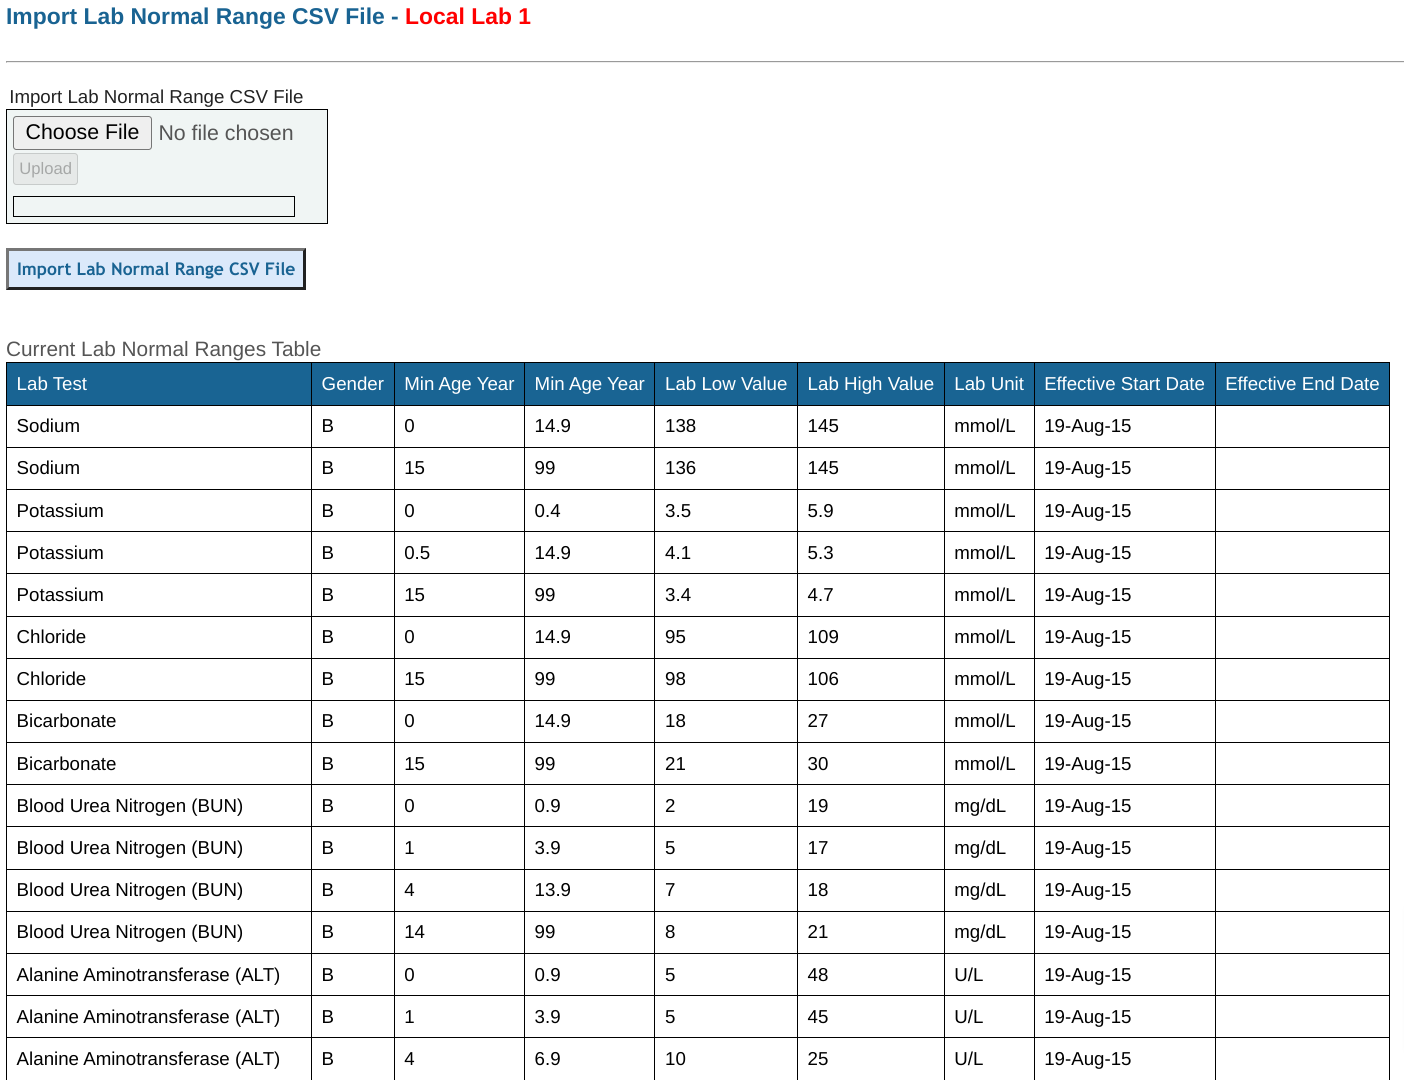
Import CSV of Ranges
Lastly, import the ranges by using a CSV file that contains the columns, based on the configuration.

At a minimum, the system will need data for the following:
- Lab Test
- Lab low value
- Lab high value
- Lab unit
- Effective start date
Here's an example after upload:
Associate Sites With Labs
Prerequisite: User has Access to Site Documents and Lab Normal Ranges
Lab sites need to be associated with study sites because any given study site can use one or more local labs. Once mapped to the ones they need, the associated labs will then be available for the site users to choose from during data entry on the lab's form.
Sites and labs are associated with one another under the Site Documents. Selected labs will be displayed as a button for each site.
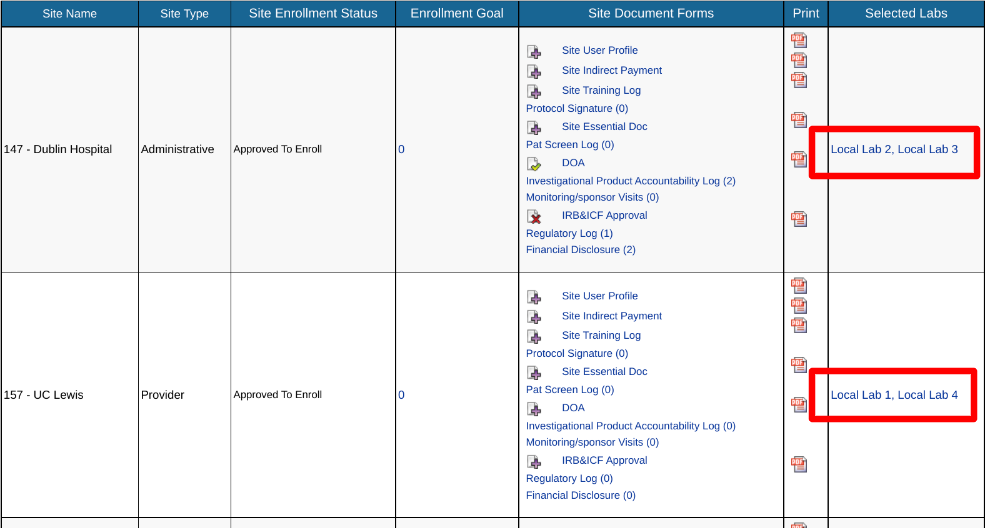
With the labs mapped, users will be able to select from those lab options within the lab's form dropdown created earlier in the configuration process.
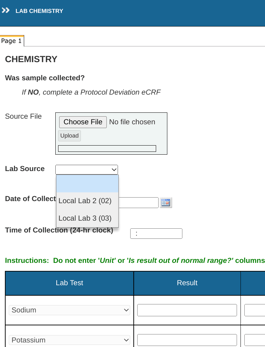
Entering Data to Check Ranges
This section discusses the data points on a lab assessment form that need to be addressed if the system is checking range results on the form.
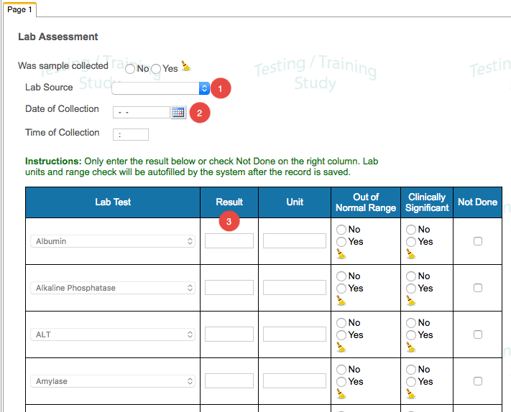
Once the three items above are entered and the form is saved, the system will run the checks and automatically populate the Units column and the Out of Range column.
The data entry user only needs to enter a lab result within the table
For lab ranges to run, the following must be true:
- The visit date is entered for comparison to the lab range effective dates
- The local lab is selected
- Result is entered
- The current subject's dependencies, like Age and Gender, have been entered
Troubleshooting Tips:
If Labs do not fire after loading lab normals for only a couple of rows of the file:
- Check the spelling of Lab Tests closely vs. the options in the drop-down field.
- Be sure you use only the Protocol min/max to map the lab range columns
- Be sure to set the end date and not the blank option- even if no date exists in the upload.