TrialKit is capable of randomizing study Participants to allocated groups for the purpose of assigning investigatory products accordingly without human intervention or bias. The allocations can additionally be used to drive conditional actions on which data points need to be collected for different Participant groups.
This article covers how to set up and manage randomization schedules.
Define Randomization
This section describes how to define randomization prior to uploading the randomization list/schedule.
Prerequisite
Access to configure randomization configuration in role security
First, open the page "Define Randomization" from the Study menu as shown below.

In the table below, randomization has been configured. Remember, the form is available to create an additional randomization scheme as needed.
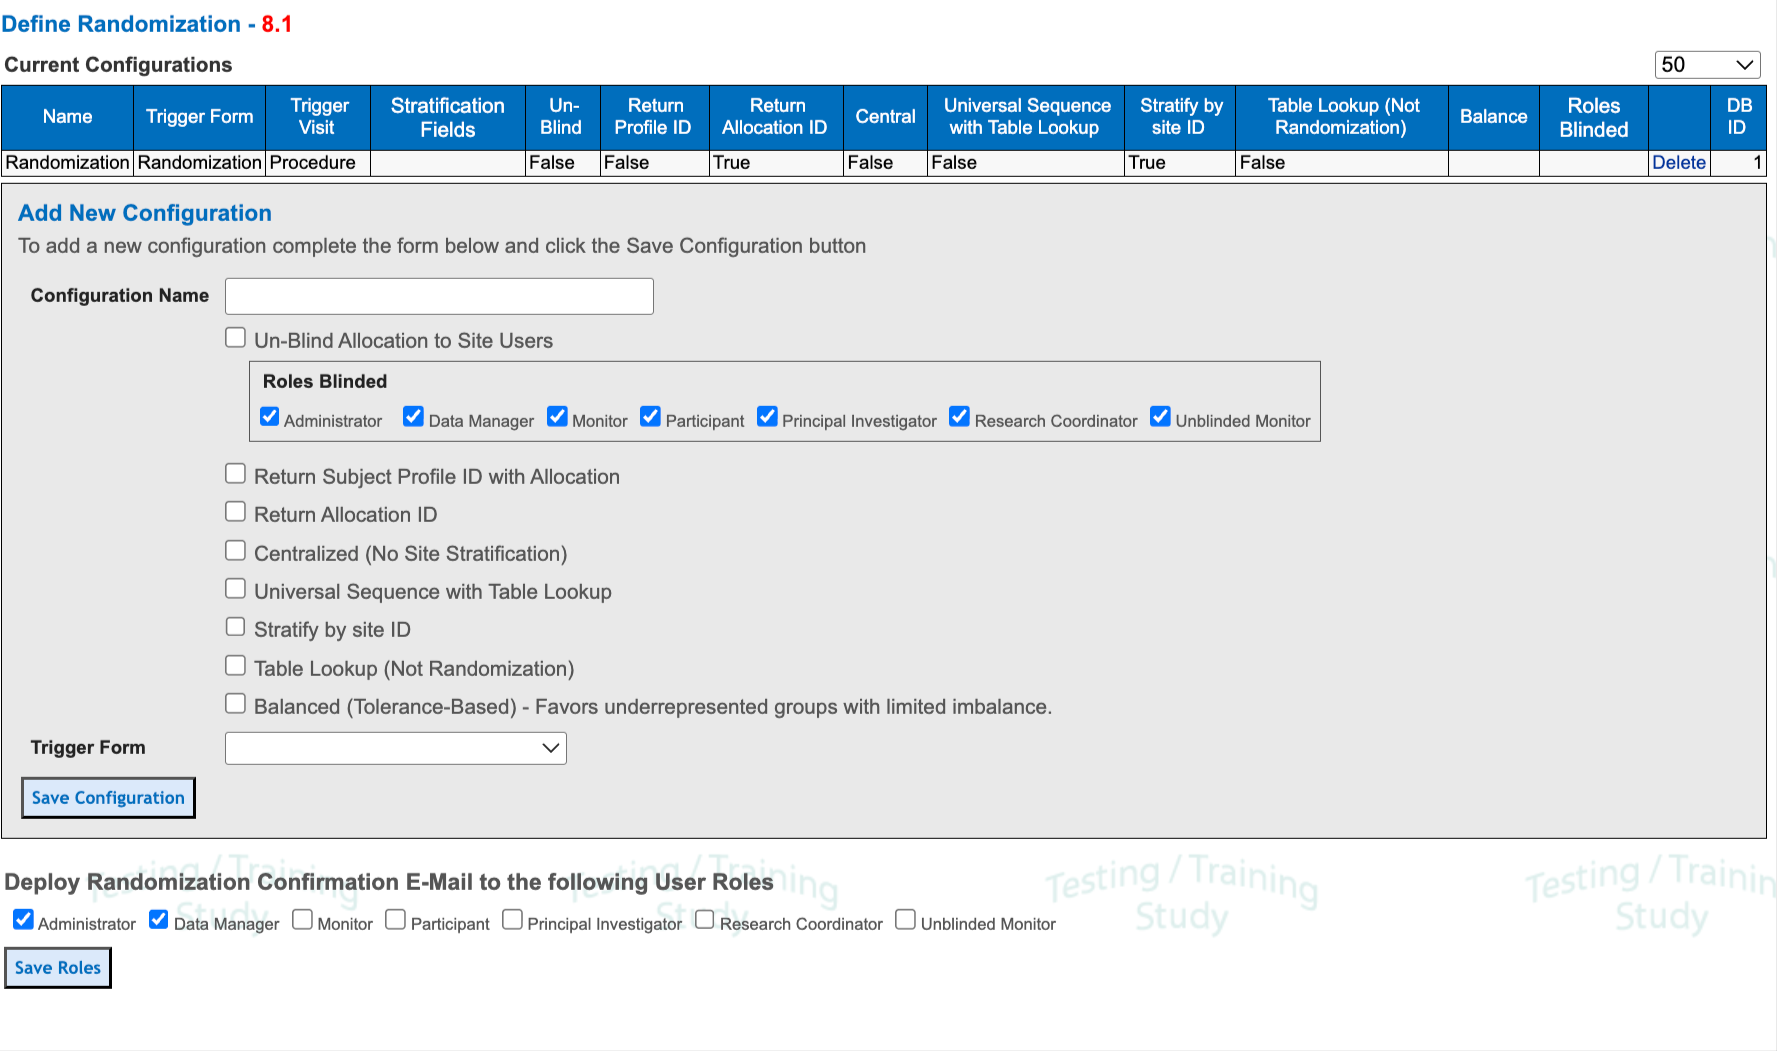
Name of the Randomization - This is only a reference to the randomization so it can be identified in various Administrative functions.
Un-Blind Allocation to Site Users - Leaving this box unchecked will blind all user roles by default so they do not see the allocation to which the Participant was randomized.
Roles Blinded - Check roles you would like blinded to randomization here. Individual roles can be unblinded by unchecking the box next to that role.
Important Notes
If a new role is created in the study, later on, the role will be assumed as blinded and automatically added to the list of blinded roles.
Any user role with access to view the randomization allocation report (separate permission) will be unblinded regardless of the randomization configuration blinding that user role.
Randomization blinding is supported by the system in the following areas:
Form save dialog indicating if randomization was successful
Participant information panel within the Participant’s file
Ad-hoc reports in the report builder
For any fields in the forms which have been configured to populate randomization information or display based on a randomization group - it is the designers’ responsibility to blind those accordingly. Blinded fields are enforced throughout the system, including in data exports and reports.
Return Participant Profile ID with Allocation - The system can optionally return a new Participant Profile ID with a new allocation. When a Participant is successfully randomized, the system will pull the Participant Profile ID from the randomization schedule and overwrite the system-generated Participant Profile ID. If you want to save both the system-generated ID and the randomization ID from the schedule, see the next item below.
Return Allocation ID - This will provide an option for text fields in the Form Builder to define for populating a Randomization ID into a CRF. This allows for maintaining the system-generated ID as the Participant ID and still having reference to the randomization ID in the Participant data.
Centralized (No Site Stratification) - Some studies may require that the pool of randomization allocations not be stratified by site. This removes the need for including the Site block in the randomization upload file.
Universal Sequence with Table Lookup - Used in conjunction with the Table Lookup option. Read more below on that.
Stratify By Site ID - If the randomization is not centralized, that means it is stratified by site. By default, this site stratification will block Participants based on the sequence in which the sites randomize their first Participant. In order to dictate specific site IDs for the randomization blocks, check this option.
Table Lookup (Not Randomization) - Used to bypass actual randomization and instead use the tool to apply a different Participant ID format to stratified Participants, but where the Participant ID is still in a universal sequence. Read more below.
Balanced - Forces the randomization assignments to take the “Least-Fill” approach. Read more below.
Trigger Form - Select the form where the randomization will occur.
Trigger Visit - Select which visit where the randomization will occur.
Field - Randomization Form Fields - Select which field(s) randomization is based. These need to be the same stratification fields in the uploaded file described below.
Deploy Randomization Confirmation Emails. Define which roles should receive randomization details and confirmation emails as Participants are randomized in the study. This same group will also get notified if a subject allocation is removed.
Note
Randomization confirmation notifications/emails will NOT be sent to users of a given role if that role is blinded.
Creating and Importing Randomization Schema Files
TrialKit users are responsible for creating their own randomization schedules. This is usually done by a biostatistician supporting the study. Randomization files dictate how TrialKit will distribute randomization allocations over sites or the entire study, depending on how the randomization is defined.
This section will explain the exact file format necessary to import a randomization file. The file needs to be in a comma-separated (.csv) file format. Here’s an example:
The following figure displays the file layout of the file to be imported into TrialKit.
Unless marked "(Optional)" the column MUST BE part of the import.
Column | Value | Description |
|---|---|---|
site_no (Only if site stratified) | The system Site ID | The site number. This will repeat for every allocation slot for a given site. When using central randomization, this column should be omitted from the Randomization Table. The Site ID used in this column can either be sequential or correspond to specific site IDs within the system, depending on the randomization behavior desired. |
sub_no | Number | The Participant number is the sequence of participants starting with 1 at each site. It will restart for each new site in the table (if the randomization is site stratified). This sequence is used by the system to read down the table and is not related to the Participant's actual ID within the EDC. |
stratification 1 | Number based on the field choice values | For each level of stratification, enter the coded stratification. For example, if 1= Male and 2= Female, then a series of 1’s and 2’s would fill this column for each Participant for each site. The codes do not have to be in order but is preferred to have the codes in order. For example, if the user is allocating 50 randomization slots per site, 25 males and 25 females, then the first 25 rows should be male while the next 25 rows should be female. Each stratification level will get an additional column. If you are stratifying by gender and BMI group, then you would have two columns. Obviously, the more stratification levels you have, the more complex the randomization file. |
stratification 2,3,4... | Number based on the field choice values | See above, additional stratification fields will have their own columns, these extra columns will not be here if the user defines the randomization to have 1 layer of stratification. |
allocation | Number | This is the coded allocation that is returned to the randomized Participant. When a randomized form is saved, the system will look for the first slot available and claim that randomization allocation, and assign it to the Participant. For example, if a user has randomization that is stratified by Gender and BMI; the system will look for the first Gender and BMI group slot available within the Participant’s site. |
Subject profile ID (Optional) | Text/string | If the user chooses to have the system return the Participant Profile ID upon successful randomization, add a column here. This column should be omitted if the user is not returning the Subject Profile ID. |
Randomization ID (Optional) | Text/string | If there is a separate randomization ID that needs to be collected and populated within the Participant data (as described in the defined randomization), it can be identified here in the last column. The system then uses this ID to populate a participant form as defined in the Form Builder. |
Importing a Randomization File
To upload a randomization file, select the "Import Randomization File..." option from the Study Menu.

Select which randomization schema to import, if there are multiple configured.

After importing the file, a message will indicate if there were any errors in the file when applied to the defined schema.
Simple Example
The table below has 10 Participants and is 2-arm randomization. It is central randomization that returns no Participant profile id and does no stratification (simply saving the randomization trigger form will allocate the Participant).
Patient | Randomization |
1 | 0 |
2 | 1 |
3 | 1 |
4 | 0 |
5 | 0 |
6 | 1 |
7 | 0 |
8 | 1 |
9 | 1 |
10 | 0 |
More Complex Example
Randomizing based on Site ID blocks with dual stratification, using the coded values for the stratification variables (found in the form builder).
Site | Patient | Strat1 | Strat2 | Randomization |
1 | 1 | 1 | 1 | 0 |
1 | 2 | 1 | 2 | 1 |
1 | 3 | 1 | 1 | 1 |
1 | 4 | 1 | 2 | 0 |
1 | 5 | 1 | 1 | 0 |
2 | 1 | 1 | 2 | 1 |
2 | 2 | 1 | 1 | 0 |
2 | 3 | 1 | 2 | 1 |
2 | 4 | 1 | 1 | 1 |
2 | 5 | 1 | 2 | 0 |
Example Configuration and File
See the example configuration shown here and the file used to import the corresponding schedule.

Sample File:
Updating Randomization Schemas Mid-study
The randomization schedule can easily be updated during the course of the study. Do this by exporting the existing schedule, modifying any open slots or adding additional slots, and re-uploading it. The system will only update ‘slots’ that have not already been filled, so it's okay if filled slots are part of the file when it's re-imported. This helps you with referencing the proper spread of allocations by seeing the rows that are already used.
Randomization Conditions
For studies that use randomization, TrialKit allows study builders to dictate form logic according to where Participants are randomized. For example, each subject's randomization assignment can dictate if specific intervals, forms, or fields are displayed.
After defining randomization, the conditional action builder will display that randomization name as a constant. In the example shown here, a condition is being built on a field to hide the field if the Participant is not randomized to group 2. For group definitions, reference the randomization allocations.

View and Decode the Randomization Allocations
After randomization has been set up in a study, the allocation table can be viewed.
Prerequisite
Access to configure randomization configuration in role security
this page is found under the Subject menu:

UNBLINDING CONSIDERATION
The ability to view randomization is considered unblinding. The person importing, viewing, and testing the schedule should be unblinded if the randomization requires blinding to most users.
The following example shows the View Randomization Allocations interface that allows the user to:
1. Decode the randomization groups. Since groups are uploaded as a value, referencing the meaning is easier by provided a definition for each value.
2. Display all planned and assigned randomization allocations.
3. If there is more than one randomization schedule being used in a study, the dropdown at the top of the page allows for switching between those schedules.

The Randomization Allocation data table on the View Randomization Allocations page, shown above, displays all planned and actual randomization allocations.
4. The user can see the randomization file that was uploaded by viewing the first five columns of the Randomization Allocation data table. Note: This particular randomization scheme is returning an Allocation ID.
5. The last three columns in the Randomization Allocation data table contain the actual allocations including the site, Participant, and date of allocation.
When a user saves a form that was defined for particular randomization, the system will find the next available slot based on the site and stratification(s). The system then claims that slot by assigning the user’s site, Participant, and date of allocation to that slot. The system also associates this randomization allocation with the Participant's visit. This information can be used to enforce randomization arms using Conditional Actions.
The View Randomization Allocations page gives the user the ability to decode the randomization allocations. #1 above. For each allocation that was imported for given randomization, the user can enter text to be displayed whenever this allocation is shown in TrialKit. To decode randomization, the user simply enters the text for each allocation and presses the "Save" button below the last allocation text box. The decoded text will show in the Allocation column in the main data table.
The View Randomization Allocations page allows for viewing only randomizations that have been allocated, rather than viewing the entire table including empty slots. #3 above. The user can then toggle back to view all randomizations by clicking the View All Subjects link.
Accessing Randomization In the App


Scroll further down to access the existing schedule via the “View Allocations” button:


Unallocate a Participant
A user with the proper permissions to open the randomization table (shown above) can individually clear existing Participants from the randomization slots they exist in. For Example, a study may have a withdrawal that requires that allocation be re-used by another Participant, or accidental randomization was made.
This action is not audited by the system, so it should only be used with an understanding of its impact on the study.
The study permission to deallocate Participants is needed to perform this action.
On the Web Browser, it can be done via the Unallocate links in the randomization table.

Unallocating can also be done from the form where the randomization occurred, if a user has the permission. Read more here.
On the Mobile App, unallocating can also be done in the randomization table by swiping left on any row within the table. An “Unallocate” button will appear on the right side. Tap on the button to complete the action.

Removing Allocations Entirely
It’s usually advised to maintain the randomization schedule as it was designed and keep all slots, even if they aren’t needed anymore (e.g. a Participant was randomized accidentally and the slot cannot be re-used). This can be done by filling the slot with a ‘placeholder’ Participant and updating the Participant’s ID to something that will not ever exist for a real Participant, like “01-005ZZ” where “ZZ” is appended to the end of the ID. Then delete that Participant. It will still fill the randomization slot and prevent a real Participant from re-using it.
The alternative method is to unallocate the Participant from the slot that needs to be removed and then update the randomization schedule by re-importing it (explained in the sections above).
Emergency Unblinding
It's common for randomizations to enforce blinding to specified roles, but there could be a scenario where a user needs to get un-blinded. If this is a possibility in the study, it can be configured into any form through conditional actions.
Add a field, like a checkbox or radio button for a user to tick if they need to get un-blinded to the randomization. That field could be blinded as well to roles that it shouldn't apply to.
Then add a series of labels, one label for each allocation group (e.g. Placebo and treatment) to conditionally display based on the field being ticked and based on the Participant's current allocated slot.
Lastly, but optionally, add an email notification condition so the right users can be informed if the randomization gets un-blinded.
Example of emergency unblinding on a form
Here’s an example form, where the labels at the top will display the subjects allocation, only after the user has filled out the confirmation questions at the bottom of the form and saved it.
In this case, a number field at the bottom is getting computed upon save, and blinded to the user. This is so the user must save before they get the allocation to appear. Saving is necessary to get the audited transaction and email notification to run.

Balanced Randomization
A Balanced randomization is where, during the point of randomization, the system will auto-adjust the allocated group based on the group that is least used across the entire schedule. Here’s how it works:
Determines the current counts for each allocation group across the entire study.
Identify the minimum count and apply a tolerance (currently + 2) for allocations valid for a specific group based on stratifications.
Any allocation found with a count <= is considered eligible.
From these eligible allocations (and valid for the subject’s group), the system attempts to assign the subject to the next available slot.
If no slots are available in eligible allocations, the system falls back to the remaining allocations for that group and searches for an available slot.
If no slots exist at all, an error is returned.
Example:
Total Allocation counts for a randomization involving 4 groups:
Group 0 has 30 slots filled
Group 1 has 28 slots filled
Group 2 has 22 slots filled
Group 3 has 26 slots filled
When allocating a subject that belongs to a group allowing allocations of [1, 3]:
Finds minimum for allocations [1,3] from the subject wide allocations (min = 26)
Find all the allocations for the group that meet the minimum + 2 rule, this returns [1, 3].
Queries to find the next available slot in this group that has an allocation of [1, 3].
If no slots are found, an error occurs.
When allocating a subject that belongs to a group allowing allocations of [0, 1, 2]:
Finds minimum for allocations [0,1,2] from the subject wide allocations (min = 22)
Find all the allocations for the group that meet the minimum + 2 rule, this returns [2].
Queries to find the next available slot in this group that has an allocation of [2].
If no slots found, then queries again to find the next available slot in this group that has an allocation of [0,1] (remaining allocations for this group).
If no slot found, errors occur.
Here’s a sample file where 4 questions (Yes/No choice fields) on a form determine which block, and from there which slots are available.
Sample Balanced randomization file:
Table Lookup - Customizing Subject IDs for Screen Fails
Use the randomization tool for applying different formatted IDs based on variables in a specific form.
This is not actually randomization and will not send randomization notification emails
A common use case would be for screening Participants, where only some Participants (the ones that passed screening) need a different formatted ID.
For example, screened Participants might get an ID like "037-001" when registered in the system, but if specified criteria (stratification) is met, the ID needs to have a different format like "037-20001". Then if the next Participant does not meet any requirements, they end up with 037-002. So formats change but the sequence remains in line.
In this example the randomization file uploaded would look something like this:
Site | Participant | Stratification | Allocation | SubID |
1 | 1 | 1 | 1 | 037-20 |
1 | 2 | 1 | 2 | 037-20 |
2 | 1 | 1 | 2 | 037-20 |
2 | 2 | 1 | 1 | 037-20 |
Creating a table lookup for a study allows the system to check for a sequential customized subject ID to give to each subject that is added to the system. For example, a study may require that when a subject is added but fails certain criteria, they get a different formatted ID than the ones that are successfully enrolled and taking part in the study. At the same time, they need to be sequential regardless of the format. A common application of this scenario is with screening IDs versus subject study IDs, where every subject gets a screening ID of <SITEID-00X>, where X is a sequence, but subjects who are successful get a slightly different format of <SITEID-40500X>. The system is able to keep the total population sequential regardless of which of those formatted IDs is assigned.
Example 1:
Subject 1 is successful and gets 301-205001
Subject 2 is successful and gets 301-205002
Subject 3 has an issue but still gets a screening ID of 301-003 - sequenced off the previous two subjects that were successful.
Subject 4 is successful and gets 301-205004
Example 2:
Subject 1 is successful and gets 301-001-4001
Subject 2 is successful and gets 301-002-4002
Subject 3 has an issue but still gets a screening ID of 301-003 - sequenced off the previous two subjects that were successful, but does not get a study ID portion on the end.
Subject 4 is successful and gets 301-004-4003
There is virtually no limit to how the formatting can be specified. Keep in mind, this is different from randomization. It is merely a table lookup to provide a sequenced ID dependent on some sort of criteria. However, it can be used in parallel to randomization. Let's look at how the examples above can be set up.
When defining a table lookup, randomization will be defined - although it's not actual randomization.