Adding and Managing Users Within a Host and its Underlying Studies
The User Manager is where users within a given host are centrally managed, regardless of which studies they belong to within the host account.
Every user has access at two separate levels:
- Host Account level - Think of this as the global list of users available to assign to all underlying studies.
- Study level - This is where you assign users to specific studies.
This article covers user management at both of those levels.
Table of Contents
How to Add Users (Walkthrough)
Copying Additional Email Addresses
Adding Users In Batch (Import Users and Sites)
Host level - Editing or Deleting Existing Users
Study Level - Adding and Editing Users
Walkthrough on Adding Users
Adding Users at the Host Level
Prerequisite: The user has access to Host level permissions for the User Manager
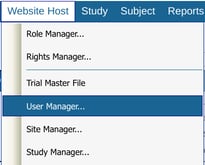
Open the User Manager screen from the Host settings menu.
If the user is new to TrialKit, they can also be sent their sign-in credentials in this area.
Web Browser:
Mobile App:


Host Role
The role selected is the Host level role, not the study role. The user's site and study role are managed separately.
Most users at the site level will have the role of 'No Access'
Users who will use the Trial Master File (TMF) in any capacity should be given access here. This will make the user displayed as an option when assigning TMF tasks.
Web Browser:
The TMF attribute is accessed in the user details as shown below.

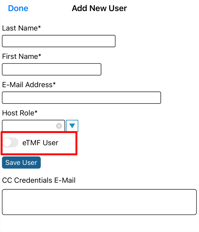
CC Credentials E-Mail

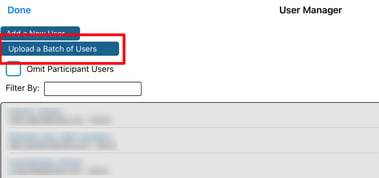
A convenient way of adding users is available where a CSV-formatted list of users can be uploaded all at once. Additionally, they can be immediately added to a study and site with a specified role in the same step. This is a big time saver over manually adding users one by one, as described in the section above, and then having to manually designate each user to specific sites.
Web Browser:
Mobile App:

The file must be set up in the following way, with no column headers:
-
Column A: User first name
-
Column B: User last name
-
Column C: User email address
-
Column D (optional): Study ID - The study ID to add the user to, found in the host Study Manager
-
Column E (optional): Study role - The name of the study level role to give to the user
-
Column F (optional): Site ID - This should be the "DB ID" for the site as found in the Site Manager. This will be the site to make the user a member of, with the role specified in the previous column.
- Column G (optional): TMF user - this makes the user a TMF user
Example:

Important Factors to Note for Batch Importing Users
- All users will be given a host-level role of No Access. Not all users need to have all columns defined. The only required columns are the first three to add the users to the host.
- Ensure duplicate emails are not used and the study role text matches the name of the role from the study configuration.
- New user emails will be added to the host. Existing emails will be updated to match the details dictated by the file (study, site, and role) - which means an existing user's membership or role could change if it already existed in the corresponding study. All changes made to users will reflect in the site/user audit report.
Please abide by TrialKit’s policy of only uploading user email addresses that are both valid and have given implied permission to be added to the system. This helps the system control spam and bounced email notifications to its users.

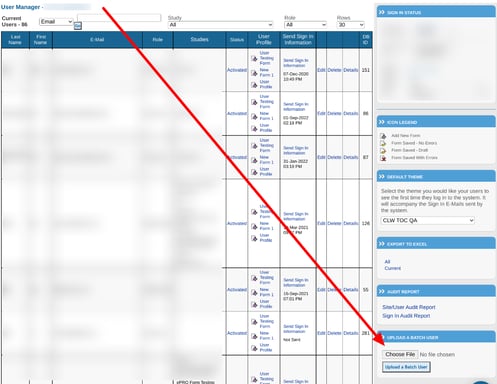
- Ability to filter/search for specific email addresses, studies, and roles of users.
- User Manager Table functions:
Last Name: Last name of the user
First Name: First name of the user
Email: Email of the user
Role: Host-level role
This is the Host-level role. "No Access" merely means the user has no access to Host level functions.
Studies: Lists all studies the user is a part of. Users are added to studies here.
Status: By default when users are added, they are active. By selecting this link, users can be deactivated/suspended to remove the login access to the account without actually removing them from the account or studies. This is especially helpful for audit purposes. Rather than deleting users, they can be maintained in the list and simply denied future access.
User Profile: This is an optional form that can be customized here and filled out to collect specific data on individual users.
Send Sign-In Information: This is a link and a date of when the user last received login information. By selecting the link, the system will reset the user's password and send the user a notice. Users can also do this on their own by using the Forgot Password function.
Sign-in information and other system emails will come from the following email addresses/domains:
- webmaster@clsds.com
- mobileadmin@trialkit.com
Be sure to add that address to the “safe sender” list in your organization's email system
Edit: Select this to edit the name, email, or role.
Delete: Select this to delete the user. This is not advised for users who have entered data in compliant studies, as it has the potential to remove that user's name from any audit trail or action they were historically involved in. Suspending users, or removing them from the study are two alternatives to removing them entirely from the Host.
Mobile App:
-
Tap a row to edit the user's information. See the next image for more info.
-
Tap the information icon to access any Host level user forms (study dependent)
-
Search for users in the list
-
Access more granular filters to apply to the list when searching for users
When a user is tapped, the following items can be edited:

-
User's Host-level role. Most users will be 'No Access' here because their role access is only at the study level.
-
Functions to send the user login information or deactivate the user on the “Host” account (all studies).
-
Enable which studies the user will have access to. This will make the user available so site(s) can be assigned to the user when managing the study level access.
Adding and Managing Users at the Study Level
Prerequisite: User has access to Study Configuration, Configure Sites and Users
Web Browser:
Under Study Configuration settings, select the Sites and Users tab. Go through the following drop-downs to add users to appropriate sites with the appropriate study roles.
- Site: Select which site to work with. The list of options here comes from the Site Manager.
- User: Select which user to add. The list of options here comes from the User Manager. The user's email is included in the name drop-down to help distinguish who the user is.
- Role: Select the role to assign to the user. The list of options here comes from the Role Security settings. If only one option appears, it's because the user selected already belongs to another site with a specific role. Users can only have one role in a study.
- Add User to Site: Select this button to add the user to the list directly to the right.
- Save Study Configuration: Select this to save changes.

The mobile app makes managing users even easier, by allowing everything to be done from one place.
Under Study Configuration settings, select the Site/User Manager. Follow the annotated descriptions below the image.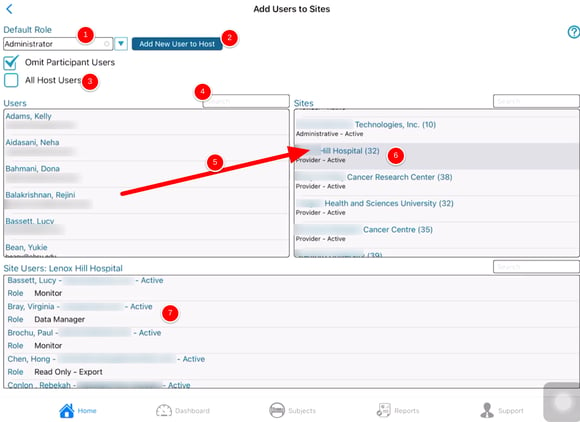
-
Choose a role that new users will get. If a user is already part of one of the sites as another role, adding them to a new site will automatically change them to the new role that is set at the top of the screen. If you aren’t sure if a user is part of a site already and does not want to tap through each site to find them, reference the site by user report.
-
If a user is missing from the user's list, they can be added to the Host User List here without needing to navigate there to add them first.
-
By default, the user list only shows users who have been made available to the study within the Host User Manager. This makes user management easier to focus on only users applicable to the current study. If you don’t see a user in the list and want to make sure the full list of Host users doesn’t already contain that user, then tap the box to display all of them. Users in red are not available for the study but can be added to the current study by simply dragging them to a site.
-
Use the search box over any of the lists to search that list (name or email).
-
Drag any user in the list over to the site they need access to. Remember, Admin users only need to be added to one site if their role has permission to access all subjects.
-
Tap a site to display the member users/roles at the bottom.
-
Tap any user to change their current role. This will change their role on any sites they are part of.
At least one user must belong to a site for that site to be a part of the study, but there is one other important step to take so the site is accessible from the subject manager: The site must be added to a study version (read how within version management)
Deleting a User From a Study
To delete a user on the Web Browser, use the red 'X' next to each user.
On the Mobile App, swipe from right to left on the user’s row in the bottom table.
When deleting users belonging to multiple sites - this must be done for each site the user belongs to. An alternative to this is suspending the user at the Host level - which will make it so they cannot access the Host account at all.
Following are some helpful reports for viewing user site membership and audit logs of user or site membership changes over time:
- Site By User Report
- Sign In Audit
- Site/User Audit
Site By User Report
The Sites and Users Report provides a comprehensive listing of all the users on a given study broken down by site. This is a helpful place to reference user membership and roles, along with other information like last sign-in.
Prerequisite: User has Access to Site by User Report.
This should only be granted to Study Administrators as it shows all sites and users.
It can be accessed via the Web Browser:

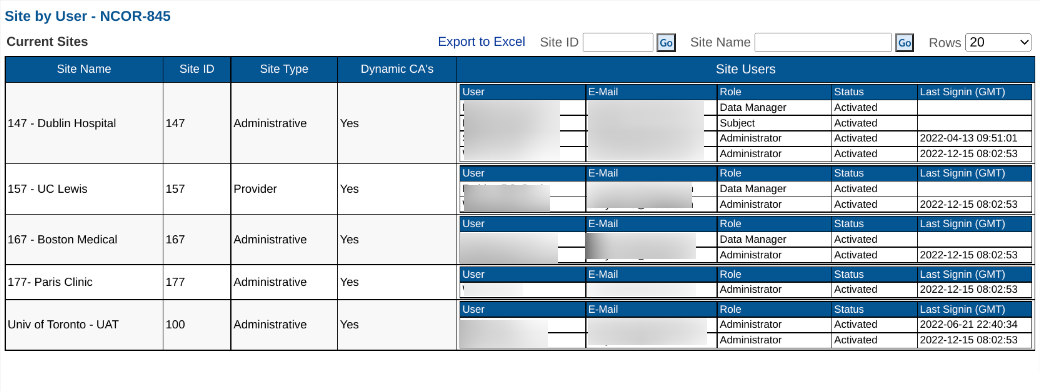
The full list can also be exported to see other details, including Subject ID for users that are Participants.
Common User Manager Management Questions (FAQ)
Question: When a user is no longer part of a study, we receive a request to remove the user from the study database. Is it better to suspend the user and remove them from all study sites, or to delete the user completely? What are the pros and cons of both ways?
Answer: The best thing to do is suspend the user at the Host level - assuming the user is not part of other studies on that same Host account. Deleting the user from the site is also an okay alternative, but that will make it less readily visible when trying to see a historical list of all site users (regardless of their current status). If you choose to delete a user from the site, you would have to reference the audit trail to see if a user was ever part of the site / removed from the site. By suspending the user, everything stays as is, but the user just loses access to that Host account when they sign in.
As a third option, you can delete the user entirely from the Host, which also removes the user from all sites/studies they are part of within that Host, but that is never recommended because users, as a matter of policy, are able to request their information be removed from the system. If that happens and the Support team sees that the user is not part of any Hosts or studies, the user will be removed without question. However, if the user is part of a Host, CDS obtains approval from the host Administrator prior to the full deletion of any user.