How to Export a Specific Form or All Form Data
Table of Contents:
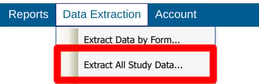
Extract All Form Data
Prerequisite: User has access to Extract All Study Data and is a member of at least one study site.

Note about data visibility:
- Field blinding is enforced in the data outputs, based on the user role executing the export.
- If the user accessing the exports is a site-level user and they have access to this function, the data exported will only be for the site(s) they belong to, or a single site can be selected to export. This saves needing to filter out that site’s data across every data set.
The following options are available when exporting all data. See the descriptions below.
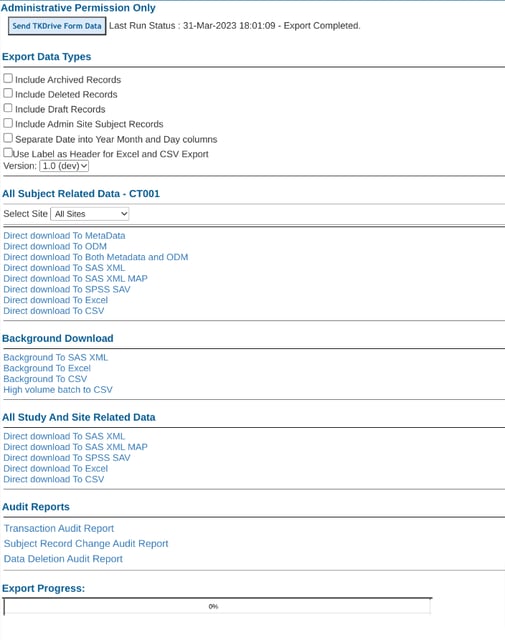
Include Archived Records
Archived records are past versions of records over time as data changes were made and records were resaved by users.
Include Deleted Records
Records that have been deleted from the study can still be accessed in the exports
Include Draft Records
Draft records are non-final versions of a record. This depends on the study function of draft saving having been enabled.
Include Administrative Site Records
Check this to INCLUDE admin site data in export. Typically that is data entered for testing or training purposes, so is excluded by default. This option will be disabled for site type user roles, so they can only export provider site data.
Split Date fields into 3 parts
This option will take any date field and create three separate columns of data with "FIELDNAME_day", "FIELDNAME_month", and "FIELDNAME_year".
Use Labels as Headers
This will use the reporting label for each field - defined in the form builder - in place of the default field name.
Version
It is necessary to select which version of the study to export. If multiple sites/subjects are on different versions, they will need to be exported separately. The reason exports are separated by version, is due to the extensive study design changes that can be made from one version to the next. Combining versions into a single export would lead to an inaccurate reflection of data.
Export Formats
Background versus Direct Download
These options will produce the same results. The only difference is how they get processed.
Direct Download will require the user to wait for the file to process while the status bar indicates progress. Once complete it will automatically download. Navigating away from the screen will stop the export. This is a more convenient option for smaller datasets.
The Background export is helpful for larger data volumes to avoid waiting on the screen for the download to finish. You can return later on to the background exports screen to retrieve the file.
High volume batch export is an option is place for studies with very high volume of data (in the millions of records). It runs differently by chunking the data into csv format.
SAS XML - Exports a single XML file.
SAS XML MAP - Produces the MAP of data types for users who need to map the XML into SAS.
Excel - Exports as a single file workbook where each data table (form) is its own worksheet in the Excel file.
CSV - Exports a zip folder of separate CSV files (one for each form in the study).
CDISC ODM (Operational Data Model) XML is a Snapshot format that supports version 1.3 of the specification as published at http://www.cdisc.org. There are 3 options for the ODM export in TrialKit: Metadata Only export, the Data Only export, and Metadata and Data in one file export.
- Metadata Only Export - defines events, forms, and questions that make up a study. The metadata can be downloaded by clicking on the Click here to Export Metadata to ODM link as shown in the figure below.
- Data Only Export - provides a data transport and storage mechanism for the actual clinical data as entered in the CRFs. The data can be downloaded by clicking on the Click Here to Export Data To ODM link as shown in the figure below.
- Metadata and Data Export - combines both the Metadata and Data in one ODM export file. The data can be the system's unique file ID which is also seen in the file repository, to help with identifying files.
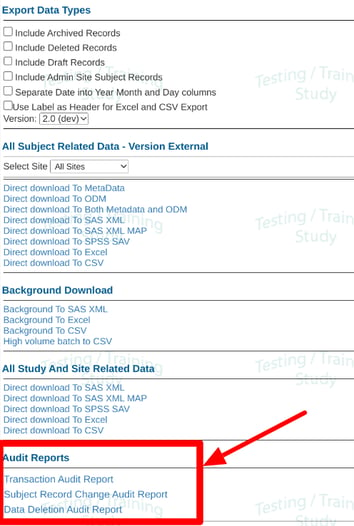
Export Audit Metadata
Prerequisite: User must have access to the form data audits.
Site users will automatically have access to the transaction audit export for their own site(s) if they have access to export all data screen.
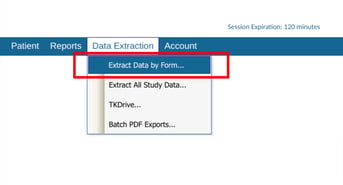
Extract Data By Form
If only specific forms are needed, there is the ability to extract data by form. This also allows Administrators to create data packages and make them available to specific roles that need to access the data, without giving those roles access to all study data.
Prerequisite: Users with a role of Administrator (role hierarchy of 200) are the only Users that can configure new exports.
Any study role with a hierarchy of less than 200 will only be able to view exports that have been targeted to their role (determined in the export configuration) - assuming the role has access to data extraction.
Field blinding is enforced in the data outputs, based on the user role executing the export.
NOTE: If the user accessing the exports is a site-level user, they will only see data for their own site(s).
These exports enforce field blinding. If the role viewing or exporting a data pack is blinded to a field on that form, the column data will display “*****”.

NOTE: If a user role should not see that a blinded variable exists, they should not be granted access to the exports.
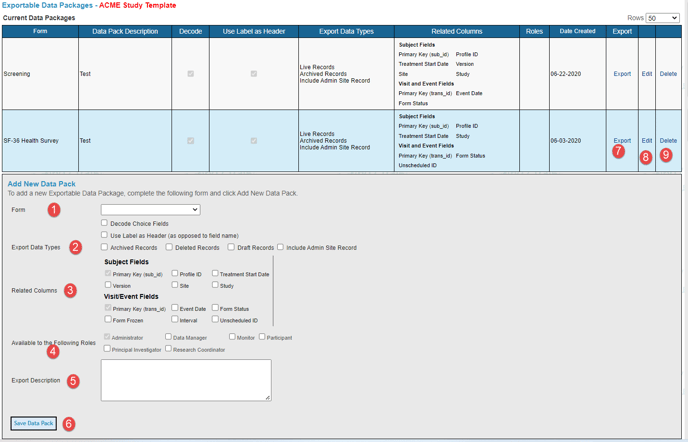
See the annotated numbers in the image below with descriptions below the image to learn how to configure new exports and export data packs that have been made available.
-
Select which form to create a data pack for.
-
Export data types:
-
Decode choice fields - Replaces the coded value of choice type fields (radio fields and dropdowns/picklists) with the choice text.
-
Use label as a header - Uses the reporting label as the column header rather than the field name for each field.
-
Archived records - Includes all archived records as well as the final ones. An archived record is a past version of the same record which was then saved again and replaced by a subsequent one - such as when data is changed and a form is re-saved. An "Archived" column will indicate which records are archived versions versus which ones are final.
-
Deleted records - Includes any deleted records in the export. A "Deleted" column will indicate which ones are deleted status.
-
Draft records - Includes records saved in draft mode, if the study was set up to allow draft saving.
-
Include Admin site records - Includes Admin/testing data in the exports. This data comes from any Administrative type sites, as defined in the Site Manager.
-
-
Related columns - Subject Fields and Visit/Event Fields:
-
Primary key (sub_id) - This is the database's primary key that is assigned to the given subject. It is used as a PK->FK relationship between the Subject Fields and the Event Fields.
-
Profile ID - The subject's ID which is seen throughout the system. This can potentially be changed by users, but the sub_id cannot.
-
Treatment start date - The visit/event date from the subject registration form.
-
Version - The version of the study where the record currently exists.
-
Site - The study site where the record exists.
-
Study - The name of the study defined in the Study Manager.
-
Primary key (trans_id) - A unique key to each subject event and is used to establish a link between the event and the actual form and sub-form data.
-
Event Date - The date key field that must be entered into each subject form.
-
Form status - The current state of each record. For example, saved.
-
Form Frozen - Indicates True if the record has been frozen.
-
Interval - The name of the visit.
-
Unscheduled ID - The name of the visit if it's an unscheduled one.
-
Randomization Allocation - This will only show as an option if the study is randomized. It can be used to display the allocation (Unblinding) for each record.
-
-
Targeted Roles - Dictates which user roles will have access to the data pack export when they open the same page. Only Administrator roles (hierarchy level of 200) are able to set up exports as described here and access all data. Other lower roles can only export what has been set up for them.
-
Export description - Brief description of what the export is intended for.
-
Save data pack - Saves the export into the table at the top of the page.
-
Export data pack - Click this link to open the data pack and run the export (described in more detail below).
-
Edit data pack - Use this option to adjust any of the pre-defined parameters described in items 1-5.
- Delete data pack (rights dependent).
Once you have completed the Add New Data Pack form and saved the form, it will be added to the Current Data Packages data table. In that data table is an export link. When clicked, the data will be exported to the selected data format and downloaded to the client's computer as shown in the figure.
Clicking the Export link will load “Grid Views” of your Form data. You will see 1 or more “Grid View” depending on how the form is created.
The figure below shows the Subject Profile Form with two grid views.
- The first “Grid View” displays the Main Form of Data.
- The second “Grid View” displays the “SubForm Table” data, which comes from having a normalized table on the form.
Depending on how a form is created, it may have no sub-form table or more than one sub-form table.
 Pick the format of the Data on the Grid Views to be exported and click Export.
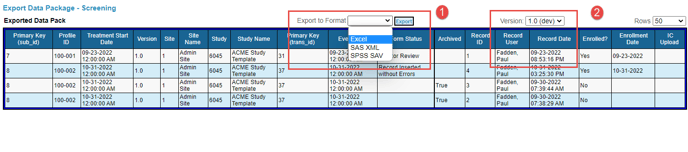 There are currently three types of export formats; Excel, SAS XML, and SPSS SAV. Choose the format you would like the form data to be displayed when you do the actual export. For Excel and SAS XML Format, you will need to pick the format for each Grid View that you want to export. For SPSS SAV you will only need to pick that form on the main Grid View and it will include all the sub-form table data in a zip file.
Variable Definitions
| sub_id |
Internal unique sequential subject ID within the study.
|
| sub_profile_id |
User-defined subject ID as seen throughout the system. Possible to change over time.
|
| sub_tx_start |
The user-defined visit date field on the study's registration form
|
| site_id |
Internal unique sequential site ID within the host
|
| site_name |
User-defined site name
|
| site_id_no |
User defined site ID. This is only included if Labels are included in the export configuration
|
| trans_id |
Unique ID of a given record saved for the subject/form/visit. This remains the same even if the form is resaved multiple times.
|
| trans_date |
The user defined visit date field from the form
|
| int_id |
The internal unique ID for the visit, based on the visit schedule design. Forms not collected in a visit schedule will be -1.
|
| Interval_name |
The user defined visit name based on the visit schedule configuration
|
| vee_id |
For forms collected in an unscheduled visit, this is the internal unique ID of the unscheduled visit configuration
|
| vee_name |
For forms collected in an unscheduled visit, this is the name of the unscheduled visit
|
| cy_id |
For forms collected in a cyclical unscheduled visit (repeating visit), the internal unique ID of the cycle.
|
| cy_name |
For forms collected in a cyclical unscheduled visit (repeating visit), the user defined name of the cycle that is provided during data entry.
|
| form_id |
The internal unique ID of the form. This is the same for a given form across multiple subjects/collection points.
|
| form_status |
The current status of each record. Displayed as a value. See status value definitions for more information.
|
| version_id |
User defined name of the study version that the record is currently part of.
|
| form_frozen |
True/False flag that gets set on a record when it is froze by a user.
|
| ev_int_id |
Present only if the form is a triggered form (part of an event schedule). Represents the interval id of when the form was triggered
|
| rel_trans_id |
Present only if the form is a triggered form (part of an event schedule). Represents the trans_id of the form that triggered this form to be entered
|
| adj_source_transid |
The transID for the related record that the current record adjudicated. Only displays if the form is an adjudication form
|
| adjudication_final |
Only displayed for forms that are getting adjudicated. This is the moderate final decision
|
| sa_# |
Subject allocation if the study has randomization configured. The # is the system ID for the randomization config.
|
| Form field names or labels |
All the user defined variables for the form. Each variable has it's own column.
|
| File ID |
Only available on background CSV format. Displays header as "FieldName_doc_id
|
| WHO or Meddra Coding variables |
System variables related to the medical coding that has been applied to the record. Only displays if the form is used for coding.
|