Defining Scheduled Visit Date Windows, Forms to be Collected at Each Visit, and Visit Cohorts
Table of contents:
- Setting up a visit schedule
- Changing the visit schedule mid-study
- Viewing the visit schedule within the subjects' casebook
- Optimizing speed On Large Visit Schedules
- Define multiple visit cohorts
- Grouped Scheduled Visits
- Study Exit Form Options
- Export Scheduled visits design
Setting up a Visit Schedule
Prerequisites:
- User has access to Subject Record Page Design
- At least one site belongs to a study version
The setup page is accessed from the Study Menu>Create or Edit Scheduled Subject Visits menu:
Web Browser:

Mobile App:


Mobile App:
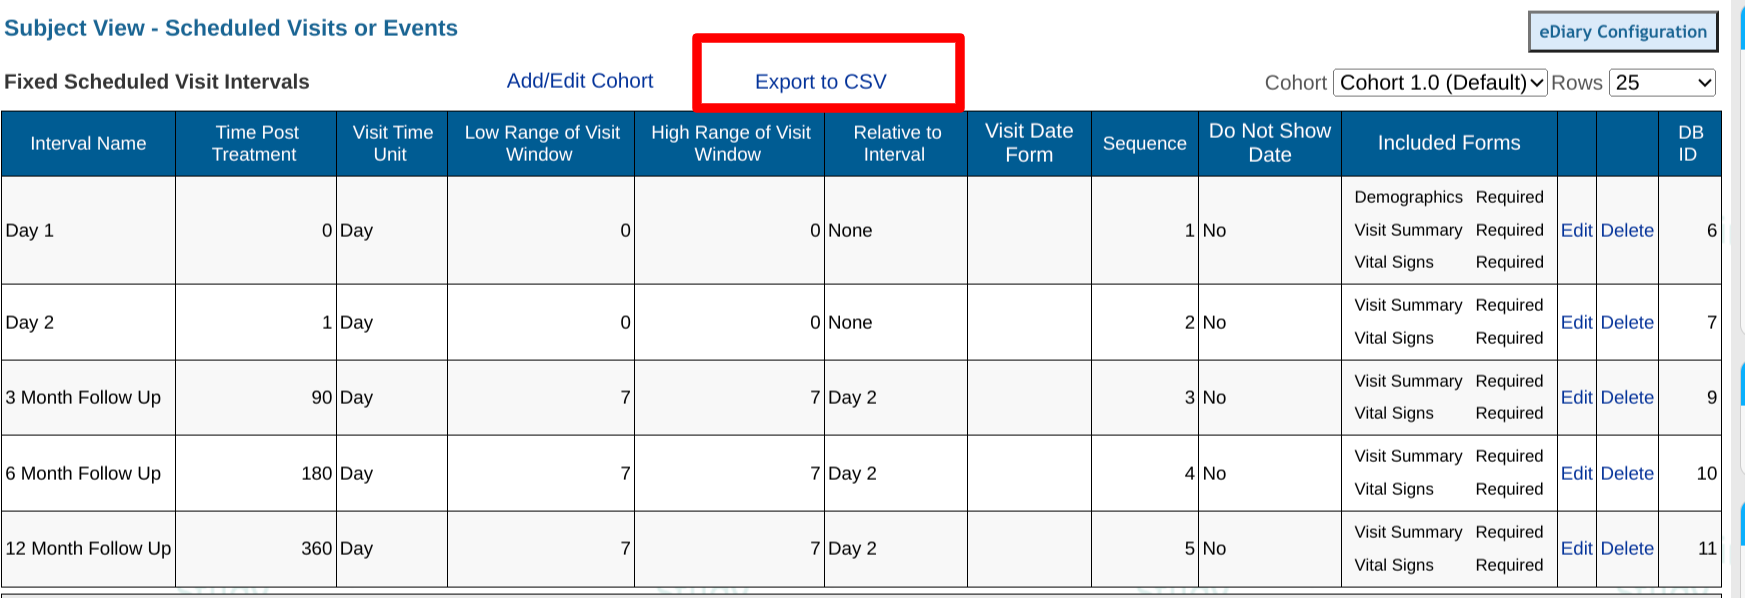
Tapping on the header of any visit will allow for editing the parameters of that visit (all defined below). New visit intervals can be added via the "New Interval" button at the top.

- Interval Name - Name the Interval that will display in the subject records.
- Time Post Treatment - Amount of time the interval will occur AFTER the interval indicated in the "Relative to Which Visit" parameter.
- Visit Time Unit - Unit of time measurement (Days or Hours) applicable to the Time post-treatment in column 2.
- Low Range of Visit Window - Acceptable time window prior to the target time from column 2.
- High Range of Visit Window - Acceptable time window beyond the target time from column 2.
- Relative to Interval - The Interval from which "Time Post Treatment" is calculated from. In other words, the dependency of the interval calculation.
Be sure to set a visit that comes PRIOR TO the visit being configured. Date windows only compute in a forward-moving progression.
-
Visit Date Form - Any interval which is relative to the current interval will also need to know which specific form to calculate from.
-
Sequence - Set the order of the Intervals to display in the Scheduled Visits/Event Forms Table.
A couple notes:
Visit date calculations work only moving forward through the sequence. On the Mobile App, the sequence is set simply by tapping, holding, and dragging a visit column to a different location.
A limit of 20 visits is enforced to encourage other mechanisms of data collection, since most studies do not require over 20 visits. Contact Support to request a limit increase.
As the parameters are changed, there is a "Preview" option to see how that schedule looks in different scenarios. This is merely a quick testing function without needing to go into a test subject and enter data.
Other Available Options
-
Do not show the date - Checking this box or indicating "Yes" will hide the date window for the corresponding visit. This is helpful in instances where a window is not applicable.
-
Included Forms - Forms that will be included and/or required in that particular interval.
-
Edit - Click Edit to edit any of the settings of that interval.
-
Delete - Click to delete the interval row.
TrialKit offers two types of scheduled visit interfaces when users are viewing the subject records:
-
The Traditional Type is a grid of all scheduled visits and the forms that need completion within each visit interval.
-
The Single Interval Selection drop-down is a grid by interval and creates a listing of forms only for the interval selected. This is useful if you have a lot of visits in an interval or huge amounts of data in many forms in a data-intensive study. It is more efficient in the performance of the site to only show forms per interval.
Mid-Study Modifications to the Visit Schedule
Over the period of a study, if changes need to be made to the visit schedule, the best way to do this is by simply making edits to the current working version. Just be aware that these changes will reflect immediately on live studies.
Alternatively, a separate visit cohort can be created and subjects can then be moved to that new cohort as needed.
Viewing the Visit Schedule Within the Subjects' Casebook
Scheduled visits are a key component of most studies, where specific forms need to be collected at specific date/time ranges for each subject.
Examples of the subject casebook are shown below.
Web Browser:

Mobile App:
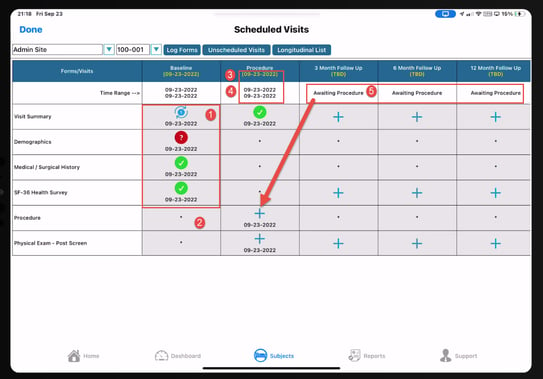
1. Each cell contains an icon to indicate the status of the record and existing queries. The icon legend is always available for user reference.
2. The red asterisk * in each cell indicates the form is not being collected in that particular visit.
3. Each visit window is defined with a specific target date/time (that's the yellow date).
4. The low/high range that is acceptable for the data to be collected (The "Time Range"). The date enforced by this date window will be the visit transaction date on each form within the visit unless the form is set up to ignore visit window checking.
5. If a TBD or "Awaiting" is displayed, it's because that visit depends on some other visit's form to be completed first. In this case the transaction date on the procedure form (Procedure Date Field).
Important Notes:
- The system still computes a default visit window based on the visit schedule configuration even when the screen indicates “TBD”. For example, if a visit window is still awaiting its dependency, and that dependency is not yet entered, the window will fall back on the registration form date in order to compute a visit window.
- If ePRO forms are being collected in a visit that is still "TBD", they will still deploy based on the background default window computation. To prevent this, use a hide condition to prevent the ePRO from deploying until the dependency date has been entered.
- Visit windows are computed only in a forward-progressing direction. If Visit 1 depends on a date being entered in Visit 2, the Visit 2 date window will not work as expected and will default to computing from the Registration date.
NOTE: Visit schedules may also vary. For example, some subjects may have forms or entire visits that other subjects don't have. In other words, it's not the same exact schedule for all subjects in the study. This is handled through cohorts.
Required Forms - Track What Is Missing
If a form is required in a visit and it's not being conditionally hidden, the system will count it as missing once the visit window has passed if the form has not yet been saved. This is then reflected in the Action Items Report, Dashboard Report, and Record Status Report.
If study exit occurs within a given visit window, TrialKit will now count required forms as missing in that visit. This is because the high range of the visit window will never pass for the subject.
Visit Dates Outside of Window (“VOW”)
When a form is saved, the form’s visit date will be checked against the corresponding visit window. If the date is outside that window a form query will fire. Blank dates will not be considered outside of the visit window. To catch blank dates, make it a required field or add a separate edit check.
To prevent the behavior of visit windows from being compared to the visit date on forms, disable the function at either the study level or on a per-form level.
If the visit window is “TBD” - or still awaiting its dependency to compute a final window - a hypothetical date will still be used for that visit. When the dependency date does not exist, the system will fall back on the registration form as the driving factor to compute the visit window.
In other words, a visit may be awaiting a previous visit but can still have forms missing or outside of the window.
Optimizing speed On Large Visit Schedules


Visit Cohorts
Cohorts in TrialKit are simply defined as different visit schedules, whereby subjects can each exist on separate visit schedule parameters.
Here are a couple of examples:
-
Some subjects will need a 6-month follow-up visit, but others will not.
-
After some determining event, some subjects will get a couple of extra visits that most subjects in the study don't have by default.
An important point to understand is that Cohorts are independent of study versioning. All cohorts that are set up in a study will exist across ALL study versions. In other words, as an example, even if some subjects exist on version 1 and others exist on version 2, all subjects on both versions can be moved between all cohorts.
In summary:
-
Visit schedule design can be changed via cohorts
-
Form design can be changed via study versions
All studies have at least one visit cohort. If only one visit schedule exists in the study protocol, it may still be necessary for some scenarios to utilize cohorts. One common example is when visits need to be hidden. Rather than utilize several conditional actions to hide forms and/or visits, different visit schedule designs can be used.
As soon as it's determined that more than one cohort is needed, it's simple to set up new ones.
Cohorts are initially set up, naturally, in the same place where visit schedules are defined. First, you'll need to make sure a couple of things are enabled:
-
The functionality in the study settings.
-
The permission to change subjects from one cohort to another (so you can test everything out).
The images below walk through how new cohorts can be created and existing ones can be edited.
Note: One cohort must be defined as the "Default" cohort. This will be the one that new study subjects are placed on when they are first registered in the study. In other words, you'll want to make sure the default cohort is the one that subjects should be starting on before they are eventually determined to be moved to another cohort.
To Edit the visit schedule and forms collected within each visit, just tap on a visit or form to make any adjustments. This can be done at any time throughout the study as changes to the visit schedule are needed. A few important points:
-
Be aware that making changes to an existing cohort where there is live study data - particularly if deleting a visit - can cause data to become inaccessible, but is reversible and data is not lost.
-
When creating new cohorts, consider the name of a visit in one cohort must match its respective visit in another cohort in order for the system to recognize them as the same visit. Each visit, in actuality, across each cohort, has unique IDs, but rather than treating them as unique, the system relates them by name. For this reason, for example, in a multi-cohort study, you will never see multiple "Baseline" visit options in the list of filters in the Queries Report.
-
When editing visit names in existing cohorts, if a visit name “ACME” exists in both cohorts 1 and 2, updating the name “ACME” to “ACME2” will automatically update the name in both cohorts.
-
If adding a new form to a visit(s), be sure that the form exists on a version of the study where subjects in that cohort will be added. As an example, if a new form is created in version 2 and added to all the cohorts, but a site still only exists on version 1 where that form does not exist, the subjects at that site will get errors when opened.
-
When adding or changing the default cohort, a window will be seen similar to the one below.
-
- The default cohort will always be labeled as such to avoid confusion when new subjects are added. Alternatively default cohorts can be defined on a per-site basis.
-
- If a new cohort is being created, an existing cohort must initially be copied.
Web Browser:


An Explanation for Studies Running Prior to Web v5.0 (February 29, 2020)
For studies migrated to v5.0 or higher to make this function available, a concept to understand is that scheduled visits, like CRFs, used to be under version control. Upon migrating to v5.0, those versioned visits became cohorts. In other words, if a study has versions 1.0, 2.0, and 3.0, it still has that version control on the CRFs, but the visit schedule now has 3 different cohorts instead of versions. If the subjects are all on the latest version 3.0, they will also be on cohort 3.0, and this will be transparent to the users. In this common scenario, it will be important to avoid giving out the user role permission and switch cohorts.
As long as the cohort function is not enabled in the study and users don't have access to switch subjects between cohorts, the subjects will remain, in this example, on version 3.0.
Moving forward in this example, if a new study version 4.0 is created, it will be important to understand that the most recent cohort (3.0) can be changed on the fly if any changes are needed to the visit schedule.
As new subjects get added, whichever cohort is set as the default cohort will be what new subjects are on upon registration. If there are subjects on different study versions, those will be unaffected, but if certain sites are on different study versions (not common), then subjects will need to be manually placed on the appropriate cohort as they are added - assuming the new subjects are not desired to be on the default cohort.
*Grouped Scheduled Visits
Grouped scheduled visits take the standard scheduled visits described above and add the additional layer of “groups”. An applicable example would be something like an Oncology protocol where visits exist in cycles, and each cycle has a specific number of treatments. In that example, Groups can be used as the cycles. This way the study designer only needs to set up one complete cycle/group and then create copies of it to account for the number of treatment cycles.
This function also simplifies data entry at the site because the casebook only needs to display one visit group at a time, rather than loading hundreds of collective visits across multiple groups.
*This feature is currently in beta, accessible from the mobile app, and not yet available for production study design.
Study Exit Form Recommendation
Many Study Builders are accustomed to placing the study exit form within the visit schedule at some sort of end-of-study visit, which can certainly be done within TrialKit. However, it is recommended to consider setting the Study Exit form as a log form rather than putting it in the visit schedule. This way it will display on the main subject manager screen to readily show which subjects have exited without the need to open each subject.
Export Scheduled visits design
Once the visit schedule is configured, it can be useful to export the parameters for external documentation about the study, or to provide to anyone performing data analytics as it helps identify visit names, associated IDs and time windows.