Accessing Participants Records and Navigating Casebooks
The Subject Manager is the most common location for data entry within TrialKit. It is where study participants are registered within a study and where existing subject casebooks can be accessed for data entry and review. Use the links below to jump to each section.
Subject Search and Loading Speed
Summary of Record Review Progress
Move a Form To Another Subject or Another Visit
Prerequisite: User has access to Subject Record Management permissions and access to view and edit forms.
Subject Manager
Locate the Subject Manager under the Subject menu in the menu bar.
Web Browser: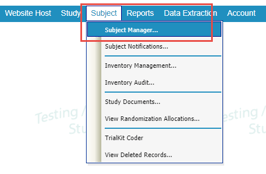
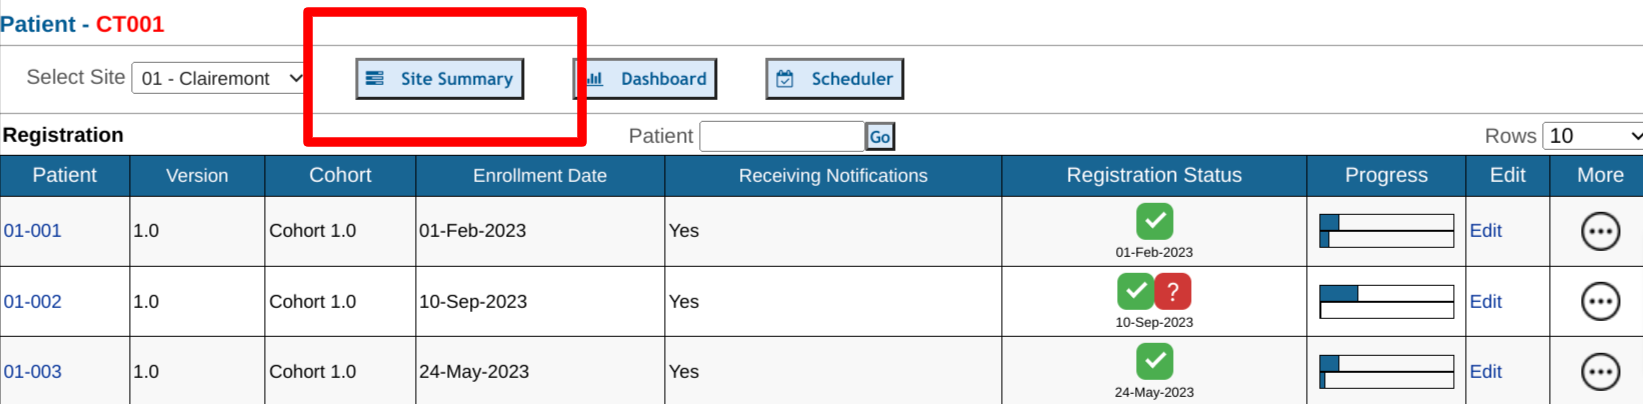
It can also be accessed via the button at the top of the screen, or from the study home screen:
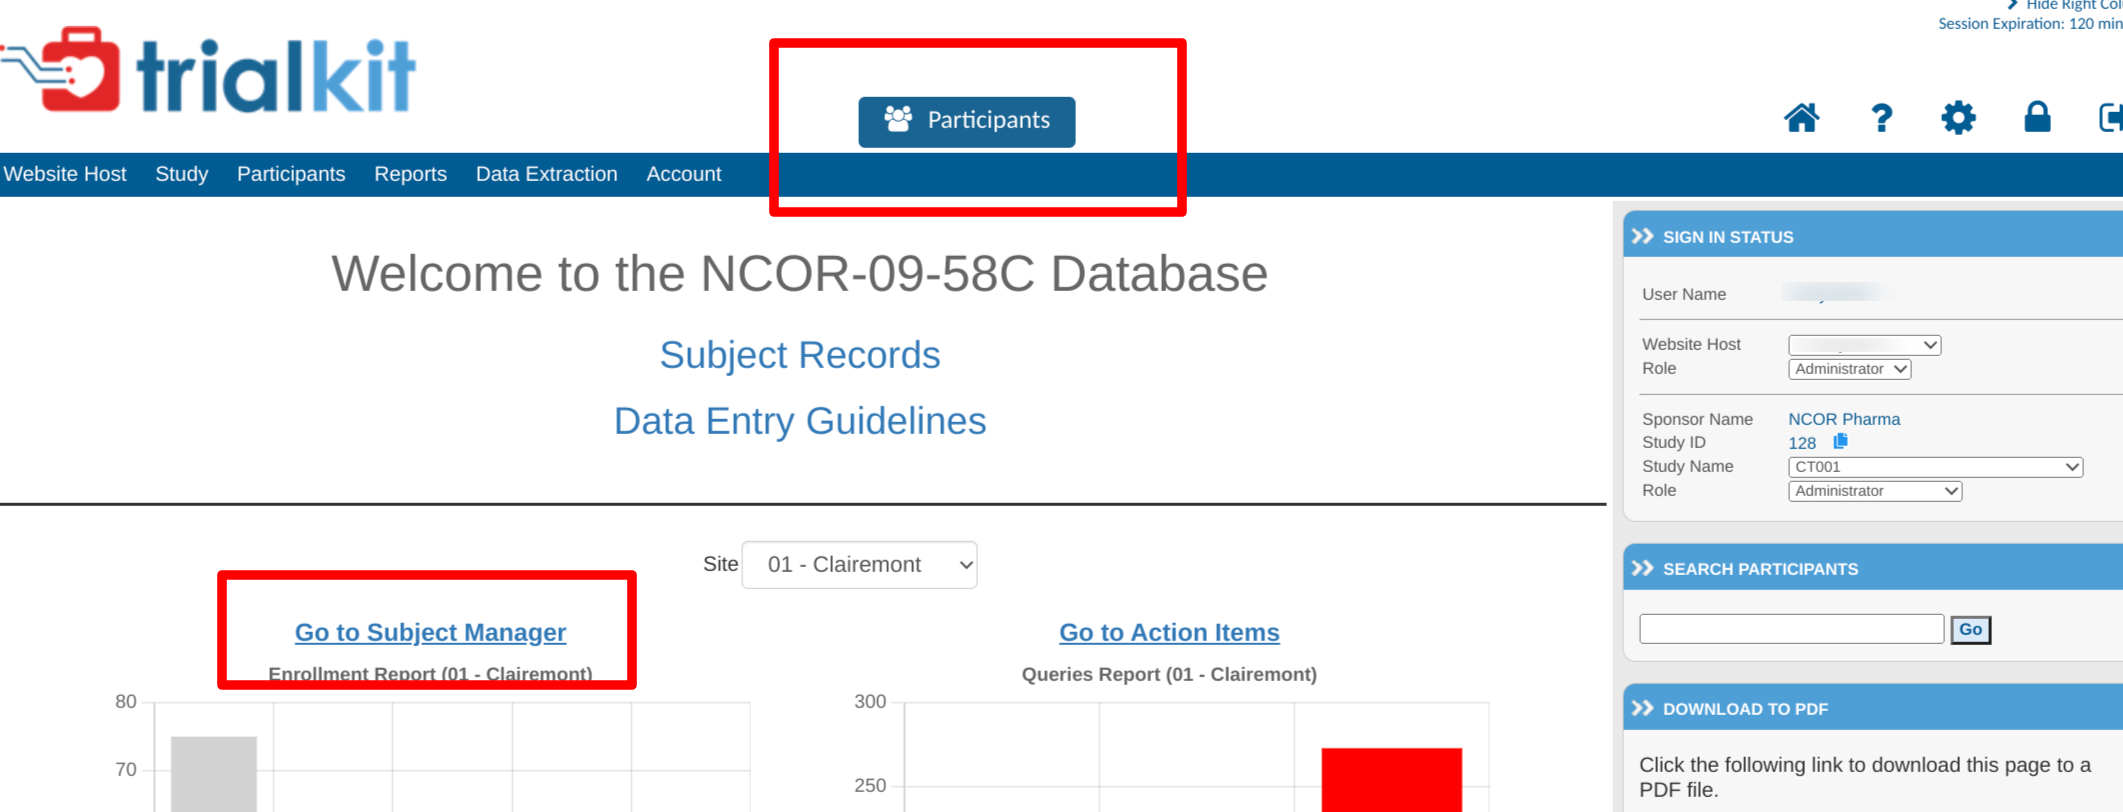
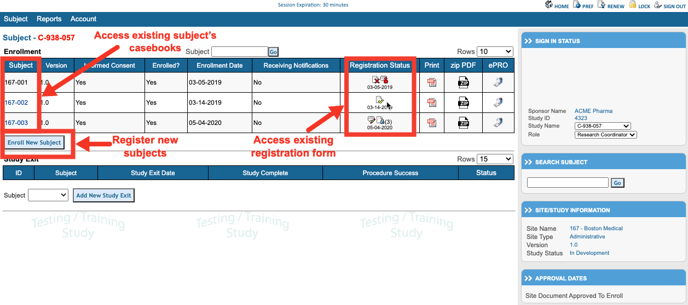
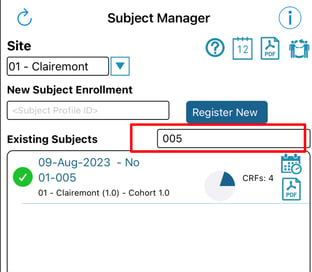
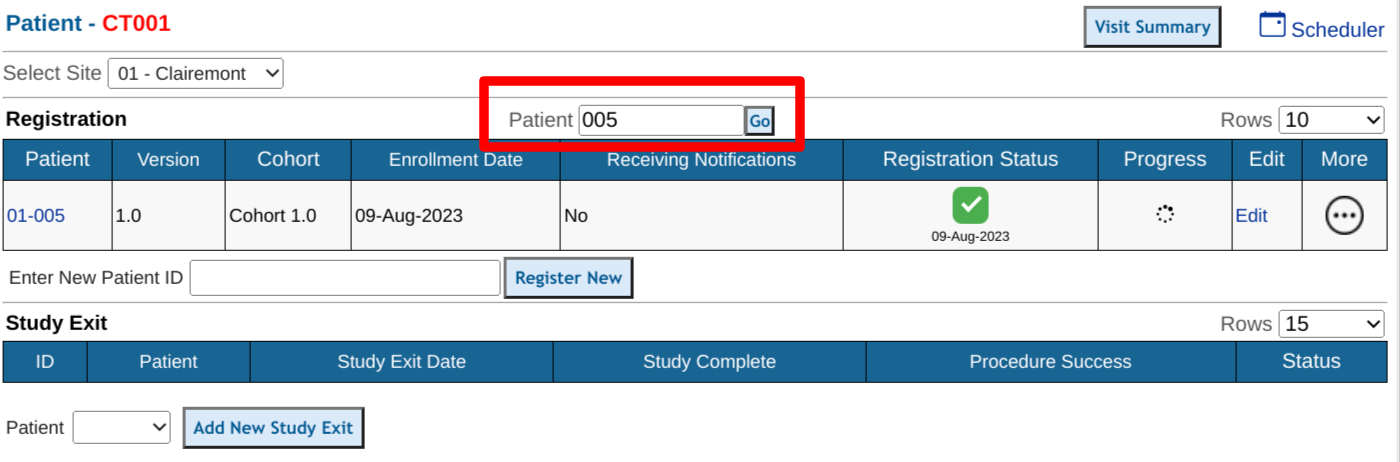
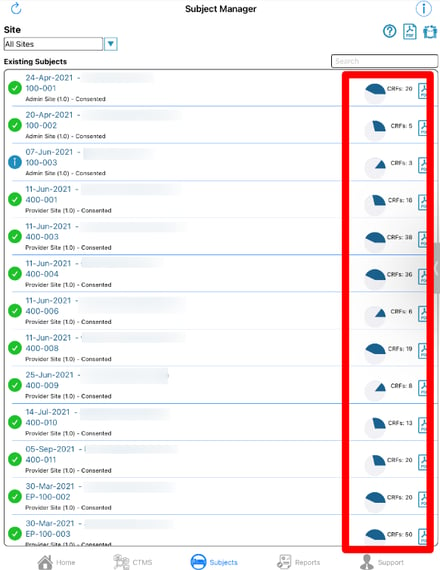
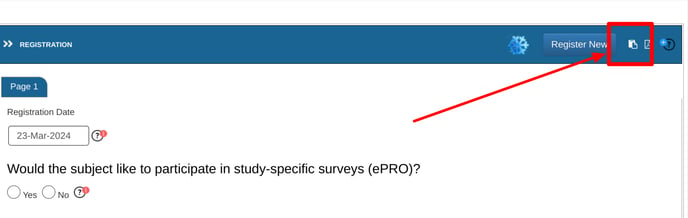
Once you selected the Subject Manager, a table will be shown with a list of information on subjects entered into the system. From this table subjects can be accessed and new subjects can be registered at the current selected site. If only one site is available, there will not be an option to select a site at the top of the table. Read more here about registering new subjects.
Mobile App:
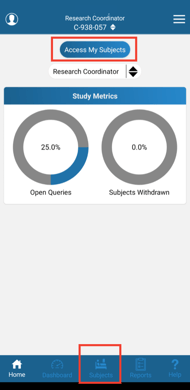
From the main home screen tap the Access My Subjects button at the top, or the Subject tab in the navigation bar at the bottom.
From here select a site (if applicable), and tap on any subject to open the casebook.
The status icon to the left of each subject indicates the status of the Registration form for the the study. Tapping that will open the registration form itself. Tapping anywhere else on the row will open the entire casebook.
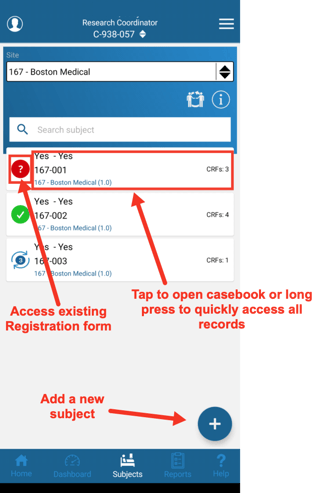
Tapping and holding for 1 second on any subject will open a popup of all the records saved. This works as a great shortcut to jump to a specific record under each subject.
Also take note, of the total CRF count on the right side of each card. This can be helpful in getting a quick view of progress.
Subject Search and Loading Speed
Use the search box above the subject listing to quickly search for a specific subject ID. This will get retained on a per user basis until it's cleared or changed.
Mobile app:
Web browser:
If a site has a high volume of subjects, it's possible the subject list can take a few seconds to load. Use the search option to mitigate this probem.
On the web, you can also use the universal search to quickly jump to a subject's casebook (requires full ID). If only a partial ID is entered, it will filter the subject manager list of IDs for matches.
Subject Progress Chart
The Subject Manager screen displays a helpful overview of the progress of each subject. This is represented as a percentage of how many required forms have been completed by the subject. The logic is as follows:
- Total number of saved records with no open system queries / Total number of required forms across all scheduled visits
This does not account for conditionally hidden forms for each subject, or for the study exit date. For a precise view that includes those factors, use the Site Summary Report.
The web browser also displays a percentage of the number of forms that have been reviewed by at least one review level. The formula is as follows:
- Number of records with at least one review level / Total number of saved records.
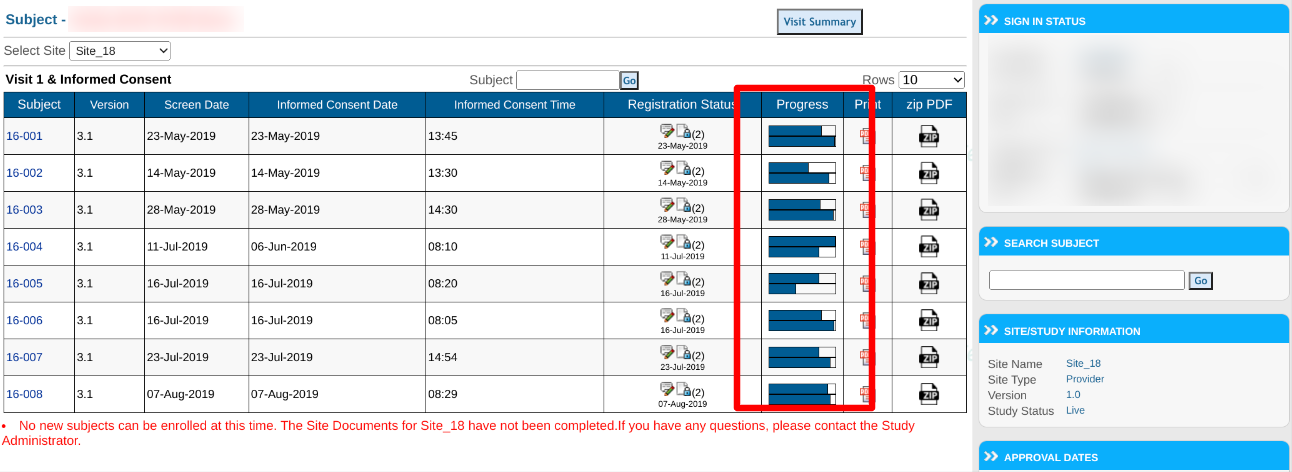
This progress bar can then be tapped for additional details about the review levels (continue reading).
The mobile app displays one metric related to the number of completed visits.
Summary of Review Progress
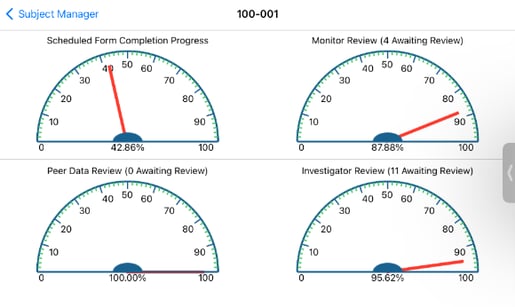
When the subject progress bar is tapped on the web browser, it opens additional details related to the progress/status of that subject. This further breaks down the review levels component to show a history of review progress for each review level as shown below.

Tapping on the the mobile app will also open a more detailed view displaying the current status of each of the review levels - in other words, as level 2 review rises, level 1 will decrease as shown below.
Subject Casebook Navigation
Once a subject has been opened, there are are three types of forms that can be accessed depending on the requirements of the study:
- Scheduled Forms - Scheduled visits based on protocol-defined data windows.
- Unscheduled Forms - Visits that can be entered at any time where a pre-defined set of forms can be added within each visit.
- Log Forms - Individual forms that can be entered at any time in repetition.
- Event Schedules - For ePRO studies only. This displays triggered events that have occurred for the current subject.
Other things to know (tap on each to learn more):
- Longitudinal List of Records
- Viewing Current Subject Summary Information
- Navigating Between Forms
- Data Entry
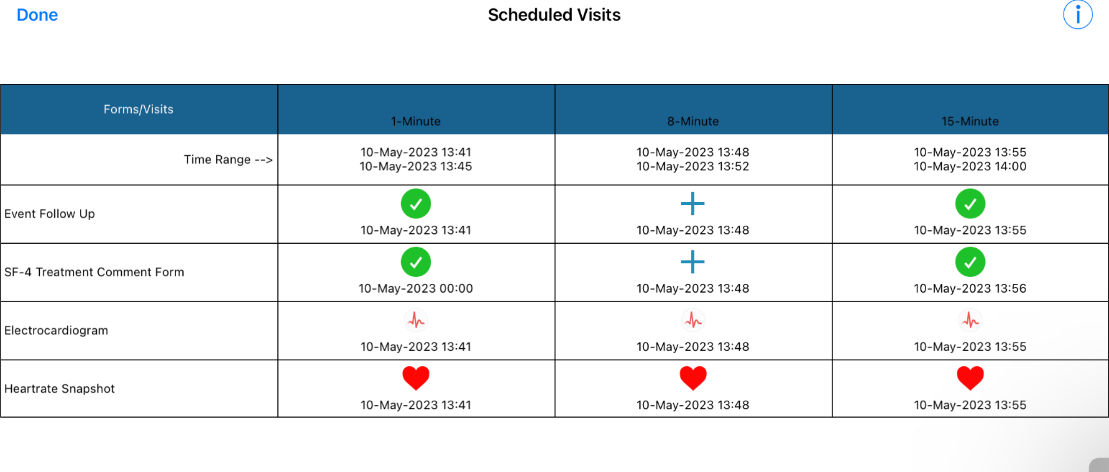
Scheduled Visits
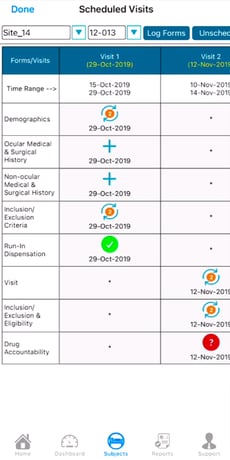
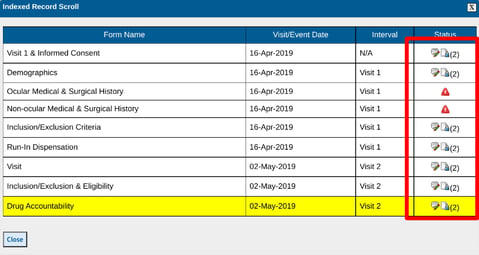
When a subject is opened, the default view will be the scheduled visits. Reference the image below for the meaning of the various areas on the screen.
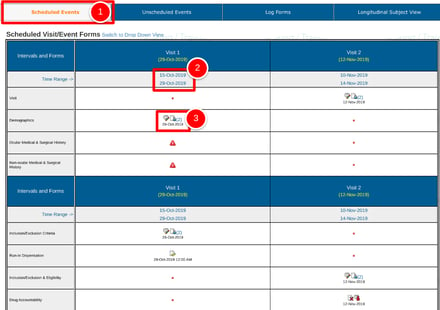
1. Tap the Scheduled Events tab at the top of the screen if it's not already selected.
2. Reference the expected visit window for the visit. This shows the low and high range acceptable (visit window). Sometimes this can be blank or "TBD" based on study design.
3. Tap on a form's status icon to open the corresponding form within that visit.
- The icons displayed indicate the status of each record. Use the icon legend on the screen to help.
- As date windows lapse, the required forms in that visit will be counted as Missing.
- To quickly see what is missing or upcoming for all subjects at a given site, use the
Site Summary Report described further down in this article.
Changing View Preference
Some visit schedules are bigger than others. The table shown above is scrollable, but can also be switched to a 'Dropdown' view of one visit at a time for a more focused perspective. Do this by selecting "Switch to Drop Down View" as shown below.
Some studies may be configured to default to the dropdown view for all users.
Web Browser:
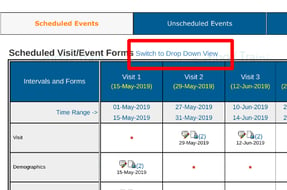
Using the Drop Dow View can be helpful on studies where a high volume of forms are collected on each subject. It allows records to load faster by only viewing one visit at a time.
Mobile App:
An added function in the mobile app is the ability to quickly jump to another site or subject at the top without returning to the subject manager list.
Unscheduled Visits
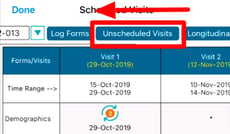
1. Tap the Unscheduled Visits tab at the top of the screen.
Web Browser:
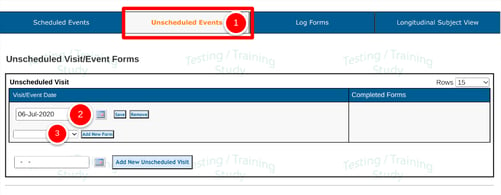
2. Add a new event by entering and saving a new date.
Prerequisite: User has permission to add/edit unscheduled visits
3. Select a form from the dropdown list and select Add New Form to open and fill it out. Once the form is saved it will display in the unscheduled visit table.
Mobile App:
Depending on the screen width, the top section can be scrolled horizontally to access the additional buttons.
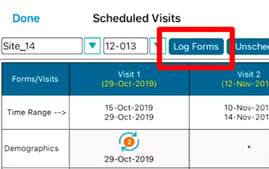
Log Forms
This section contains forms that can be entered at any point in time, and also repeatedly. Common examples are shown below.
Each table will default sorting order based on the form date (displayed under the record status icon).
Web Browser:
1. Tap the Log Forms option at the top of the casebook
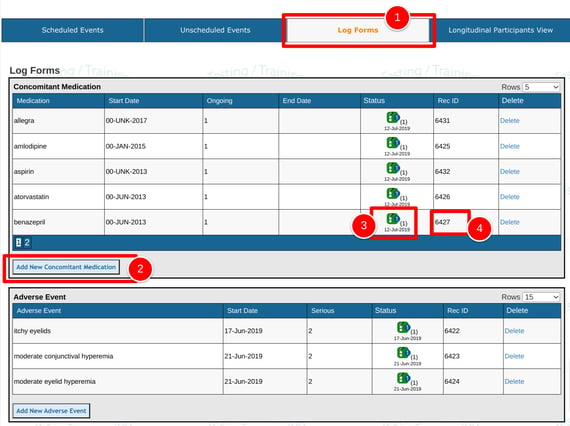
2. Add a new form by using the button under the desired table where a new record is needed.
3. Tap any existing status icon in the table(s) to open the corresponding existing record.
4. "Rec ID" is the unique ID of each record. Note, this may be different from the log number built into a form.
Mobile App:
When saving log forms on the web, there are two options for saving:
- Normal Save will return the user back to the subject’s casebook to select another form - assuming no errors occurred when saving.
- “Save and New” will save the records and immediately open a new record - assuming no errors occurred when saving.
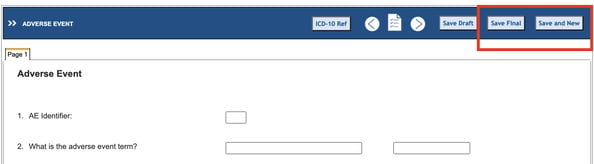
After saving, each record will populate the Log table.
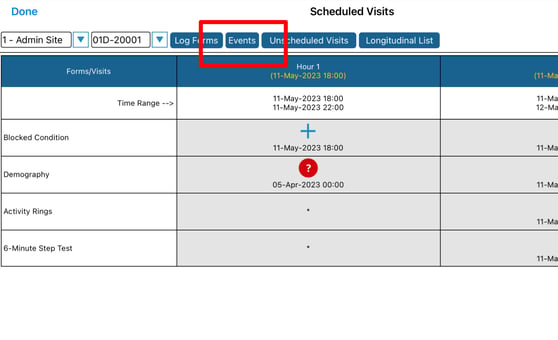
Event Schedules
Events are specific to ePRO studies where participants individually trigger a schedule of data collection that must occur. The Event schedule report displays those events and which forms within each interval have been completed.
To access the report within a subject's casebook, tap the "Events" button as shown below.
The "Events" button will only display if the current subject has events which have been triggered.
Web browser:

Mobile App:
This opens up a list of events that have occurred based on a chosen trigger. The trigger can be selected at the top of the report to open the corresponding events.
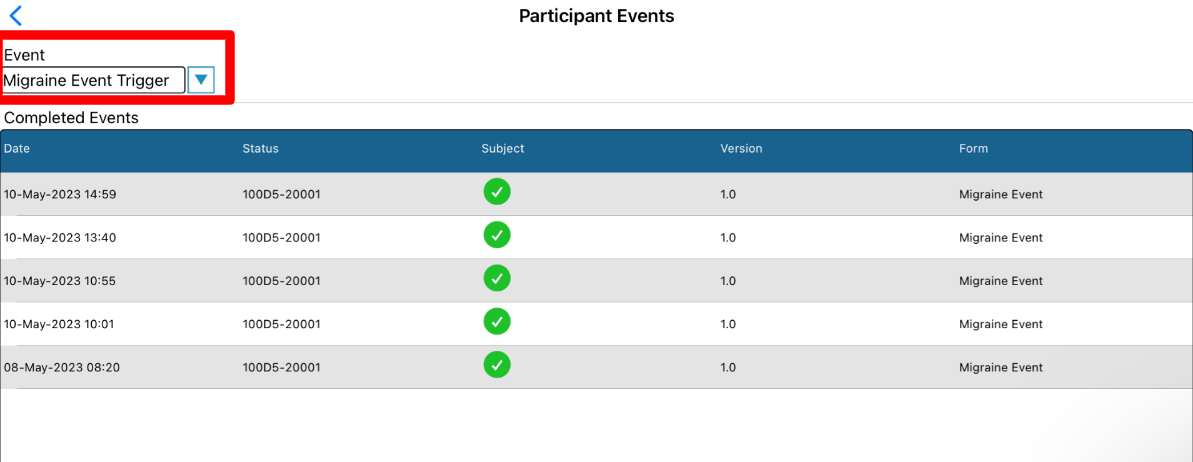
Each event in the list can then be tapped to open the intervals and forms that were completed in each event.
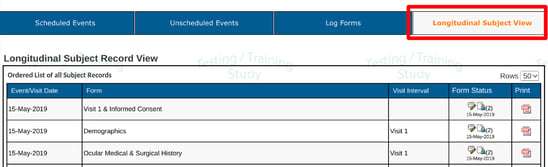
Longitudinal List of Records
This is merely a list of all the records saved under the current subject to-date, in date order. It's an alternative way to see all records in one view.
This is also a handy place to export PDFs of individual records or delete forms - based on permissions granted.
Web Browser:
Mobile App:
In any open form, scroll the toolbar to the right to access the list of forms

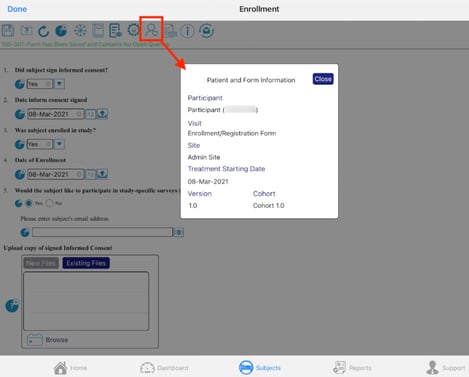
Current Subject Information
When a subject's casebook is open, the current subject ID and other summary information can be seen at the right side of the screen (web browser).
With a specific form open, additional details will display such as the current visit. This serves as easy reference during data entry or review to verify you are in the correct subject's records.
Web Browser:
The "Starting" date listed in the info panel can have various meaning. This is defined by the Study Administrator. The Registration date is the date from the Registration form (the form that was filled out to create the subject). The Starting date is the date from some other defined form that dictates when the subject actually started or enrolled.
Mobile App:
Opening the subject information window will display:
-
The subject’s pin - This is for ePRO studies only and is permission-dependent
-
The visit ti which the current record belongs
-
Site name
-
Starting date (this is the date from the registration form)
-
Study version
-
Visit Schedule cohort (if applicable)
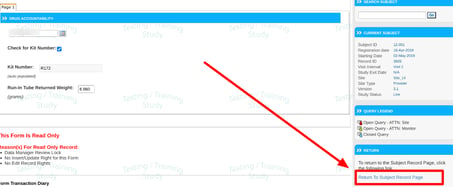
Navigating Between Records and Accessing Forms
When a form is open either for data entry or review, there are a couple of options to jump to other forms within the current subject.
1. Return back to the visit schedule with the quick-link at the right side of the screen (Web Browser only). If the form was opened from some other location like the Action Items or Queries Report, this link will return you to that location without the need to manually navigate back to where you were.
2. The arrows at the top of the form, regarded as the "Record Index" can be used to scroll through the list of existing records in date order. This is an alternative to navigating back to the visit grid/casebook to select the next desired form.

3. The Index list popup will open a list of all forms to quickly select one by tapping on an icon. The current form is highlighted.
On the web browser, from the resulting window, you can see the list of forms (log forms included) based on the following prioritized factors:
-
Visit Interval
-
Form Sequence - Setup by the study designer
-
Date - as applicable to log forms, which can be found at the bottom of the list below the scheduled visits
On the mobile app, this list will only display the existing longitudinal list of records.
4. To return all the way back to the list of subjects, use the main menu.
Mobile App:
With a form open, tapping the Done button in the upper left will return subject's schedule.
A long press will open the breadcrumb menu to jump back to the subject manager, as a shortcut to save a couple of extra taps.

You can also scroll the toolbar to the right and select the list of records to quickly jump to another form:

Site Summary Report
The Site Summary Report provides a comprehensive listing of the progress at each site.
Access to this report is based on permission to view the subject records page, and limits users to see only data for the sites in which they are a member. It is accessible from the subject manager screen.
Once open, a series of counts display the number of visits in various categories. Tapping on any of the numbers will expand the corresponding list. Tap on any subject ID to drill into that subject.
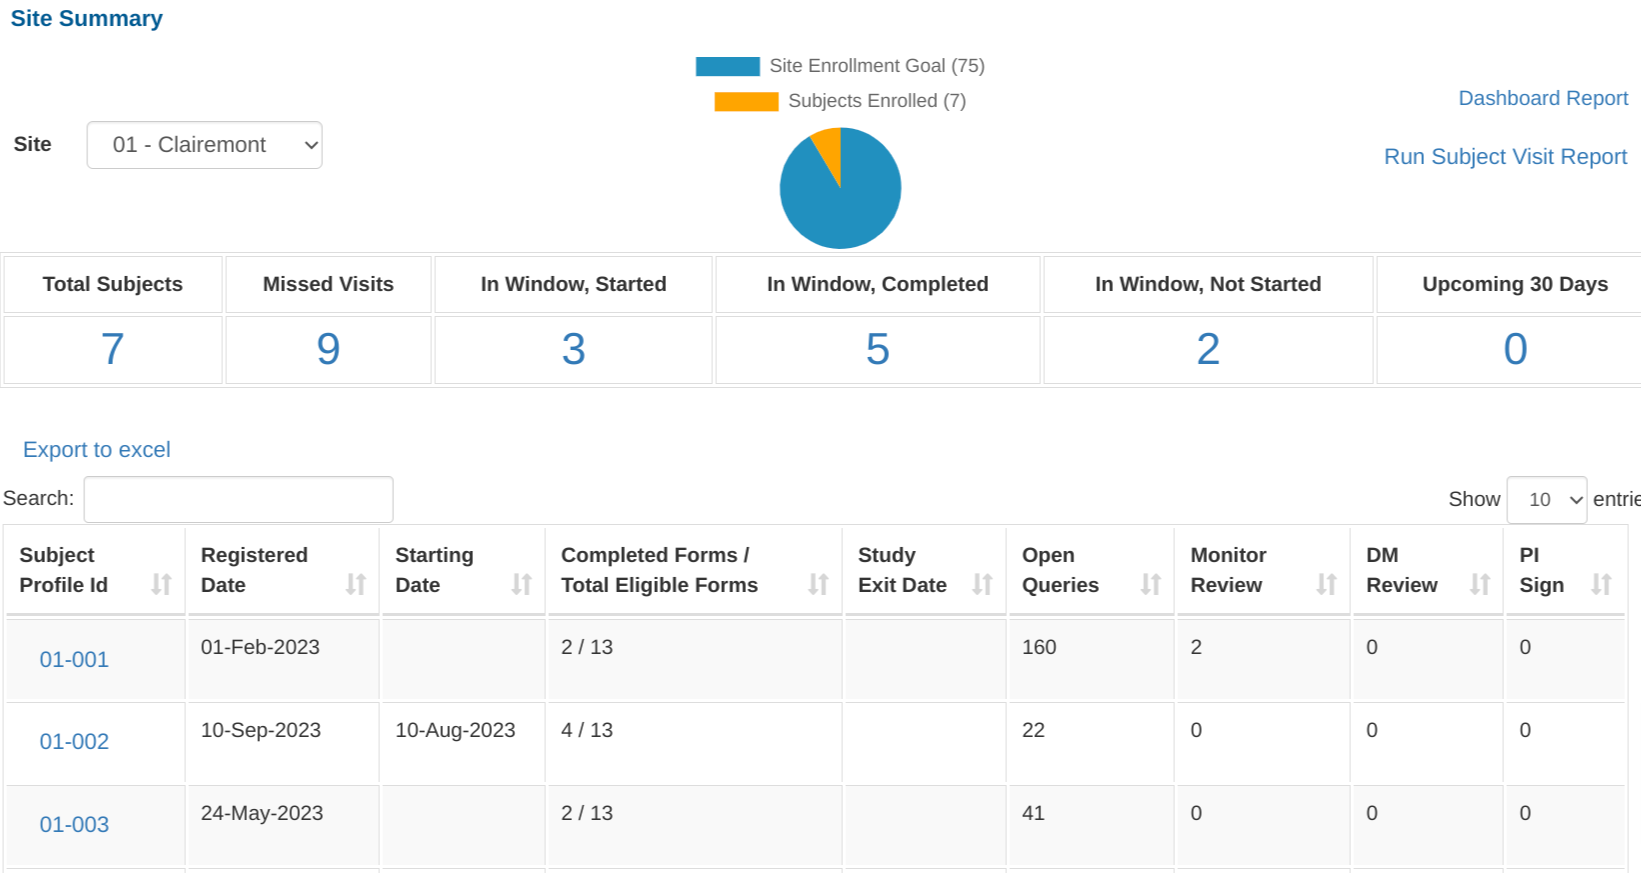
- List of subjects and the progress of each subject:
- Number of required forms saved without errors / Total required unhidden forms within scheduled visits. If study exit occurs within a visit date window, that visit and all later visits will not be counted.
- Number of records reviewed at each level
- Number of visits that are missing, counted based on at least one missing form in the visit
- Visits that are currently in window where data entry has started but not yet complete
- Visits in window where all required forms have been completed
- Visits in window where no required forms have yet been entered
- Visits upcoming within the next 30 days
The upper right corner of the screen also gives quick access to a couple other related reports:
- Dashboard Report
- Subject Visit Report download - for a detailed list of each visit across all subjects:
|
Column summary |
Column header |
Data type |
Description |
|
Site ID |
site_id |
Number |
Internal System site ID |
|
Site Name |
site |
Text |
Site Name from Site Manager |
|
Subject ID |
subject |
Text |
External Subject Profile ID |
|
System Subject ID |
sub_id |
Number |
Internal System Subject ID |
|
Visit Name |
visit |
Text |
External visit name |
|
Visit Interval sequence |
int_seq |
Number |
Visit sequence defined in visit schedule setup |
|
Visit Interval ID |
int_id |
Number |
Unique system ID for each visit within each cohort |
|
Cohort ID |
coh_id |
Number |
System cohort ID |
|
Cohort Name |
cohort |
Text |
Cohort Name |
|
Target Visit Date |
visit_interval_date |
Date/time |
Date defined in visit setup as the time “post treatment” |
|
Visit window low date |
low_window |
Date/time |
Low date boundary for the corresponding visit/subject |
|
Visit window high date |
high_window |
Date/time |
High date boundary for the corresponding visit/subject |
|
Visit Status |
status |
Text |
Complete/Incomplete based on the required forms in each visit being entered with a status of complete without errors or reviewed. This is automatically “Complete” for Hidden visits, or "Exited" for visits that are past the study Exit date (low window is after the exit date) |
|
Number of Missing forms |
number_missing |
Number |
Forms which are not entered, visit window is passed, and have not been flagged as Not missing via the action item report (scheduled visit forms only) If status is exited, then all the form counts will be 0 and the visit_started, visit_missed, and visit_missed columns will be false |
|
Number of entered incomplete forms |
number_incomplete |
Number |
Forms containing open queries - Only required forms within scheduled visits |
|
Number of forms not yet entered |
number_pending |
Number |
Forms which are both not yet entered and not yet due - Only required forms within scheduled visits |
|
Visit Missed |
visit_missed |
Text |
True/False - Visit window is passed, visit status is incomplete (at least one required form not entered in completion) |
|
Visit In Window and awaiting data |
visit_waiting |
Text |
True/False - Visit is currently in window with no forms entered. This is always false if the visit is hidden/not-applicable. |
|
Visit In Window and started |
visit_started |
Text |
True/False - Visit is currently in window with at least one required form entered, but visit status is not yet completed. This is always false if the visit is hidden/not-applicable. |
|
Visit upcoming in 30 days or less |
visit_upcoming |
Text |
True/False - Visit has an approaching low window date within the next 30 days. This includes hidden visits. |
|
number expected |
number_expected |
Number |
number of non hidden required forms for an interval |
|
number complete |
number_complete |
Number |
number of saved forms |
|
percent complete |
percent_complete |
Number |
Division of the previous two colums |
Data Entry
Data entry involves filling out a form either entirely or partially and tapping the Save button.
During form completion, some fields may be inactive or hidden due to conditions designed by the study Builder. If questions arise about data entry rules or form behavior, please contact your study Manager.
TrialKit Support Team is unable to help with questions related to data entry rules for a given study.
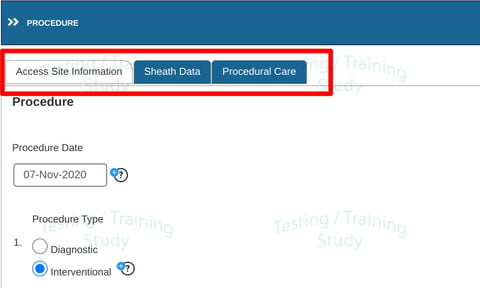
Form tabs/pages
Some forms may be designed with multiple pages or "tabs". This helps to visually break up different parts of the same form into smaller sections. If a form has errors and you don't see them on the current page, be sure to check other pages that might exist.
Tabbing across fields (Keyboard shortcuts)
On the web, the tab key on a keyboard can be used to move from one field to the next. The order is from left to right and then down the page.
The enter key will cause the for to get saved (for users that have edit permissions).
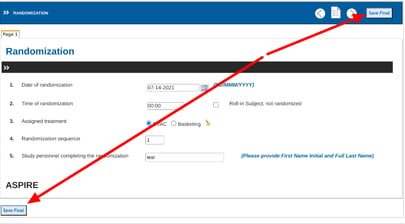
Saving Data
NOTE: Data is not auto-saved by default. The save button must be used when adding or updating data on a form. If Draft save button is available, that can be used to save progress without running system queries on the data.
Web Browser:
The save button is located at both the top and the bottom of the form. Either can be used. The enter key will also save the form. Think of this as a "Submit", where the data is being formally committed. It is different from Draft saving. In both cases you can always return later to correct the resulting errors or resave with changes.
Auto-saving as Draft
If Draft saving is enabled for the study, a button will be displayed with that option, but only on forms that have never been saved/submitted. If the form has never been saved formally, the system will automatically save data in draft state every 15 seconds. This helps prevent data loss on longer forms in case the browser quits or computer issues arise.

Mobile App:
The Save button is accessible at the top of the form.

Draft saving is also available if the study has it enabled.

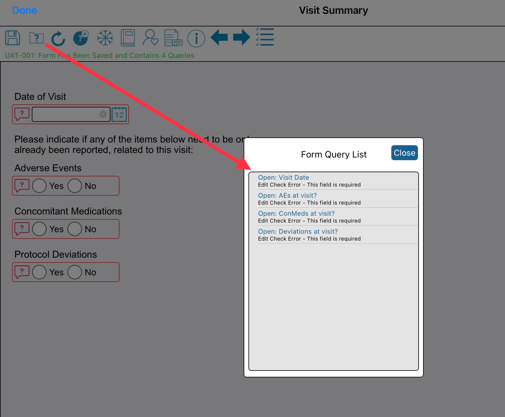
Viewing A Form's Errors
When a form gets saved, there is a popup window listing the errors. After closing the window, the errors can be seen on the form by red query icons next to the corresponding field(s).
For large forms where it is more difficult to locate the errors, the list of errors can be opened from the form toolbar at the top.
Within the list, hovering over the error will scroll the form to the corresponding field.
Web browser:
Hover over any error for the form to scroll to the corresponding field. Tap or click to open the query dialog directly.
Mobile app:
Tap to jump to the tab/page where the query exists. use the field labels as visual reference of which field it applies to.
Move a Form To Another Subject or Another Visit
Prerequisite: User has access to the "Move Records" permission and the permission to edit existing record, in subject record management.
With any form open, tap the Move Record option in the subject info panel on the web:

This will present a window to select the Desired destination visit or subject. If a Different subject is selected then the system will assume it's going to the same visit. A new subject and new visit cannot be selected at the same time.
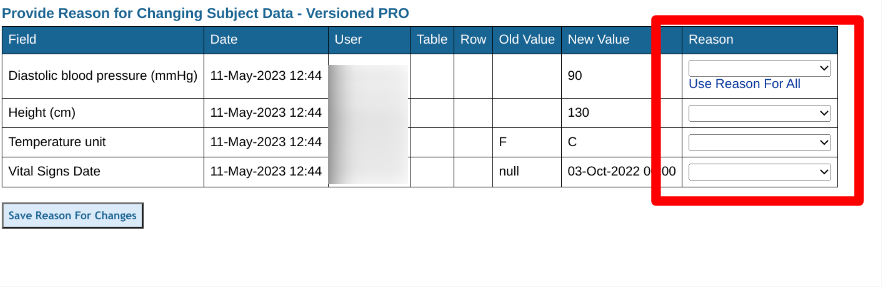
Updating Data On A Form - Flagged Reasons For Change
When changing data and resaving, the system will prompt for reasons for changing data. It's best to provide this immediately. If not, the form will remain flagged until reasons are provided.
Web Browser:
Mobile App:
The flags will pop up directly on the form during data entry as shown below.
To provide reasons for multiple changes, tap the flag at the top of the form.
TIP: In the mobile app, to exit a form and quickly return to the subject manager, tap and hold the Done button in the upper left to get the breadcrumb navigation options.