A Data Entry and Review Guide for Site Users
The objectives of this instruction include:
- General Information
- Signing In
- Registering/Adding New Subject/Participant
- Accessing Forms and Filling Them Out
- Searching for Subject/Participant
- Changing/Setting Grid Views
- Giving Subjects/Participants Access to ePRO
- Managing Queries
- Action Items and the Action Items Report
- Data Entry FAQs
General Information
Supported Browsers
TrialKit is validated for data entry with the following platforms:
- Google Chrome
- Microsoft Edge
- Firefox
Chrome is the only browser validated across all other lower-impact functions outside of data entry.
Supported Mobile Versions (Oct 2023 - Oct 2024)
- TrialKit on the App Store is optimized for iOS 16 and 17
- TrialKit on Google Play Store is optimized for Android 13 and 14
Any mobile OS version prior to the ones listed above could possibly have issues in isolated areas of the app. It would still be downloadable and perform key functions (opening and saving forms), but some functions may be problematic if they rely on device functions (camera, biometric based activities, location logging, and computing current dates).
User Preferences
The system will ask each user to set or verify specific information as a new user when signing in the very first time. These are:
- Preferred time format
- Timezone
- Privacy Policy agreements
A prompt will display until those are set. To later change preferences, access them as shown below for both the web and the app.
As an option, a phone number can be saved for the purpose of receiving 2-factor authentication codes if the study is configured for added security.
NOTE: By default, if preferences are not updated, users will see date fields in DD-MON-YY format and time fields in 24-hour format. Time zones are required to be set by each user when signing in for the first time. If a timezone is not set, the system will default to GMT.
If needed, user preferences can be changed, learn more here.
The date and time format must be set by each user individually. It cannot be forced as a single format for all users in a study.
Signing In
If you have been provided access to an existing study, you should have received an email from one of these addresses:
- webmaster@clsds.com
- mobileadmin@trialkit.com
That email contains a unique link to get signed in. The link must be used within 1 hour or else a new one should be requested via the "forgot password" option on the sign in screen.
If you don’t seem to be getting an email with your sign-in information, please take the following steps:
- Check your spam folder.
- Verify the following domains are white-listed with your IT department or email platform - clsds.com and trialkit.com.
- Request a new sign-in link by using the Forgot Password option. The email should be received within 1 minute.
- If none of the above work, submit a support request to have a technical team member verify the email is being sent.
Use the link contained in that email to sign in. The link expires 60 minutes after being sent. If yours is expired or you didn't receive a link but were told that you should be able to access the system, simply request a new link by using the forgot password option. Be sure to use the same email address that was registered with the system by your study Administrator.
Alternatively, you can find the website at trialkit.com or via the TrialKit mobile app on both the iOS app store and Google Play. From there, use the Forgot Password link.
Prompt for Basic User Settings
After signing in for the first time, the system will prompt for timezone and agreement to site policies as described above under General Information. Please be sure to set the correct timezone for your region to ensure data checks function correctly on the study.
Biometric Sign In
After your first sign-in on the mobile app on a personal device, biometric sign-in will be an option to make access more secure and convenient.
2-Factor Authentication
Some studies may require 2-factor authentication. If this is the case, a 4-digit code will be sent to your email address for any new device you sign in with.
Subject Management
The Subject Manager is where subjects (also referred to in this knowledge base as "Participants" or "Patients") are registered in a study and where their records can be accessed. This is dependent upon your user permissions.
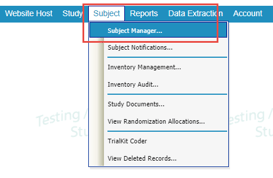
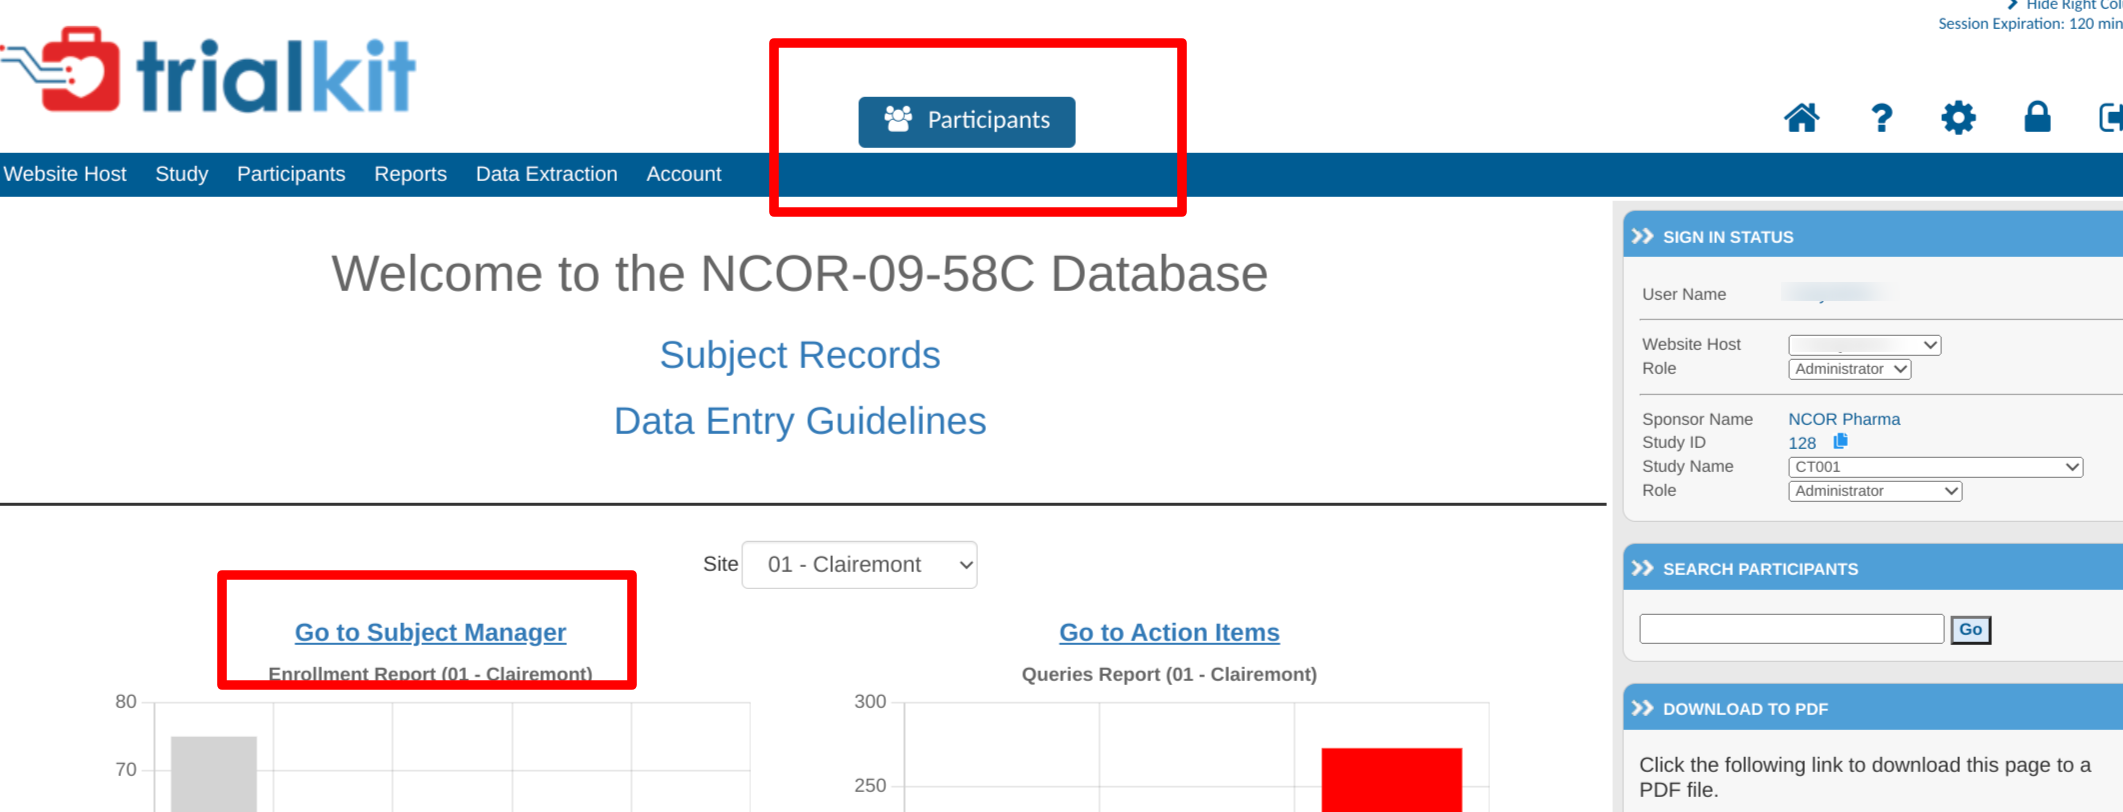
Web Browser:
Locate the Subject Manager under the Subject menu in the menu bar, or via the button in the top header area.
The terminology used for "subject" may vary from study to study. This is defined by the study Manager.
Mobile App:
The Subject Manager is found in the bottom navigation panel, or by tapping "Access My Subjects" from the Home screen.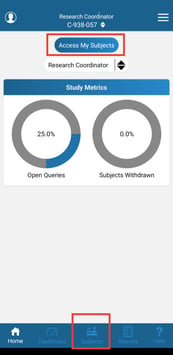
Once inside the Subject Manager, you will be able to register new subjects as shown below and access current subject casebooks by tapping on the subject ID.
Registering/Adding New Subjects
Depending on the study, subject IDs are either automatically generated or manually entered. This and the format of the profile ID will depend on how the study is configured. In this example, the system will auto-generate a new subject profile ID.
Web Browser:
Tap the button to add a new subject ID and open the registration form. The button may be titled differently across studies.

Mobile App:
Tap the add new subject button.
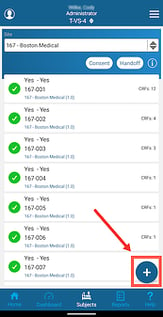
Once a new subject is created, The ID will display in the table. Tapping on the ID will open up the subject's casebook for entering additional forms.
If the registration form contains any errors, the subject's casebook cannot be opened. Errors must first be resolved on the registration form.
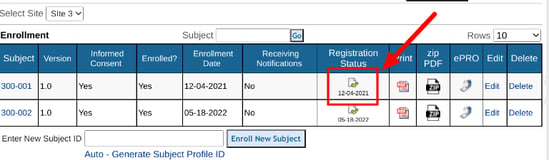
To re-open the initial registration form, tap the status icon on either the web browser or mobile app.

Read more in these links about the following topics:
Searching for Subject/Participant
The subject search option on the right side of the page is a quick an convenient way to jump to a specific subject ID, or directly to the subject listing (Subject Manager page). This is the section that gets keyboard focus within the subject manager so it's always easy to start typing, tap enter, and jump to another subject.
Requires the user has access to Subject Record Management -> View Subject Registration
The search box is able to search not only subject IDs but also all date and text fields that exist on the subject registration forms. For example, if subject initials or birthdates are collected, those can be used in case the subject ID is not easily known.
Only subjects at the current site will be searched, to prevent users from searching for subjects at other sites. The current site is simply the last site you visited in the Subject Manager. If other site searches are needed, it will be required that the site be switched from the top of the Subject Manager page.
If an exact ID is entered, the system will navigate directly to the records page of that subject. Once done working on that subject, simply hit enter to jump back to the subject list, or type in a new subject.
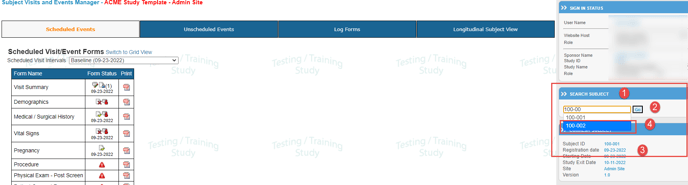
1. Search Subject Section
2. If the search criteria have multiple matches,
3. Search from one record to go to another quickly.
4. Search has a list of the possible matches that will display and the subject manager page will filter by that criteria, after which the user must manually select which one is desired.
The search is not case-sensitive.
To clear the current search criteria, just click the "Go" button or hit enter with no search criteria in the box.
Providing Access to Study Participants (Patients)
If the study is registering Participants to access their own forms for data entry (ePRO), the registration form will contain a field on the form for collecting the Participant’s email address. When adding an email address, please make sure it is an email owned by the Participant.
The system will run checks to verify the email address entered is NOT:
- Already in use by another subject in the same study
- Already registered within TrialKit as a Clinician user
Patient Privacy:
Collection of the patient/participant's email address is necessary to give the Participant access to the system and send notifications on forms that become due.
TrialKit is HIPAA-compliant and focuses heavily on data privacy. Email addresses are not attached to Participants' data and are blinded to other users in the study who do not need access. Each study should have its own privacy practices to properly enforce who is able to view the Participant's email addresses.
Use of fictional or un-owned email addresses:
TrialKit's end-user agreement requires that email addresses collected by the system have been given explicit consent by the address owner to be saved and used by Crucial Data Solutions solely for study-related activities.
Crucial Data Solutions prohibits the use of fictional emails that are not owned by either the Participant or Sponsor. Email addresses that bounce or report spam will greatly impact the study’s ability to deliver email notifications effectively to all of its Participants.
Managing Your Queries
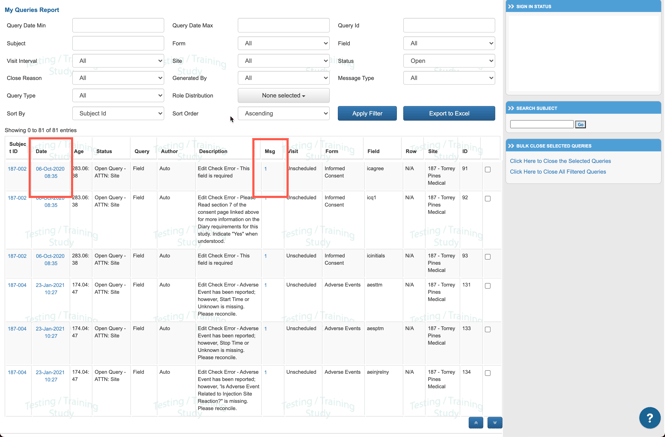
As data is entered on forms or as data is reviewed, queries may be opened. There are two types of queries: System queries and Manual queries. All of these can be seen and managed from the Queries Report - located in the Reports menu.
Once open, you will see a table like the one shown below. This report contains links to the corresponding form where the query exists and options to view details or comment on the query. Tap on the "Msg" column to open the query details and post comments or close the query, depending on user permissions.
Web Browser:
Mobile App: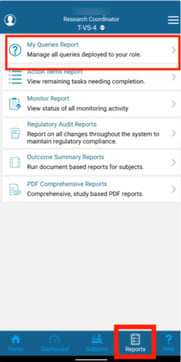
Once open, you can choose between the different query types.
The resulting list can be filtered further if needed via the filter icon at the upper right corner, or exported via the share link at the bottom right.
Tapping any row in the queries table will open the record where that query exists. Tapping the dialog icon on the right will open the query dialog for posting a message or closing the query (permission dependent).
Read more here to learn about query definitions and management.
Action Items and the Action Items Report
The Action Item report is helpful for Coordinators, Monitors, and Investigators to access a combined list of key action items that help drive the progress of data collection. It provides a listing of the following:
- Records missing - Visit window has passed
- Records with open queries or errors needing to be resolved
- Records where data was changed and reasons for change are pending
- Records awaiting review or eSignature
Users may see different items in this report depending on individual roles and permissions.
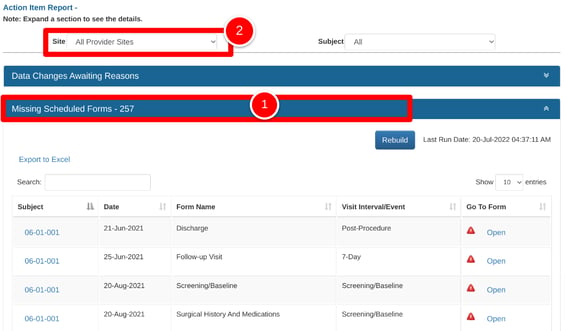
Access Action Items within the Reports menu on either the web browser or mobile app.
Within action items, select one of the available sections and then change to the desired site via the filter at the top.
If using the Missing Forms section, like the example below, take note of the "Last Run" date indicated at the upper right. This will let you know if the report needs to be refreshed for an updated list, or if it's already been refreshed for the current day. This can take some time for higher-volume studies.
Read more here to learn about the Action Items report.
Data Entry FAQs
Q. Can I open multiple browser tabs/windows?
A. We do not recommend opening multiple windows/tabs because it may lead to conflicts with saving data if multiple subject records are opened at once by the same user. If those conflicts do occur, the system will display an error message.