Setting Up and Running Ad-hoc Reports (Custom Data Listings)
The Report Builder tool provides a means of pulling specific variables or measured outcomes together into targeted listings for a quick view of data that needs to be reviewed, tracked, or made available to specific user roles - including study Participants. This is an alternative to exporting all the data and then needing to filter or report on it outside of the system.
Accessing and Running Reports
Reports can be run from multiple areas:
From the report builder
Subject Manager
Subject Casebooks
Form toolbar, when viewing a form (subject forms and site documents)
Prerequisite
User role has Access to Report Builder
The report builder is accessed under the reports menu.

If your user role has been given access to one or more reports, they will display in the table of reports. Use the Execute option to run a report on screen, or the Export option to download it directly.


Tip
When running a report, use AI to ask more detailed questions about the data it contains. Read more here.
Run reports for all subjects at a specific site
From the Subject Manager, with a given site selected, the same reports can be executed so they are pre-filtered for the site’s own data.

Run a report for a specific subject
From the subject casebook, the same reports can be executed for the current subject. This is very helpful when data needs to be seen across various forms in a single view.
From the Participant’s casebook screen, access the reports from the right side (web browser only):

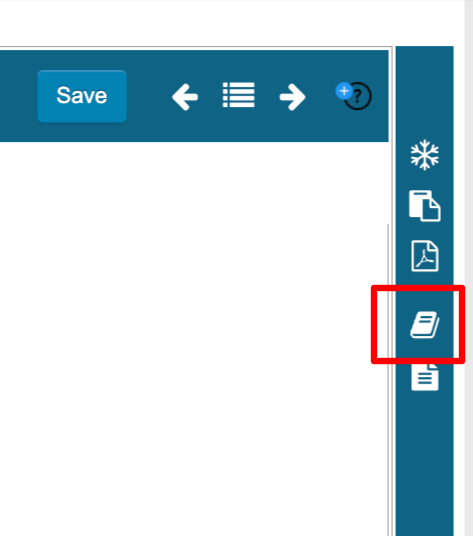
Run a report during data entry
This can be done on either subject forms or on site documents to get a quick reference of other relevant information without leaving data entry. In site documents, the options will be limited to site reports.
Look for this icon in the form toolbar:
Creating and Modifying Reports
Prerequisite
User has Access to Report Builder and access to Create or Setup a Report
The creation of a new report first involves defining the basic parameters:
The forms from which data is to be included in the report
The user roles that will have access to view the report
Web browser


Mobile App

1. Name the report and choose what type of data to include. The name can be any name with a maximum of 100 characters. The report name is displayed when the report is executed so the name should be representative of the data in the report as closely as possible. Options of what to include:
Use Label Header - Use reporting label instead of the field name, as defined in the form builder
Include Draft Records - Include records saved as a draft (not applicable if the study does not include draft saving)
Exclude Admin sites - By default, reports include both Provider and Admin site data. Check this option to only include Provider site data.
2. Choose which form type to build a report from. Participant forms (data collected in the Subject Manager) or Site forms (data collected in site documents).
3. Select which role(s) will be able to view the report. This assumes the selected role(s) also has access to the report builder. User roles that don’t have the ability to define their own reports will need reports created for them and deployed to their role. 4. Save the report to populate the table. Now the report can be set up with specific data and filters as described below.
Blinded fields are supported in the report builder when reports are run. If a report includes variables that are blinded to certain roles in the study, and if those same roles are given access to run the report, they will not see the blinded data when they execute or export the report.
Defining the Report Variables
After a report has been initially created, it is ready to be set up with more detail, including which variables to include in the new report.

At the top of the next window, select a form in dropdown at the top. From the list of available fields, add them to the 'Included' column. Do this separately for each form that was included in the report.

The first form (the parent form that gets joined to), will provide additional system variables to optionally include in the report. When these are included, they may repeat for each form in the report. For example, if visit name (interval name) is included, there will be one interval name column per form to identify the interval name for when that form was collected.
The same can be done for filters that need to be made available in the report for the user to quickly filter on key variables.
Mobile App

Common variables
|
|
|
Field variables
All the fields on the form will be available to include in the report. The order they are placed in the list will be the order they show in the report.
Dates will export in the format that the exporting user has set in their user preferences
e-Signature data - If an e-signature variable (name is user defined so will vary) is available on the form and included in the report, it will create two columns in the report. One with the user name and one with the date of the e-signature. The columns will be named based on the field/button label. If multiple users e-signed, only the most recent one is displayed in the report.
Uploaded files - if an upload field is available on the form and included in the report, the column information will include a text string with the following info: “File name : date+time : system file ID”
Custom Variables
Expand to view content
There is also an option to include blank/placeholder columns. This can be useful for defining a place in the report that will get filled in with a non-TrialKit variable by another program after the report is exported from TrialKit.
On the report setup window, tap the custom variables link

Joining data from multiple tables can be confusing, so it’s important to understand the relationships of data in the study.
TrialKit uses a Left Outer Join method. This is opposite of the Standard Join in that a table row will still be included in the report even if the joined table has no matching row. for example if Participant ID from Demographics is being joined to the Heart rate value on the Vitals form, and the vitals does not exist for a given Participant, The Demographic data will still display as a row in the report. Alternatively if multiple Vitals have been entered for a given Participant, the report will repeat the single Demographics data for each row so that it can show the multiple vitals records.
Report Configuration
Because of the longitudinal nature of clinical trial data, it is very important to understand the relationship between the forms. Imagine a typical trial. The central entity is the Participant. Case Report Form data is captured concerning the Participant. How that CRF data relates to that Participant is very important. The form can have 3 types of relationships:
One to One
One to Many
Many to Many
One to One
This is the simplest of all relationships. It means there is exactly one record per Participant per form. A good example might be the demographics form. Normally, there is only a single demographics form to complete per Participant. If the enrollment or Registration data is the master Participant record, then the demographics record can be joined right alongside it.
One to Many
An example here is when wanting to view something like Demographics (collected once) to Adverse Events (collected many times). When joining variables from both tables, it should be expected that for a given subject, the Demographics data will show repeated down each row based on the number of rows of Adverse Event records that also need to display.
Many to Many
Things get a little more complicated when relating data from two forms containing many records per Participant. A good example of a ""Many to Many"" relationship is when comparing Medications to Adverse events.
Here's an example of a subject with two AEs and 2 related CMs:
.png "image(204).png")
Building a report without setting up the form configuration, the output ends up giving four rows of data (one for each record):
.png "image(205).png")
From the above, it's hard to see which CM each AE is related to. This is where the form configuration comes in. It can be updated to this:
.png "image(206).png")
With the above, the system is being told that each CM is related to an AE if it occurred within four days of the AE.
The Form's visit date field is how the report determines the Days Before/After
Now the output makes more sense:
.png "image(207).png")
Basic Rules when using the Form Configuration
The sequence in which forms appear is determined by the order designated in the Form Configuration Table.
If required is not checked for a form, the Participant will appear in the report with empty columns if the given form does not exist for the Participant. If required is checked for a form and the form does not exist, the Participant will not appear in the report.
Relate one form to another and use the Days Before and Days After to select which forms are related.
Modifying Existing Reports
If you have access to setup/modify reports, existing reports can also be modified.
Use the edit button to modify basic report parameters
Forms included
Report properties
Roles that the report is available to

Use the Setup button to modify variables and filters for an existing report

Export List of Reports and Details
The reports list and details of each report can be exported if needed to see all the high-level details, including all the forms and fields included in each of the reports.
To export the list, tap the export link at the top of the reports table.
.png "image(208).png")
The exported file will only include reports that are available to the user's role.
Role Targeting/Report Visibility
Users will only be able to access reports if the reports have been made available to their role within the report configuration as described in the section above.
Points Regarding Report Visibility for a Given Role
If a role is given access to a report be sure that role also has access to the report builder.
If the role is a site type role, the user will only see data for the site(s) in which they belong.
Field blinding is enforced on reports - so if a user is blinded to a field that is included in the report, that data will not display when they run the report.
Users with reports targeted to their role will also be able to access them in both the Report Builder and within the Participant's casebook screen.
If a report is targeted to a Participant user role, the Participant will have access within the Participant web portal on the web browser.
Custom Reports
Custom reports are written by CDS on a per-customer basis.
If this has been done for your studies, those reports will be accessible from a couple places:
Prerequisites
Your role must have access to a custom report to download it. The data provided will be based on the site(s) you belong to.
The subject manager, within the Custom Lists report:
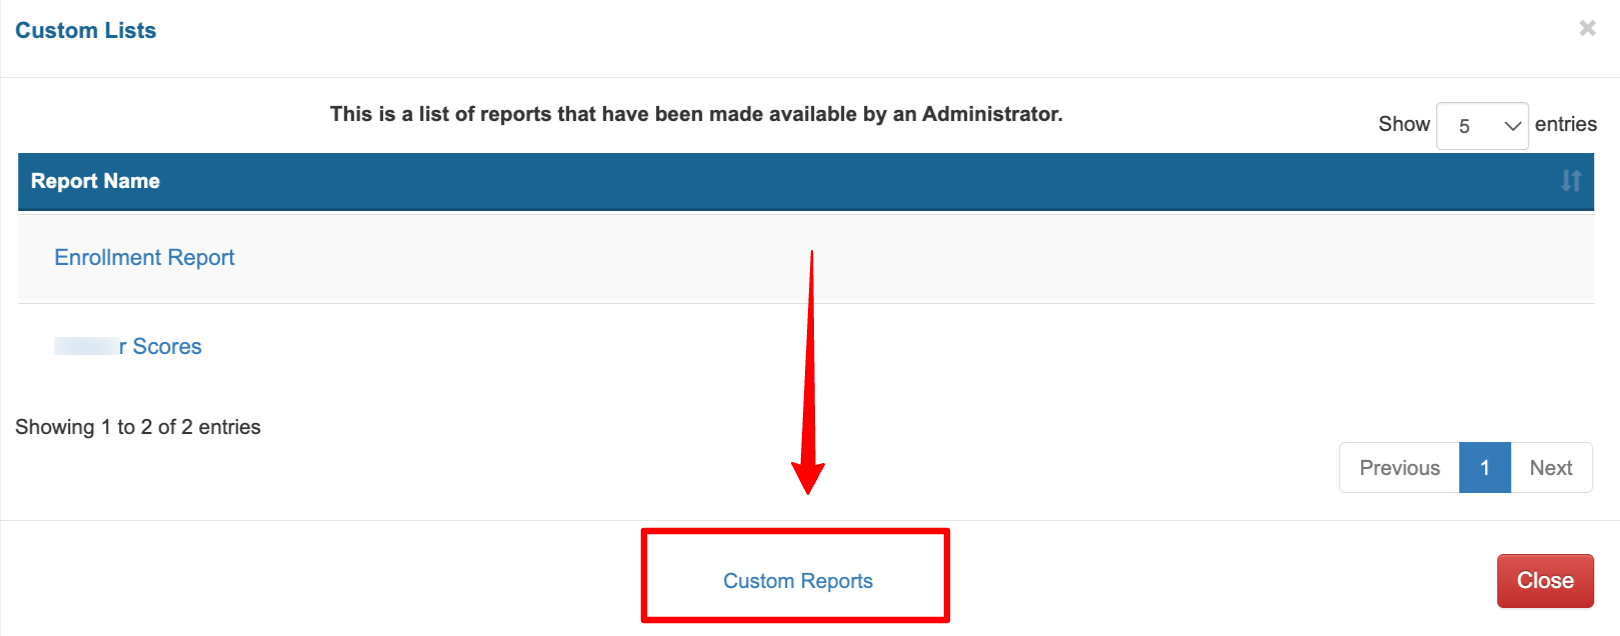
In the Report Builder at the right side of the screen.
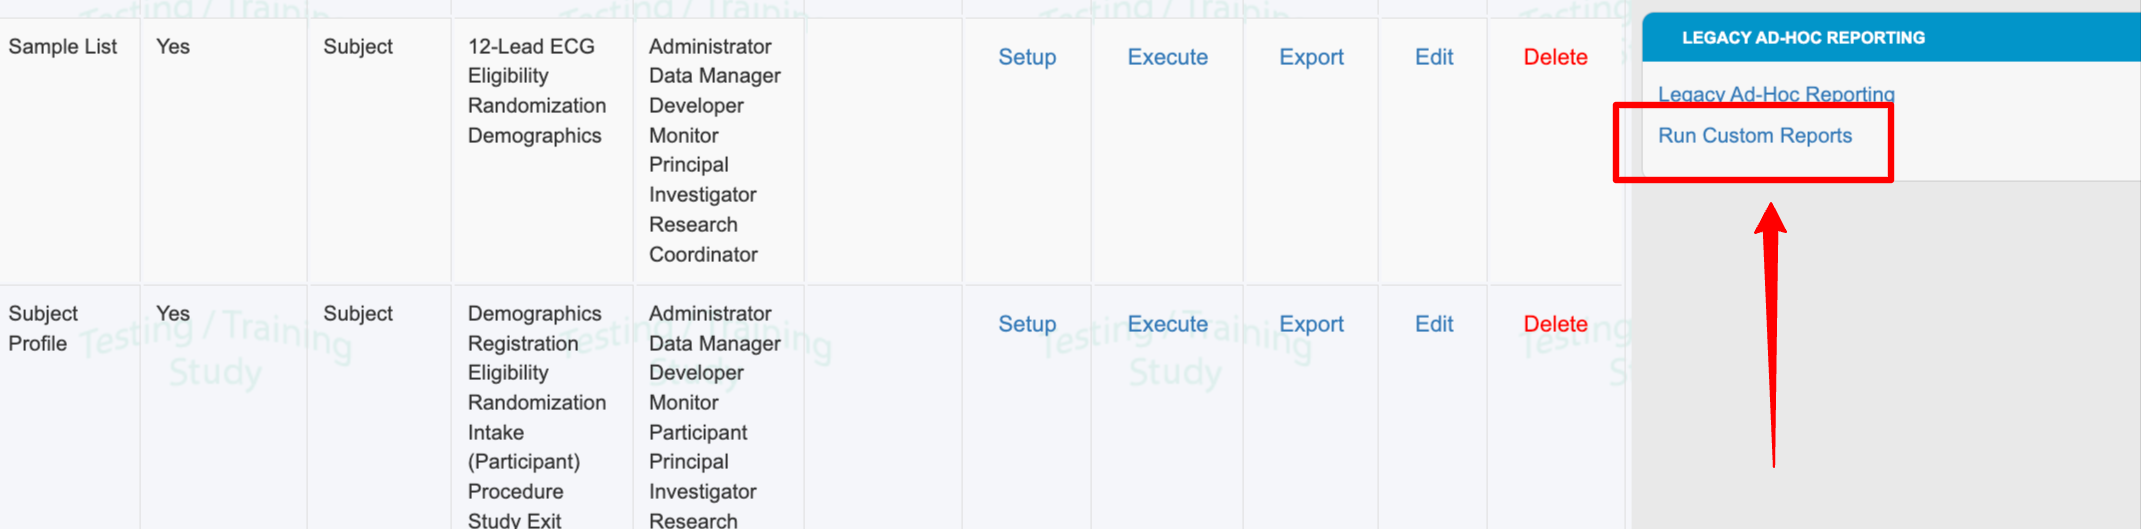
If this opens to an empty table, that means there are no custom reports available for your study.