Descriptions of the Various Tools Available for Form Builders
Table of Contents
Navigating or editing pages/tabs on a form
Export Blank PDF (single form)
Export Full PDF Casebook (visit order)
Notifications and Distribution Lists
Translating or Updating Form Text
Setting Field Source Verification
Form Building and Editing
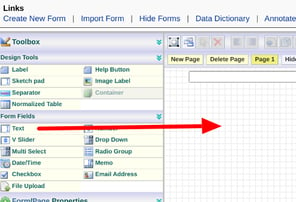
Form Design is made easy in TrialKit with its drag-and-drop approach and various tools for sizing, moving, and copying objects around a form's canvas.
Adding New Fields or Labels
Tap and hold on an object and drag it out onto the form's workspace.
Web Browser:
Mobile App:

Selecting Objects
Selecting objects is necessary for moving them on the form, copying/cutting, or accessing the field properties for a given field.
Tap any object on the workspace to select it, or drag a box around several objects to select all of them. On the Mobile app, this is done by tapping and holding for 1 second before dragging your finger or stylus.
The form builder on iOS brings some great improvement for selecting multiple objects in a couple other ways.
Batch select objects manually
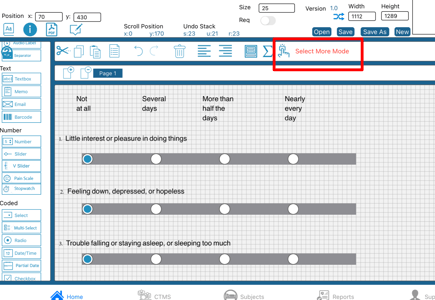
Select all items below the current selected item
This is especially useful in mobile where dragging a box down the form is not as easy as the web.
.png)
Select all fields
Web Browser:
Mobile App:
Quick Alignment
To quickly justify selected objects to the left or right, use the alignment tools.
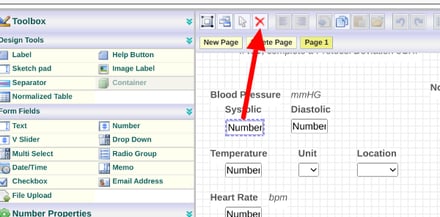
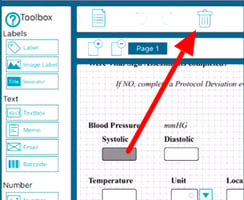
Deleting Fields
Select a field or group of objects and tap the delete button.
Web Browser:
Mobile App:
Please note that deleting fields on a Live study will remove the data and any external variables that depended on that field. It normally only makes sense to delete a field on a study in its initial development. An alternative to deleting is using the hidden field property or blinding the field to users.
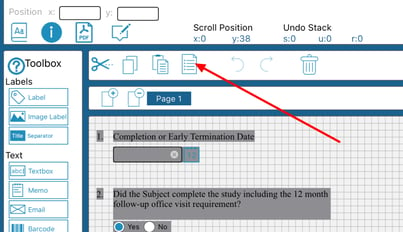
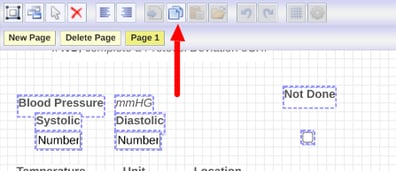
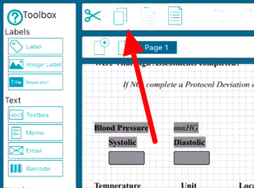
Copying and Pasting
Select one or more objects and then the copy or cut function above the form.
Web Browser:
Mobile App:
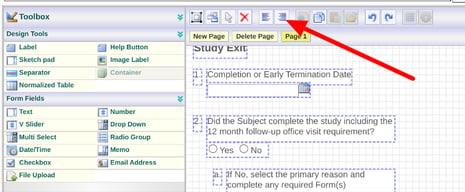
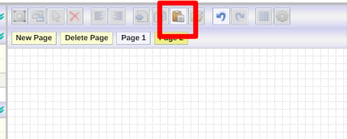
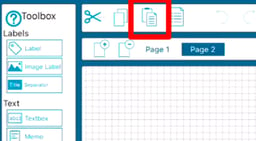
Then tap paste and drag the new objects to where they are needed. If the objects need to be pasted on another tab, navigate to that tab first before pasting.
Web Browser:
Mobile App:
Conditional actions will not be carried over when pasting fields. Those can separately be copied and pasted as needed (detailed in the conditional actions help article).
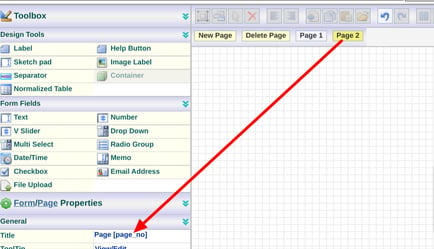
Navigating or editing pages/tabs on a form
If you wish to split up content on a form across multiple pages, use the paging tools (also referred to as "tabs"). With a page selected, it can be named or removed.
Searching Field Names
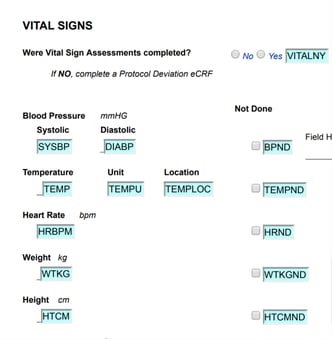
The person who built a form is normally the only one knowledgeable about field names and where those fields exist on a form. Any other user with access to the form builder may have a harder time finding where a specific field is located, for example if it needs to be modified or referenced. This is where the search comes in useful.
The field name search searches all field names across all forms. For example, here the Visit Summary form is open and the user wants to find all field names starting with "WT"
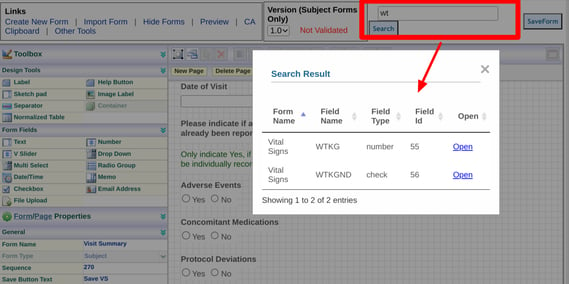
Tapping "Open" then redirects to that form and highlights the field on the form.
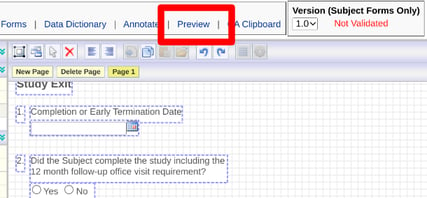
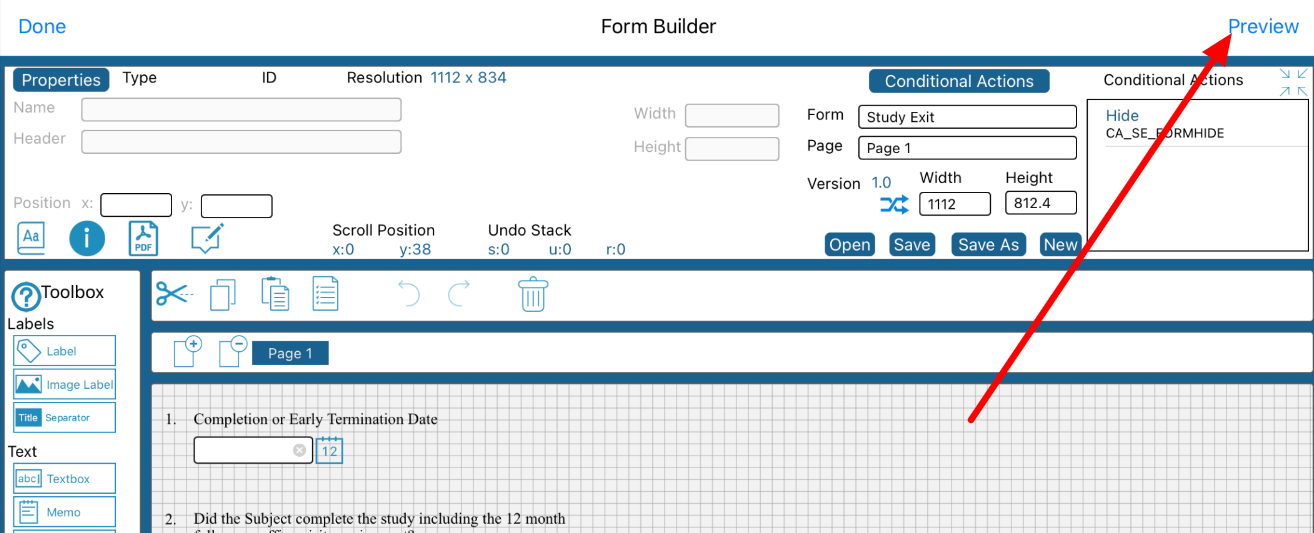
Previewing A Form
To visually check the layout of a form outside of the workspace, use the preview option shown below.
It is recommended to bypass this preview tool and instead open the form under a test subject. This is because some objects or form behaviors cannot be supported in preview mode.
Web Browser:
Mobile App:
Data Dictionary
The data dictionary is a system-generated blueprint of the forms and their properties. These are especially valuable when performing validation of the various behaviors which have been built on a form.
These files can be used to perform requirements testing and validation documentation.
The data dictionary details every characteristic of the form content across three categories:
- Form properties and form-level conditional actions
- Field properties
- Field conditional actions
These are accessible via the following link (only on the web browser).
Web Browser: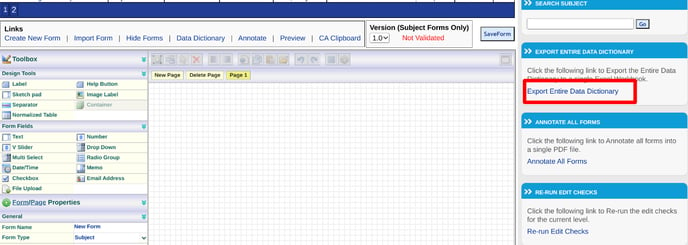
Select which study version or other form types, followed by the export button for the type of details needed as shown below.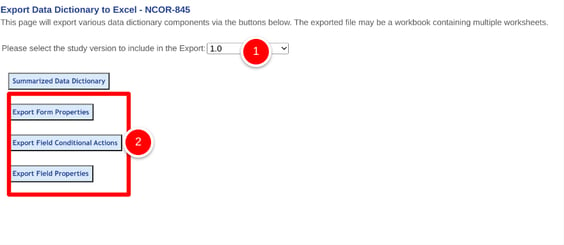
The exported file name will contain the date exported and the study name.
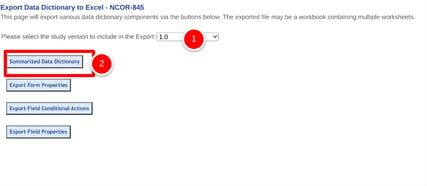
Normally the options above are the best for a detailed layout of form content. Other times, a summarized version is sufficient for quick review. If you have a form open, you can create a summarized data dictionary for that form, focusing only on the field conditional actions and primary field components. Use the quick link, Data Dictionary found above the form workspace shown below.
Web Browser:

You can also get a summary of the entire data dictionary for all forms:
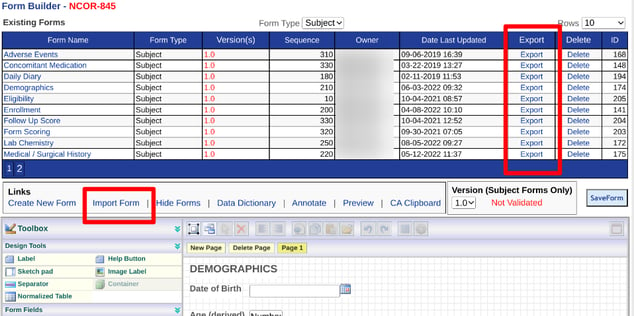
Importing/Exporting Forms
Forms can be imported from form libraries, complete with edit checks and other conditional actions, or from a CSV file to quickly create an initial template prior to further editing within the form builder. This is a powerful way to move forms across studies and avoid the work of reproducing them.
Importing from a Form Library
Importing and exporting is done from the Forms Manager table (web browser only) shown in the example below.
Web Browser:
Once you select "Import" or "Export" you will be prompted to choose which library to Import/Export with.
Note, Public Libraries can only be imported from. These are managed by the TrialKit Team
Private Libraries are specific to the current Host and can be freely imported into or exported from by any user with access to the form builder for any studies within the host.
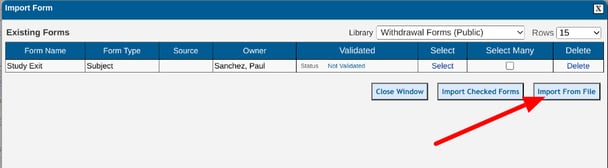
Import From a File
Importing a form from an external file is useful for instances where a form is being created from scratch or from outside of TrialKit. It's a good method for getting all the right fields and labels into a new form. Note, file importing cannot be used to update an existing form.
To import a form into the Web form builder via a file, follow the instructions in this section.
Set up a CSV file with the following column names at a minimum:
- Form_Name
- Field_Type
- Field_Name
Other optional columns can be added to set some of the common field properties.
Use this sample as a template to see how field types should be named and the other optional column headers that can be included.
Importing the file: After tapping the "Import Form" option described above, Select the "Import from file" option:
Rules to be aware of, as shown in the sample file:
- One file will only create one form. Do not use multiple form names in the same file.
- For field properties, use either TRUE/FALSE or 1/0 to enable/disable the respective property.
- Log forms will be created with a relationship of 'Many' by default.
- For choice fields, the "choices" column must be last. It will serve as the starting point of all field choices for the given field. Each code and text equivalent will be in its own column.
- The visit/transaction date will be set to the first date field in the CSV file.
- The "label" field type, does not need a field_name and will use any text found in the "text_label" column for the label text.
- The valid Range column will allow a user to set low-high range field properties by using a format of 9 - 19. Min and Max need to be separated by a dash. If only one number is in the column, It will be the min.
Annotating Forms
Annotated forms can be produced in various ways depending on the objective. The following three options are available:
- Export a single annotated form with a complete data dictionary
- Annotating All Forms with Complete Data Dictionary
- Annotated Forms as a Casebook View
The mobile app can also export blank PDFs - individual forms.
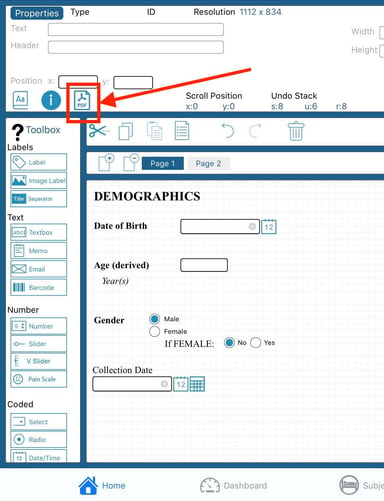
Exporting a Single Annotated Form With Complete Data Dictionary in PDF Format
The single annotated form provides the CRF and additional information about each field including the Field Number, Label associated with the field (if applicable), Name of the field, Type of field, Length of the field, Choices for the field (if applicable), and any Conditional Actions.
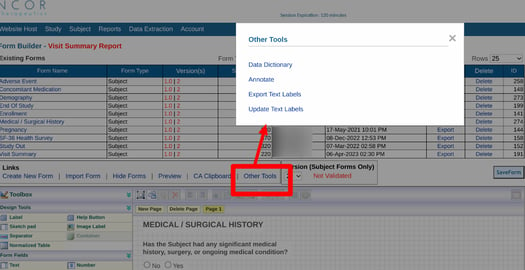
To export a single form, start on the Form Builder page. Select the desired form to open in the workspace, and tap the 'Annotate' option above the form as shown below.
Web Browser:
From "Other tools", choose the Annotate option.
The PDF will download to the computer's downloads folder. The Annotated PDF document shows the layout of the CRF with a field number displayed by red-colored numbering. The field number corresponds to the Field Number displayed on the Form Summary listed directly below the form in the exported PDF file.
Annotating All Forms
On the forms screen, there will be an option to ANNOTATE ALL FORMS on the right side of the screen as shown below.
Web Browser: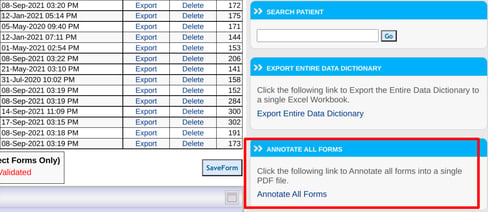
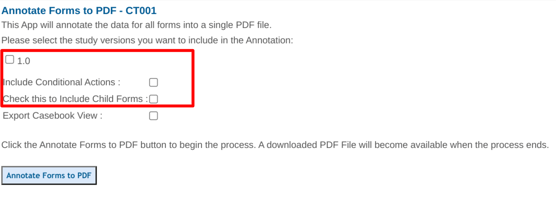
Do not select any versions on the screen that follows if you want to annotate study/site-type forms.
If conditional actions are not included, a simplified data dictionary will be produced, which leaves out conditional action details.
By default, the system will not include child forms built for device/language optimization. If these are needed, check the box shown below to include Child forms.
Annotated Forms as a Casebook View
To export all the PDFs in visit order based on how it would look under a study subject, use the casebook view. This leaves out all data dictionary details and exports a single file of only the forms as they would appear in a physical visit-based binder.
Web Browser:

When exporting the casebook view of the scheduled visits, it is important to select which visit schedule cohort is desired.
Unscheduled visits and log forms must be separately exported. They will be exported in sequence and alphabetically.

With Casebook view selected, you can also choose to include the "field name annotations" to help with SDTM submissions. This will produce the same PDF, but with field names labeled next to each field as shown below.
The PDF file includes embedded bookmarks by Visit for convenient navigation within the PDF.
Export Blank CRFs - Individual Forms
Web browser:
With the desired form open in the form builder, tap on Other Tools.

Mobile App:
Tapping the button highlighted below will automatically open the PDF preview and also export the PDF instantly to the device's iCloud TrialKit folder (iOS only). No further action is needed.
If the form content goes off the page due to the parent form design, it's simple to create a targeted child form for the purpose of paper data entry. This way you can have separate layouts for PDFs without impacting the validated electronic version.
To create a targeted PDF version of the form, follow these steps:
- Create a PDF size option in the device dictionary. If the paper width is 8 inches (accounting for .25 inch margins) and there are 100 dots per inch, then any forms targeting this size would screen width setting of 800 pixels wide. Dots per inch x paper width = CRF width.
- Open the parent form in the form builder (do not tap save).
- Open the form properties.
- Target the form to the PDF size option. A message will indicate when complete.
- Without tapping the save button on the parent form, open the form library list and select the newly created PDF child version of the form.
- Change the layout as desired for the paper version of the form. 300 DPI is generally a good setting to display all content of most forms.
- Save the changes.
- Tap the PDF export button shown above.
If some of the content is off the boundaries of the PDF page, adjust the DPI settings in the form properties to a higher value. Normally, a value of 200 is enough to fit most forms on a PDF page.
From the IOS app, these are exported to the device’s iCloud folder. If the margins are off the page, the form properties DPI setting can be adjusted.
Notifications and Distribution Lists
Notifications and Distribution Lists must be configured prior to utilizing them within Conditional Actions. This tool provides users with the information they need to know as data entry requires. A common example is notifications for new enrollments or for adverse events.
Read more here on this topic.
Translating or Updating Form Text
It is possible that the text on a form needs to be reviewed and updated from outside of the form builder. A common use-case for this is when forms need to be built in English for validation purposes and then quickly translated to another language because all data entry on that form needs to be in a given language.
This is different from building targeted forms in multiple languages. Targeted forms are used when the parent form needs to remain in English and all the data from multiple form languages need to be saved as part of the same form (one data table in the exports).
There are two methods to update all the text on a form:
- Download all the text to .tsv file, update it, and then re-import it
- Download the text to a Json format and re-upload it. This can be done manually or via the web API.

The Json format option gives a comprehensive view of all text, including hover help and edit check error messages. This method is intended for professional translation organizations that can make quick use of a Json format. The .TSV file on the other hand is a more basic approach to update only the text labels readily visible on the form.
To get the basic .tsv file, the first step is to export all the text from the form. This is done by tapping "Other tools", followed by "Export Text Labels".
A .tsv (tab separated) file will be downloaded. The file will contain all the text from both labels and choice field choices (radio fields, drop-downs, and multi-select). Use that file to insert the updated/translated text under the "New Text" column (column 3).
Make sure to save the file with changes in the same .tsv format.
Lastly, upload the file back into the form via the same "Other tools" option.
JSON Information Provided:
When exporting the Json format, the following keys will be exported:
- "sub_btn_text" = save button text
- "tooltip" = tooltip for objects
- "title" = page (tab) name
- "labeltext" = Label object text
- "rpt_label" = Reporting Label for each field
- "choices;text" = Radio Button or Drop Down Choices
- "cond;name" = Conditional Action Name
- "cond:vmsg" = Conditional Action Validation Text
- "cond:pmsg" = Conditional Action Popup Text
- "cond:citems;type_value" = Conditional Action populate text field value
Replicating a Form
Form replication is a quick tool to copy a form either in the current study or into another study (of which you are a member) even if the other study is part of a separate host. Access is based on access to the form builder and it can be found on the right side of the screen in the form builder as shown below.
Web Browser:
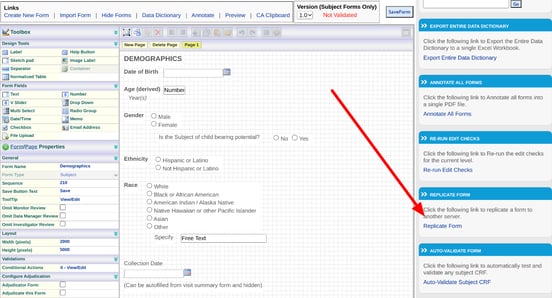
When choosing a destination Form, keeping it blank will create a new form in the destination study. If a form is selected, it will be overwritten with the source content being replicated.
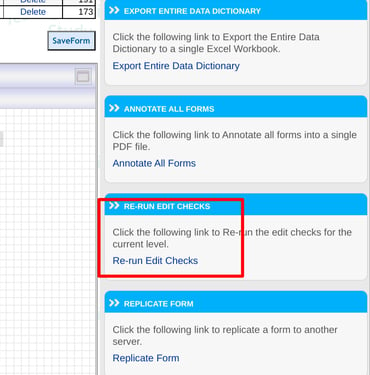
Re-Run Edit Checks
The re-run edit checks screen allows a study builder to selectively run all conditional actions on specific forms or fields. This is helpful when new edit checks, computations, or email notifications are added or existing ones are modified. It allows an Administrative user to centrally run specific conditional actions (CAs), without forcing all CAs across the study to be run as would normally be done in a version migration.
In a versioned study, version migration is still necessary. The function covered here can help make version migrations much faster by allowing the Study Administrator to selectively run only the conditional actions that were added or updated on the latest version.
Re-run edit checks can be found within the form builder on the web by any user with form builder access as shown below.
Web Browser:
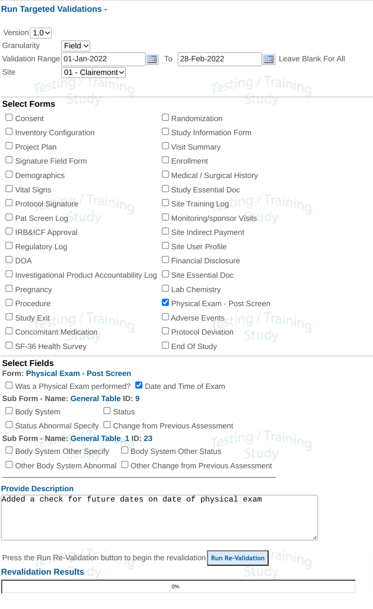
Granularity - Select which level to run edit checks (the Granularity). This could be all conditional actions on specific fields, forms, or entire visits. Anything more would be the entire subject, which can be done during version migration.
Validation Granularity Definitions:
- All - Run validations for all fields in all forms in all visits.
- Form - Run validations for all fields in the selected forms for all visits.
- Visit - Run validations for all fields for the selected forms in the selected visits.
- Field - Run validations for selected fields in selected forms for all visits.
Validation Range - As an optional specification, choose which records to run the checks on based on the visit date range. For example, if an edit check on a field was modified on the Demographics form, and they only need to be rerun for subjects that had their screening/demographics visit after January 15th, the date range can help with this. Otherwise, it can be left blank to simply rerun the checks on all records.
In the example above, a validation (edit check) was added on the Date field of the Physical Exam form because the site was entering future dates. The Study Manager would like to run that validation on existing data only at the Clairemont site for records with dates between January and March.
Running this will cause the edit check to fire system queries on that date field for any data that is a future date.
ALL conditional actions will be run for the field(s) selected. Caution should be used when running checks on fields that also contain an email notification or computation. This would have the potential to send email notifications or update data on a computed field, depending on the conditions. Other types of conditional actions will not be run (hide, disable, populate, event triggers).
For Computations being rerun: The potential for values to be updated/recomputed exists. If that happens, field SDV and form level reviews will be broken on the corresponding record, if they exist. If that happens there are tools available to locate which records were impacted: Filtering for unlocked records, and finding records where data changes occurred.
Rerunning the validation will have the potential to create new queries on existing records. This can be verified through the Queries report. Some conditional actions will not apply because a form save is required via manual form entry. Those include Hide, Disable, and Populate CAs.
Records Flagged for Change Reasons
If the field(s) being re-run include computations, there is the potential for computed values to get updated. This is counted as a data change and will flag the corresponding records for a changing reason.
To clear these flags on specific changes individually or in bulk close mode, use the action items report.
Auto-Validation
Auto-validating a form is a quick way to run volumes of test data against the edit checks on a form. Read more about that here.
Setting Field Source Verification
Field Level Source Verification, or "FLSV" is similar to SDV (Source Data Verification). Configuration of FLSV on forms is done as part of the study workflow configuration.