A Description of the Various Functionality and Master Settings That can be Controlled by a Study Administrator
The study functionality settings area defines the list of study settings that allow for defining, selecting, and disabling the core functions for a particular study.
Prerequisite: User has access to Study Configuration functionality
Jump to any section in this article:
Accessing Study Functionality Settings
Functionality Settings:
Accessing Study Functionality Settings
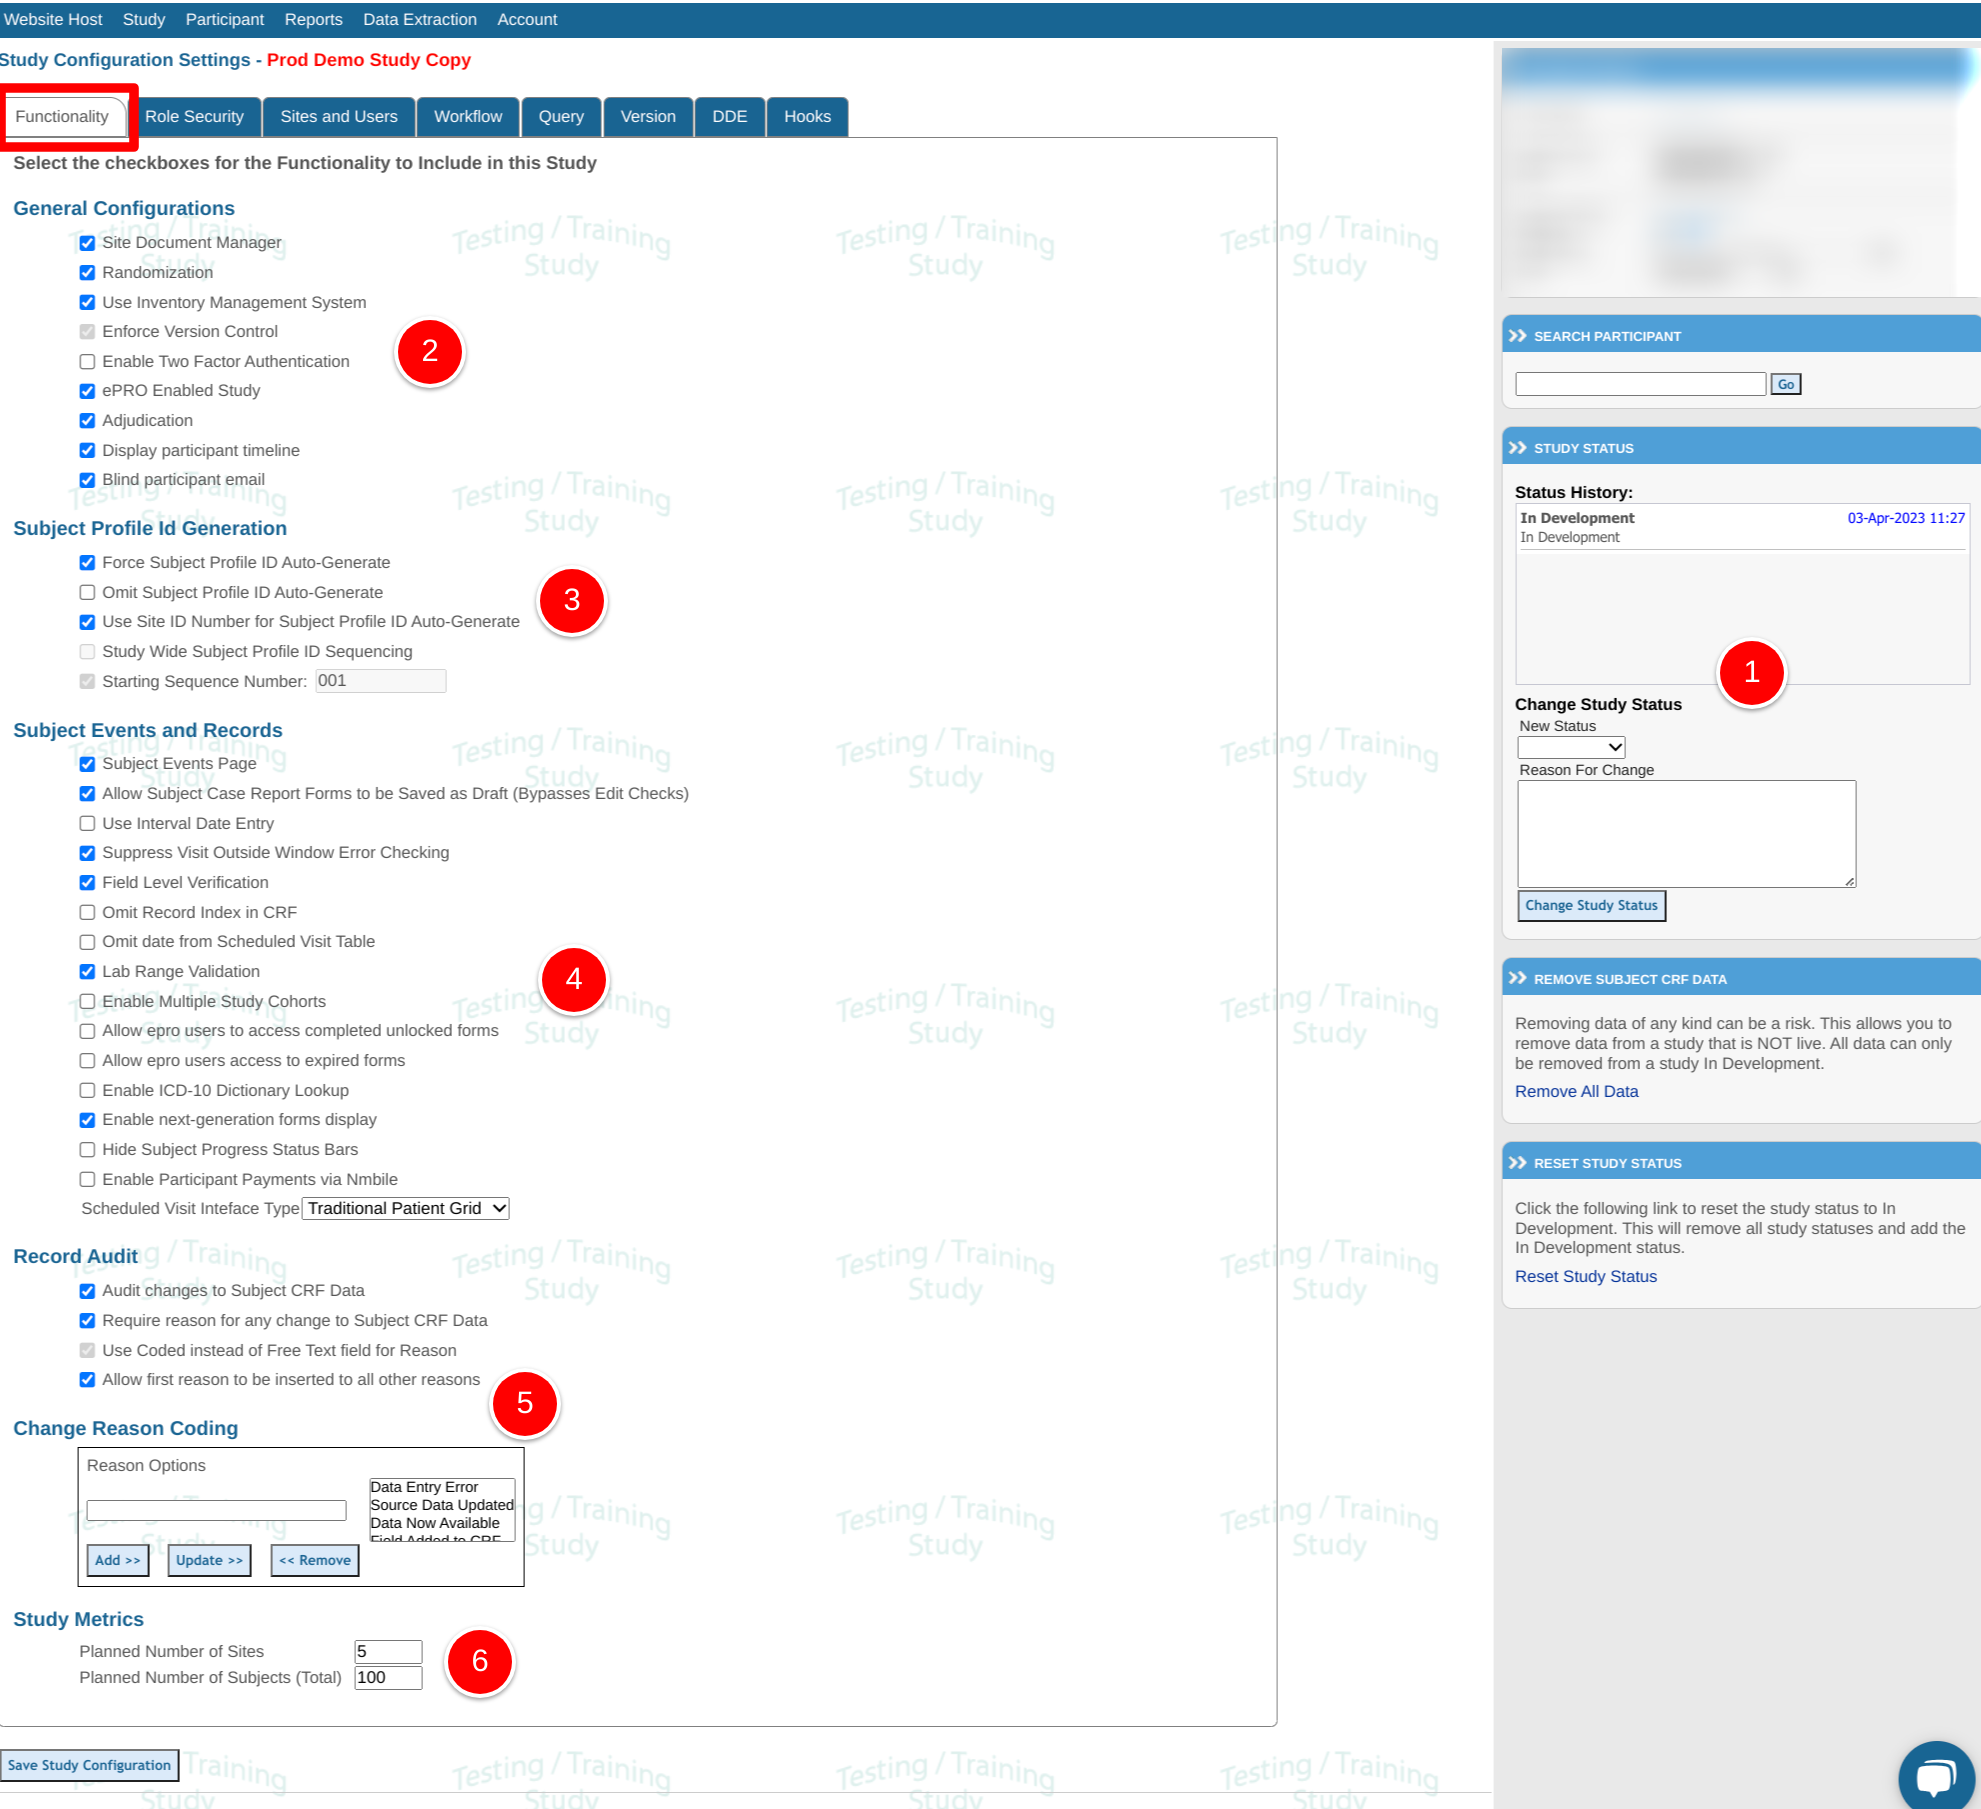
Configuration settings can be accessed under the Study Menu by selecting Study Configurations.
The annotated numbers in the images below are detailed in the remainder of this article.
Web Browser:

Mobile App:


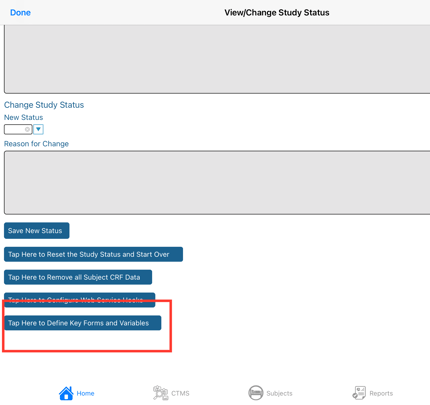
1. Study Status
This controls data entry within Provider sites.
Study Status is used to control site record entries for provider sites. Read Site Management to learn about the difference between Provider sites and Administrative sites.
Prerequisite: User must have access to Study Configuration
How to Change a Study Status
Status Definitions
In Development - When a new study is created, its status will be "In Development." Test subjects can be enrolled and tested from any Administrative site.
Live - When the study is Live, any site can enroll new subjects. The study design can enforce IRB approval and site documents are completed prior to enrolling, which is recommended. Only production (licensed) studies can be moved to Live status.
Once a study has been moved to "Live", it will not be able to go back to "In Development" unless the study status is reset.
Suspended - This option will not appear unless the study is live. Suspending a study can be done at any time to temporarily close the study. During this time, provider sites will be unable to enroll new subjects or edit existing subject records.
To make modifications/changes to a study, suspending it is not necessary. Study version control allows for making changes and validating those changes, all while the existing study continues to remain live.
Locked - When a study is Locked, provider sites cannot enroll new subjects or create new records for existing subjects after the lock date. Using this option is a good way to shut down a study but still allow sites to complete data entry on existing records and for study team members to perform reviews of existing data.
Completed - This is used as a mechanism to end licensing/billing and all activities have been completed. When a study is completed provider sites cannot enter any data. All records are read-only. Completed studies cannot be changed back to Live status, and data can no longer be exported.
To close a study entirely, please submit a Study Closeout Form. See How to Close a Study.
Resetting Status and Removing Data
These options are available from the Study Configuration (accessed via the "Study" menu).
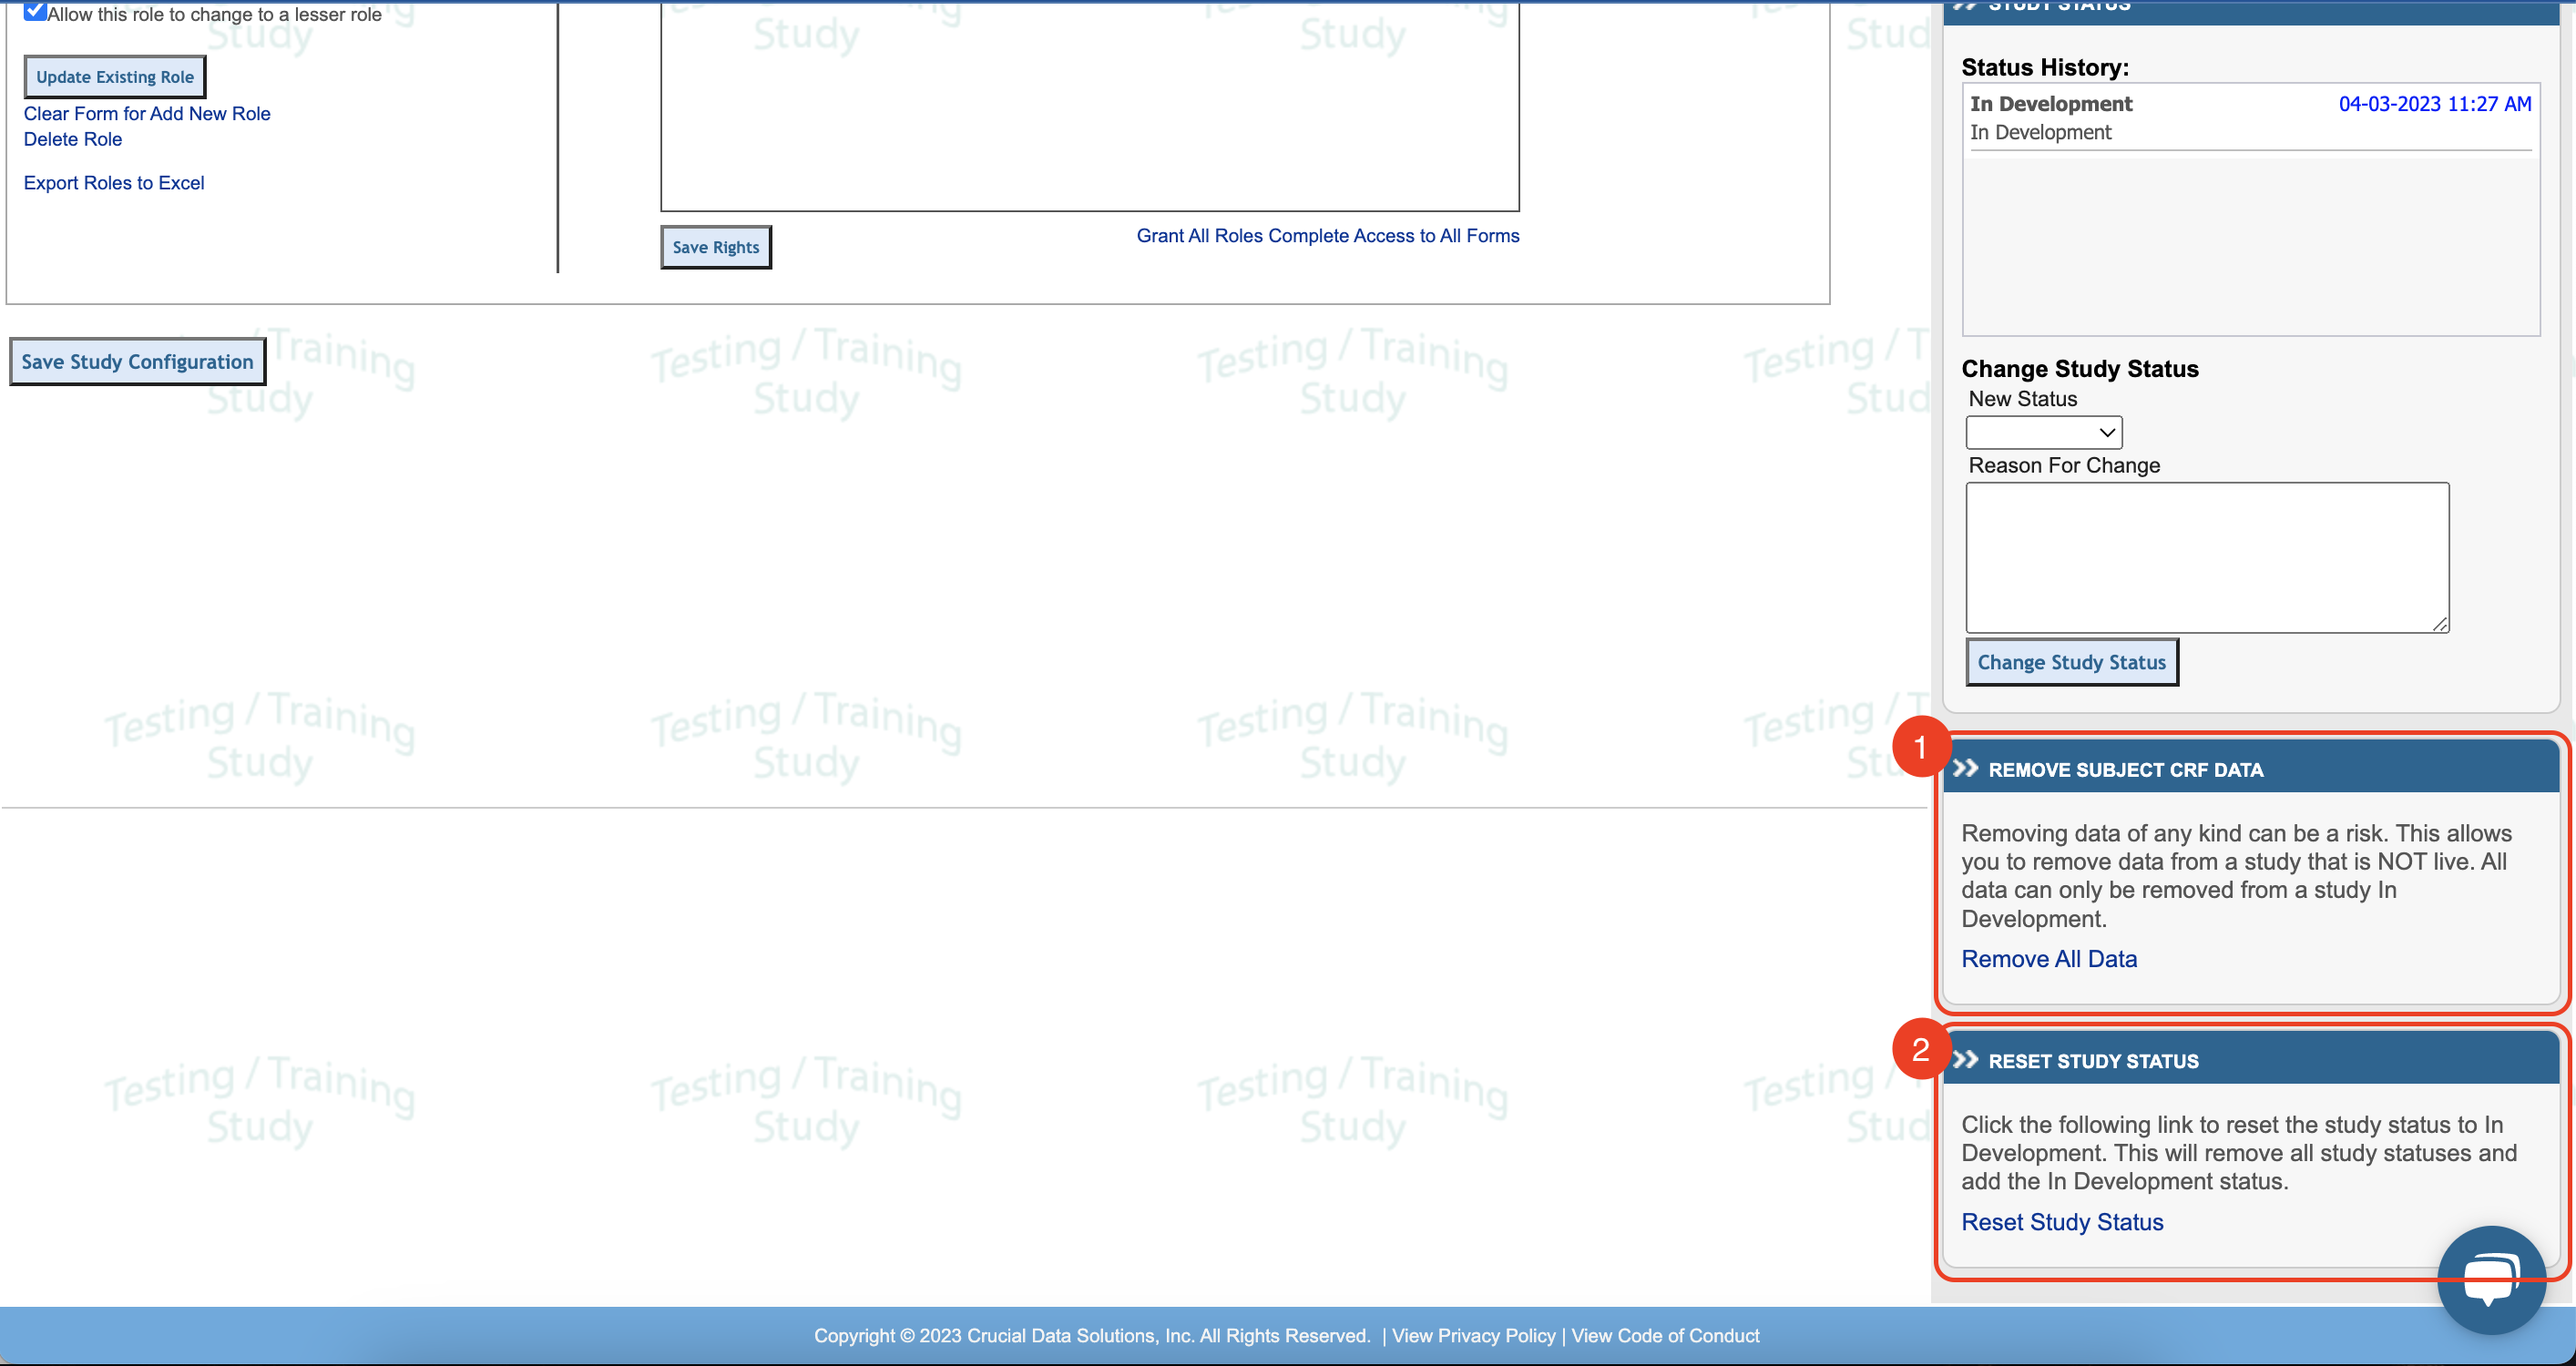
1. Reset Study Status is used to control record entry for provider sites. There may be testing scenarios where a study builder wishes to clear all the data and reset the study status.
2. Remove All Study Data - Removing study data of any kind can be a risk if not careful. This allows you to remove all data from the study's database. It comes in handy when testing a study and you need to get rid of test data and start clean.
Accessing study status settings on the mobile app:
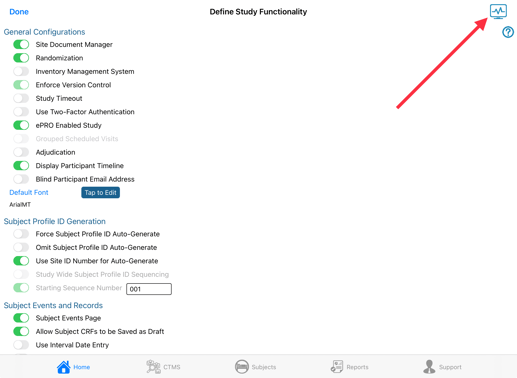
2. General Configurations / Functions
Site Document Manager
All Studies will have this enabled regardless of this option being checked.
Randomization
Must be selected if you plan to randomize subjects in the study.
Use Inventory Management System
This enables inventory-related functions if products will be dispensed or tracked in conjunction with the study.
Enforce Version Control*
This enables study versioning and should be used in most studies as it allows for making controlled post-production changes to the study or form design.
This option cannot be changed after data is entered into the study.
Subject Events Page
This should be enabled in most studies as it allows access to a subject's records. Occasionally studies are simple enough that scheduled visits and other forms are not required. In these cases, a single form can be managed from the subject enrollment table alone.
Study Timeout
Enforced only on the Mobile App. This causes the user's session to time out from inactivity.
Mobile App operating systems will always cause the app to sign out when it is stopped in memory, regardless of this setting.
Enable Two-factor Authentication
This forces all users in the study to use two-factor authentication when signing in with an unregistered device. The system sends an email and text message to the user for device verification any time a new device is used with that user account.
Note, if a user belongs to multiple studies, they will only need to use 2 factor when they are directly signing into the study where it's enforced. If they sign into another study and then flip over to the 2FA study, the device check will not be made.
ePRO Enabled Study
This enables a new column in the subject enrollment table with a link to each subject's ePRO sign-in information.
Grouped Scheduled Visits
This replaces a standard visit schedule with a Grouped Visit model.
Adjudication - Enables the adjudication function for the study.
Display Participant timeline - For ePRO studies, this Provides a visual timeline chart on the Participant’s home screen.
Blind Participant Email Address - This blinds the email address of participant users in the Sign In Audit, the Host’s User Manager, and the Study Site/User Manager.
Default Font - This is used within the mobile app form builder. When creating new labels on forms, this default font will be used, unless there is a default already set for the form.
3. Subject Profile ID
Force Subject Profile ID Auto-Generate
Forces users to use a link on the subject enrollment table for the system to automatically generate a profile ID for a newly enrolled subject. If this option is not checked, the auto-generated link may still be available, but the system will also allow the user to manually change or enter a profile ID.
Auto-generating the ID will give each new subject a sequential ID within each site. The format (number of digits) depends on the "starting sequence number" described below. So the first subject at each site, for example, would be 001. If the site ID number is being used, the first subject at each site will be SITEID-001.
Omit Subject Profile ID Auto-Generate
Removes the auto-generated link option from the subject enrollment table. Users will need to manually enter a profile ID for new subjects.
Use Site ID Number for Subject Profile ID Auto-Generate
Uses the site ID number from the Site Manager as part of auto-generated subject profile IDs.
This will not be enforced if manual Subject IDs are allowed.
Study Wide Subject Profile ID Sequencing*
When auto-generation of profile IDs is used with this option enabled, the system will sequence subject profile IDs across all sites of the study. With this option not checked, the system will default to sequencing subject IDs independently within each site.
Starting Sequence Number*
When auto-generation of profile ID is used, the system will begin with the "0001" unless another format such as "001" is specified herein which case the first subject generated would be "001".
*Items marked with an asterisk cannot be changed after subjects exist in the study, even if they are test subjects. To start with a clean study, either create a new study (copy) or clear all subject data.
4. Subject Events and Records
Subject Events Page
This is normally enabled and allows for tapping a subject to open the casebook of all other forms. If the study only collects a registration form, this could be disabled to simplify it for study users.
Allow Subject Forms to be Saved as Draft
This places an option on each form to “save as a draft”. This option will allow users to save data entered on forms without the system running any edit checks or firing unnecessary queries on forms before they are finished completing the form.
Possibility of 21 CFR Part 11 compliance loss:
Draft saving does not track the data changes in a form if data is changed. Only saving data as final will start the "Data Changes" audit and you may be prompted to input a reason for data change per 21 CFR Part 11 guidelines.
Use Interval Date Entry
Allows for dates to be entered on scheduled visit intervals so users do not need to enter a date on every form within the intervals. If this option is enabled, the individual forms must also be configured for Interval Date Entry in the Form Builder.
Suppress Visit Outside Window (VOW) Error Checking
Forces the system to NOT check the dates entered on scheduled visits as being within their scheduled window. This option is normally left unchecked as forms can individually be configured to suppress VOW error checking in the Form Builder.
Field Level Verification
Field-level source verification, sometimes called risk-based monitoring, is enabled here and then set up in the Workflow and Form Builder areas in the Study Configuration Settings.
Omit Record Index
This will disable a link built into forms that allows users to view the list of forms collected for the current subject without needing to leave the form they are currently working on. It allows the user to arrow forward/backward to the next form in sequence order by DATE of the form (if entered). A warning message is there to remind you to save data to prevent data entry loss.
Lab Range Validation
Enables the study to use site-specific lab range checks.
Omit Date from Scheduled Visit Table
Hides the date windows and target date that are normally displayed in the scheduled visit grid within a subject's records.
NOTE: All date calculations continue to be done in the background - including missed visits or forms that are entered outside the allowed window.
Use ICD-10 Dictionary
Enables an ICD-10 Lookup button on the top of all eCRFs for users to reference ICD-10 diagnosis and procedure codes/terms.
Enable Study Cohorts
Enables functionality to add multiple cohorts within the visit schedule configuration and adds a new column in the subject manager to see which cohort each subject is currently on.
Allow ePRO Users Access to Unlocked Forms
For ePRO studies, this allows Participants to access from the home screen previously entered forms that are not "review locked".
NOTE: If participants update existing forms from the list, the visit date on that form will not be updated.
Allow ePRO Users Access to Expired Forms
For ePRO studies, this allows Participants to access missing forms from the home screen. These are ePRO forms collected within a visit schedule where the windows have expired.
Default to Single Interval Page
When users open a subject to view records, the system default view is the full visit schedule grid table. This setting makes it so only one visit at a time can be viewed. This is helpful for large visit schedules to prevent slowness of page loading every time a user opens a subject's casebook.
Enable Next-Generation Forms - Updates forms to a more modern interface that was made available in November 2023, and is advised for use on all new studies beyond that date. Read more here.
Hide Subject Progress Status Bar - Prevents the subject status from displaying on the subject manager screen, for studies where visit schedules or required forms are not applicable.
Enable Participant Payments Via Nmible - This will display a "Payments" button in the Participant web portal for Participant users. It should only be enabled if the study is licensed with Nmible Patient reimbursement system. Contact CDS if you would like to learn more about this function.
Enforce Consent Age Rules - For studies that have eConsent enabled, Participants will be required to re-consent at specific age(s) which are pre-defined in this section as well. Read more here.
Scheduled Visit Interface Type - Determines if the subject casebooks will open up to display the full visit schedule table, or require users to select one visit at a time. Read more here.
Create Universally Unique Identifiers (UUID) - When new records are saved, with this option enabled, a UUID (aka GUID) will get stored in the database. This UUID is accessible via the report builder, but will only display for records that were first saved after this function was enabled.
Workflow and Key Forms
The study Workflow is where the data review rules are defined. Read more about that in this article.
Key Forms are used to define which purpose a form will serve based on common milestones of data collection. Two of the most important are the form that Registers a new subject and the form that determines when a subject exits the study.
All key forms are not required, but Defining some of the key forms helps track key metrics within the Dashboard report. Study Exit, in particular, is normally important to define for the system to track the correct study exit date for each subject.
Web browser: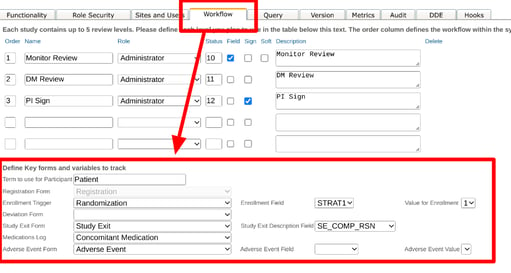
Mobile app:
Within the study functionality screen

The form types are defined as follows:
Registration - The form from the form builder that will be used to create a new Subject in the study. This option will be grayed out/disabled if there are subjects in the study. In those cases, clear the data or create a new copy of the study to change the registration form.
The visit date on this form is also what is used to:
- Compute the starting point for the visit schedule
- Display the “Registration Date” on the information panel of the subject’s casebook screen
Enrollment Trigger - This is the form and corresponding variable (boolean) and value that will count each subject as "enrolled" in the study. This may be the same as registration in many cases, but may also be some date later on. For example, screening subjects (registration) and later enrolling them upon randomization (enrollment).
This variable is used in:
- The dashboard for the number of subjects
- TrialKit Drive Site Progress Data
- The visit date defined on this form is displayed as the “Starting Date” on the information panel of the subject’s casebook screen
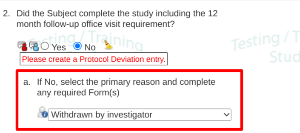
Deviation form - Indicate which form will serve as a deviation form. These are counted in the dashboard report
Study Exit form - Indicate which form will determine the end of each subject’s study involvement (e.g. study exit or discontinuation). The system uses the date on this form to make any visits beyond that date inaccessible to the site. It also stops any ePRO forms from being deployed to the Participant.
A description (Study Exit ‘Reason’) field can also be identified which is displayed on the subject's casebook screen.
If a field is not defined, the system will use a generic message: “Subject has exited from the study”
Medication log - Indicate which form will serve as the medication log.
Adverse Event form - Indicate which form will serve as the adverse event form. This is counted in the Dashboard Report AE metric. The configuration on the web also allows for setting the following for more exact tracking of a specific AE type:
- Adverse Event Field - This is the field (must be a choice field) you want the system to use specifically when counting the number of AEs in various reports. If this is not set, it will default to simply using the form defined above.
- Adverse Event Value - This is the value of the Adverse Event Field selected above that will give a "true" response - or a count in this case.
5. Record Audit Settings
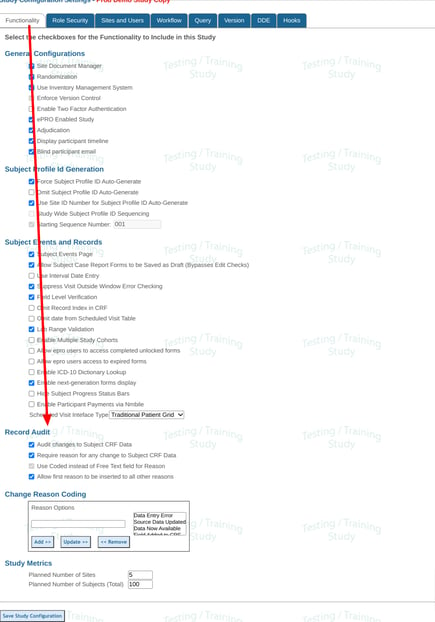
Audit Changes to CRF
This causes the system to track events that occur on forms and is recommended.
Require Reason for Any Change to CRF
This forces users to provide a reason after making changes to existing (previously saved) data. This must be enabled for full change audit tracking and is recommended.
Use Coded Field for the reason
This provides the users with pre-defined reasons for changing data, to save them time typing a free text reason, particularly when reasons are most often the same.
Change Reason Coding
Configure the reasons users can provide for changing data.
The reasons for change should normally not be changed during the course of a study. Doing so could alter the meaning of reasons already provided on data changes.
Allow the First Reason to be Used on all Others
This adds convenience for users to quickly apply one reason to all other changes that occurred in that same save event. Otherwise, the user must individually provide a separate for each change.
Query Configuration

Query configuration allows for defining the following:
- Automatic email notices related to queries
- Query coding
- Default deployment roles
NOTE: There are various permissions related to what users are able to do with queries - like creating manual queries or closing them. Those permissions are separately controlled in Role Security.
Query Email Notices
TrialKit can auto-send e-mails to users to notify them of new queries or query responses.

Send Notification E-Mail for Each New Query
Each time a query is generated, regardless of whether it is manual or automatic, a notification e-mail can be generated and sent to all or some of the relevant parties. This works in conjunction with the other settings.
Send Notification E-Mail for Each Query Message
Each query will have a series of messages. Messages can either be sent from the author or recipients. These messages form a query dialog. Each time a message is added to the query, a notification email can be sent to all or some of the relevant parties. This works in conjunction with the other settings.
Do Not Send E-Mail Notifications to the Site
If you are concerned about spamming your Site, you can check this setting so email notifications will not be sent to the Site. Remember the My Queries report will report all open queries and allow users to access the entire query dialog. Therefore, it is often not necessary to send query notifications to site users.
Only Send E-Mail Notifications for Manual Queries
This sends notifications to all users who are part of the distribution for the query that triggers the notification. All queries and their dialog are available in the Queries Report, which is why you may only want to send out notifications when queries are generated manually by a user such as a Monitor.
Query Coding
Query codes allow for standardizing queries based on the possible reason(s) for the query. There are 4 types of queries in TrialKit. Each can have its own unique coded reasons:
- Interval Queries
- Visit/Event Queries (form level)
- Field Queries
- Close Query Reasons
When a query is created or closed manually, it provides the user with a list of possible reasons for creating or closing the query.
On the query configuration screen, select a type and then fill in the text to add a new reason.
To remove a reason on the mobile app, swipe left to delete.
Default Deployment Roles
When queries are created, they are deployed to specific user roles at the corresponding site. Those roles are set in this section. When a user creates a manual query, they also have the option of changing these default roles, so only the necessary users can access the query.
If specific edit checks should only deploy queries to specific roles, these default settings can be overridden on a per-query basis.

Subject users can only see system queries by design. The reason is they can not interact (post comments) with Clinician queries - as that is beyond the scope of that type of user. A manual query can be posted to a subject's form for other Clinician users to interact with.
Metrics
Metrics settings are used by the system in various areas as a variable to measure study progress-related metrics. These are shown in the Dashboard Report.
There are two factors to set: the total number of expected sites and the total number of subjects planned for enrollment.
Integration Hooks
Hooks can be used to integrate an external platform for receiving real-time information based on some event - such as the saving of a form - that has occurred within TrialKit.
Hooks work by sending a JSON string to an external restful web service endpoint (example https://www.companyname.com/trialkit/3) when a TrialKit record is created/updated or has its review level (status) changed. An example string is passed to the external application as follows:{"trans_id":"70","form_id":"282","form_name":"Enrollment","OnUpdate":true}{"trans_id":"476","form_id":"304","form_name":"Adverse Event","OnInsert":true}{"trans_id:"68","form_id":"282","form_name":"Enrollment","OnReview":true,"wf_id":2,"wf_status":12,"LockBroken":false}
Once the external endpoint receives this information, the endpoint can utilize other APIs in the TrialKit library to get the additional desired information and/or to perform additional tasks.
To Configure Hooks, use the screen accessible via the Web Browser as shown below.
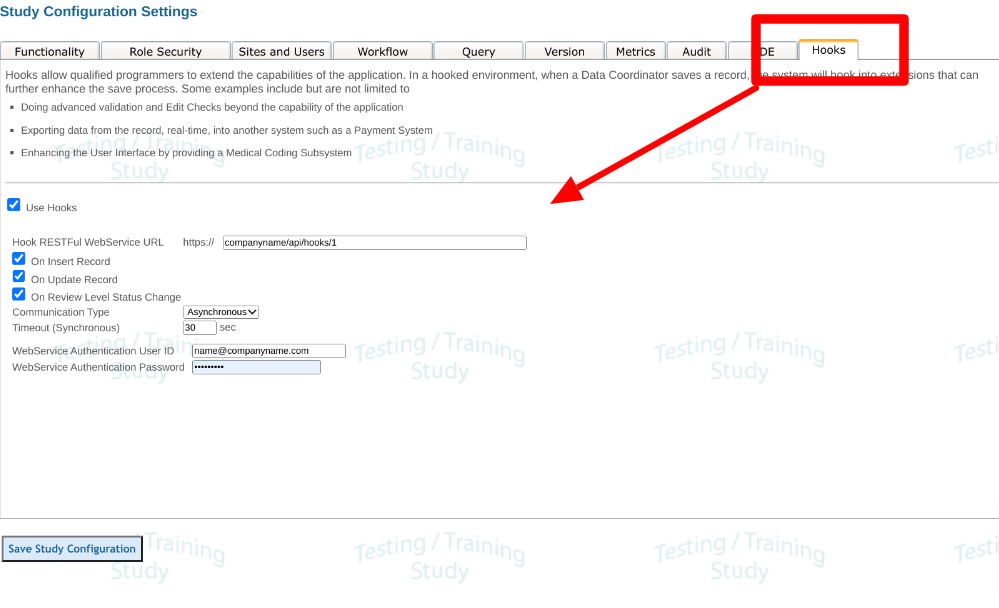
Hooks are currently only triggered based on changes made to records via the web browser. The mobile app and API do not yet support hooks.
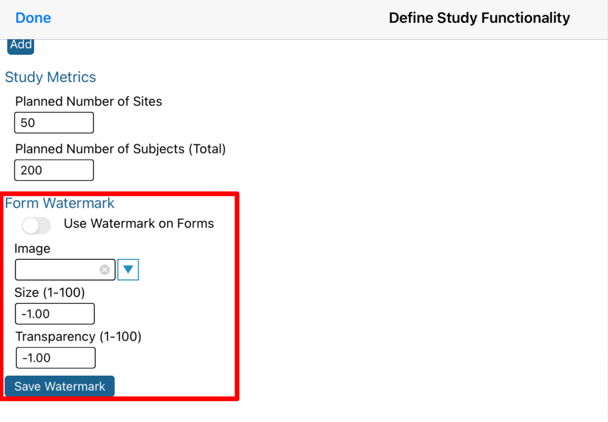
Form Watermark
To provide a better branding experience for a study, an option is to place a logo watermark on the background of the forms. This is for display purposes only and will not be included with any PDF exports.
The list of available images are coming from the host's image library. Be sure to upload the image there before defining it here.