An Overview and a Central Guide for Building Forms
Table of Contents:
- Accessing the Form Builder
- Form Builder Map of Functions
- Form Building Guide
- Common Form Building FAQs
Accessing the Form Builder
Prerequisite: The user has access to Form Builder and all of its underlying functions
There are two form builders in TrialKit. Host Level and Study Level. Selecting one over the other depends on what type of form needs to be built. The type of form being built is determined by the data being collected.
Host-Level Forms
- User - Data collected about a user of a host account
- Site - Data collected about a site being used for one or more studies within the host
- Study - Data collected about a study within the host
The form builder for those form types is located under the Host menu.
Study Level Forms
- Subject - Data collected about a subject within a study. These are the most common form types used to conduct study data collection
- Site - Data collected about a site within the context of the study where the form exists
- Study - Data collected about a study. The difference between this and the study forms at the host level is that study users can be granted access.
The form builder for those form types is located under the Study menu.
Most forms, like subject eCRFs, are built at the study level. Please ensure you are building your forms in the desired location and choosing the correct form type.
Web Browser:
Expand the Study menu and tap on the Form Builder option.

Mobile App:

Form Builder Map of Functions
Reference the annotated image below for an overview of the page layout and links to more descriptive articles on each item.
While TrialKit study Builders can choose where they prefer to build forms, CDS recommends the iOS mobile app for various tools and shortcuts it provides. Doing so on a modern iPad with a mouse and keyboard will provide the best experience possible.
The end result of the study design will be the same regardless of where you choose to build, but the iPad provides optimized tools for getting to that point more efficiently and with greater flexibility.
Form Builder in the Mobile App:
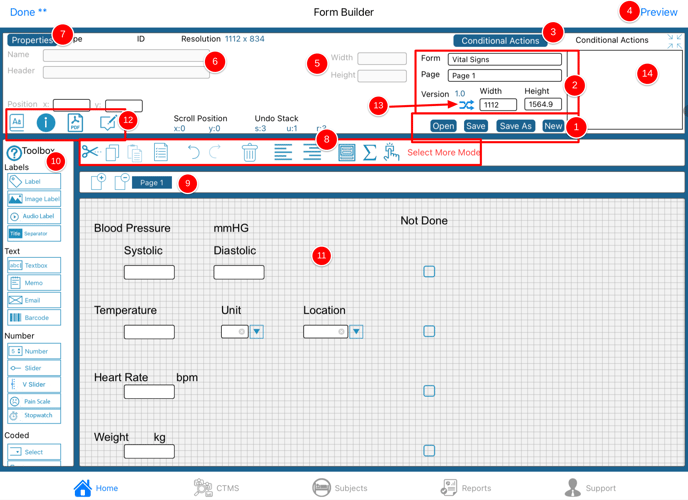
- Form Library access and saving
- Open form library list
- Save current form
- Save the current form as something new
- Start a new form
- Basic form properties
- Form name
- Page name (see item 9 for multi-page forms)
- Form version
- Width and Height of the overall page
- Open conditional action builder for the currently selected form or field. Quick access is also provided via the small window on the right.
- Preview form and collapse the top properties panel. These are helpful to increase canvas area when building.
- Width and height of the currently selected field. Text labels will also include wrapping and font options.
- The field name and field reporting label for the currently selected field.
- Tap to open either the advanced form properties or the advanced field properties for the currently selected form/field. To select the form, just tap anywhere outside of any field on the form.
- Object editing tools:
- Basic tools: Cut, copy, paste, select all, undo, redo, and delete
- Align selected objects right or left
- Create a group conditional action
- Create a rapid sum computation on number fields
- Select multiple objects manually
- Add or remove pages. See item 2 for page naming.
- Toolbox of form elements that the user can drag onto the form.
- Form canvas/working area.
- Export and view options:
- Data dictionary table - exportable
- Display query icons on the workspace. This helps to see how the form appears to Monitors when additional icons are put on the form.
- Download the blank PDF to iCloud.
- Annotated PDF of the current form. This produces an annotated PDF with the data dictionary.
- Merge all checkboxes with their associated text labels. This is not required but makes it so the user can tap the text to check a box, rather than tapping directly on the box itself.
- List of conditional actions on the current selected object
Web Browser Form Builder:
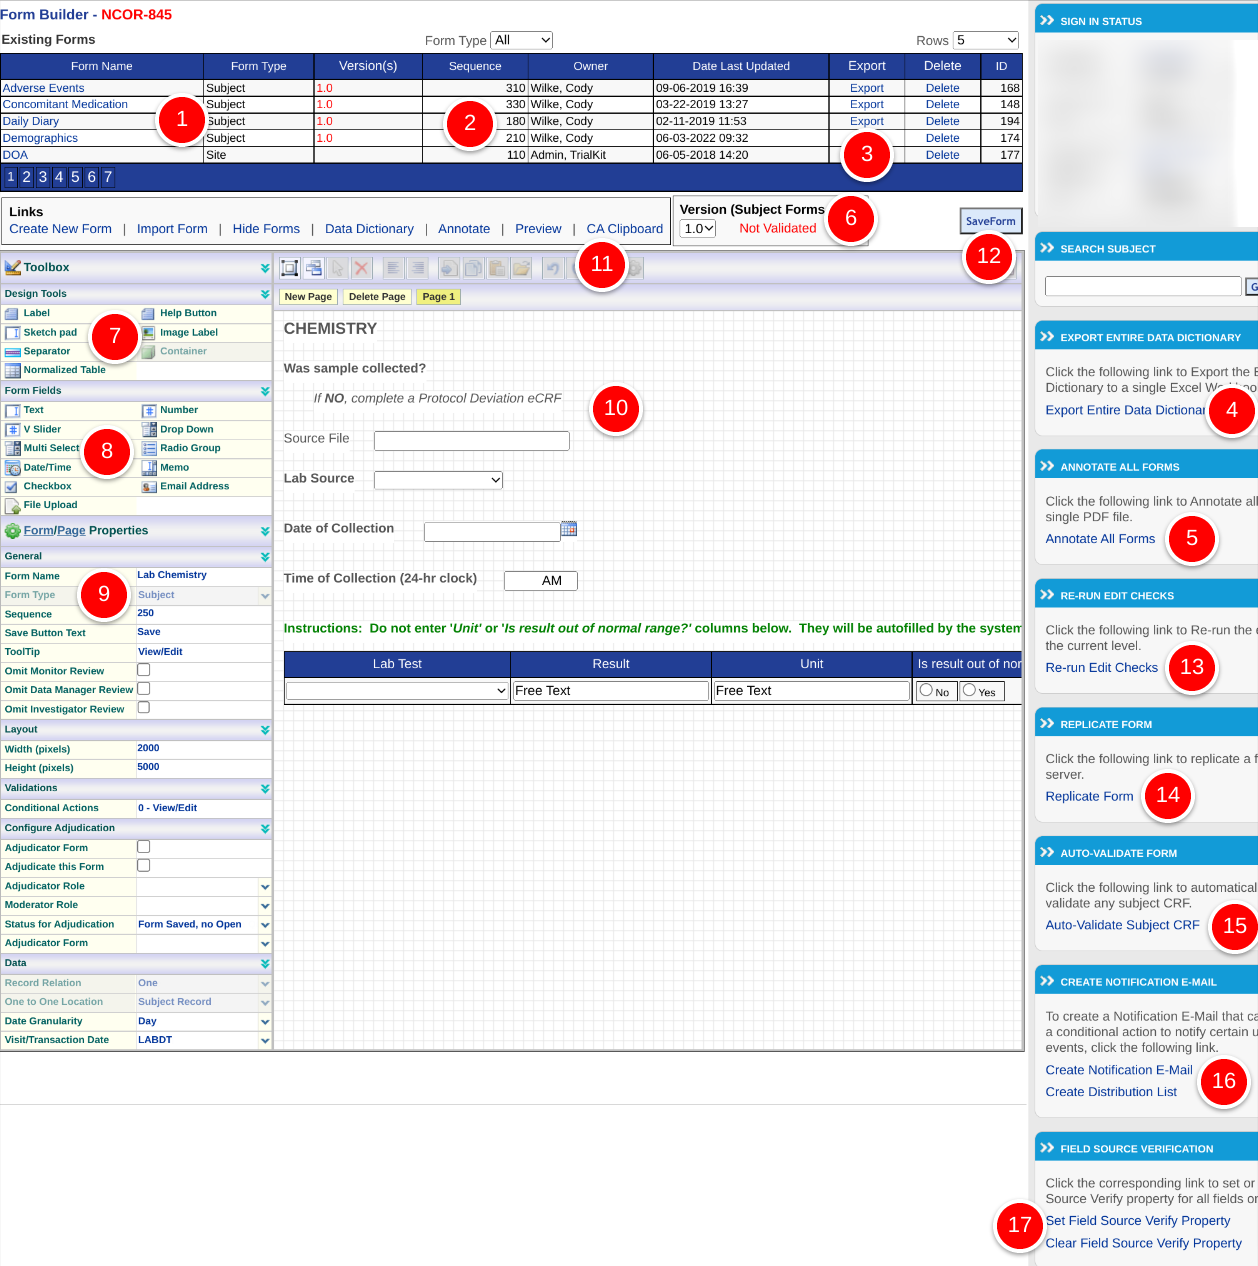
- Form Name and Type of All Existing Forms.
By default, only parent forms will be displayed in the list. Use the table filter to access child forms. Child forms can be opened on the web browser form builder, but can only be modified on the mobile form builder. - Sequence
- Export/Import Forms
- Data Dictionary
- Annotate forms
- Version selection - for studies using versioning
- Design Tools - Visual objects
- Field Types - Data storing objects
- Form or Field Properties, depending on what is currently selected in the workspace (10)
- Form Workspace - Drag and drop field types (7 & 8) here
- Editing tools
- Save Form - Saves current work in the workspace. This is not automatic, so be sure to save changes regularly if working on the same form for an extended period of time
- Re-run Edit Checks - Only appears for non-versioned studies. This re-runs all conditional actions on all records in the study database.
- Replicate Form - This can be used to copy the form to another study that the user belongs to
- Auto-Validate forms
- Setup notification messages and distribution lists for use in conditional actions
- Field Source Verification
Form Builder Guide
This section serves as a simple guide to building forms. Use the links to open the respective topic.
- Creating New or Editing Forms
- Repeat step 1 for all forms needed in the study
- Add additional needed fields and labels
- Ensure the registration form for the study is defined and has at least one log field identified
- Build Form Logic and Edit Checks
- Identify which forms are log forms. These are forms that can be collected anytime
- As forms are modified, they can be tested within an Admin site in the Subject Manager
- Making form changes after moving the study live
- Other optional form-building topics:
- Auto-validation
- Automated email notifications
- Form Preview
Form Size Limitations:
The underlying database limits forms from containing more than 1,170 fields. Additionally, there is a limit in table memory which could be possible to reach if there are, for example, 1,169 fields on the form and each one contains multiple edit checks. Keep this in mind if you are considering combining multiple forms into one large form.
Common Form Building FAQs
Q. What's the point of building separate forms in some cases where I could combine groups of content into one unified form?
A. That's a good question and one that should be considered carefully with the following points:
- One big form will produce one big data export file with a high number of columns. This makes data analytics harder because variables aren't split up based on the topic. For example, an Eligibility form could be combined with the medical history and demographics which are all done during an initial visit. However, the data exports are easier to make sense of when they are built as separate forms.
- The bigger the form, the slower it will be to load and perform data entry. You won't notice it with 100 fields, but you will with 1000 fields.
- If the form is a log form, you won't be able to display as much in the log table because it would all be one long table.
- If the form is a lab form, you won't be able to have multiple labs collected on the same form if you use the "Labs" option in TrialKit. They use fixed-length normalized tables and need to be one per eCRF.
- Less configurability with form dynamics. Typically, one form can determine what happens on another form. If all the fields are combined into one form, that cross-referencing is lost.
- Required forms can only be tracked as entered/missing if separate. In the example in the first point, medical history might be entered, so the form is entered, but demographics are missing. The system won't count demographics as missing if it's in one form.
- If one of the forms is repeating across visits, the data would need to be split across two separate forms if one was a combined form.
Q. Can I score responses on a form? How Do I accomplish survey scoring scenarios?
A. Yes, choice fields can be used to do this. Each choice in a choice field (dropdown or radio) can contain an associated value. A number field can then compute a score via a formula that factors in the choice fields. No selection in a “choice” type field will be counted as zero.
Q. Is there a function/code to disable a field and clear its contents of data entered in data entry?
A: Yes, using Populate Value to Clear a Field - Clearing Data from the field with conditional action. You can use the Populate Value conditional action to clear a field. It processes the condition precisely the same way. However, if you want to clear the target field, do not enter anything into the target value area, which is located at the bottom of the conditional action window. By leaving this blank, when the user triggers the event, the system will clear the field if the condition is true.
Q. Can I open/design in multiple browser tabs/windows?
A. We do not recommend opening multiple windows/tabs because it may lead to conflicts with saving data if the same user opens multiple subject records at once. If those conflicts do occur, the system will display an error message.
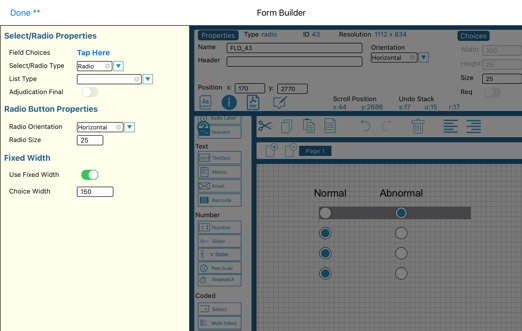
Q. How do I make an ePRO survey form that has a series of questions with the same answers for each question in a table-like format that resembles the SF-36?
A. We want to use the Fixed Width Radio Field
This allows for defining a set width for each radio button for horizontal orientation only. The text label will also be hidden, based on the objective of displaying repeating similar table-style answers. The width can be manipulated to spread the buttons to any extent required. See below: