Description of the Properties That can be Defined on Forms
Jump to any section:
Accessing Form Properties
Form ID
Form Name
Line Height App only
Description
Form Type
Sequence
Save Button Text
Field Prefix - App Only
Width and Height
ToolTip or "Hover Help" - Web Only
Omit Review Levels
Conditional Actions
Record Relation
One-to-One Location
Study Form Type (key forms)
DDE (Double Data Entry)
Date Granularity/Precision
Visit/Transaction Date
Log Form
Interval Date Entry
Suppress VOW
Omit Error Msg
ePRO Form
Save as Draft and Next (Mobile App Only)
Preserve Deleted
Do Not Send ePRO Notifications
Prevent Form Editing
Default Font (Mobile App Only)
Adjudication
Device Targeting (Mobile App Only)
Form Footer (Mobile App Only)
Dots Per Inch - App Only
Translation Tools
Access to Form Properties is in the Form Builder
Web Browser:
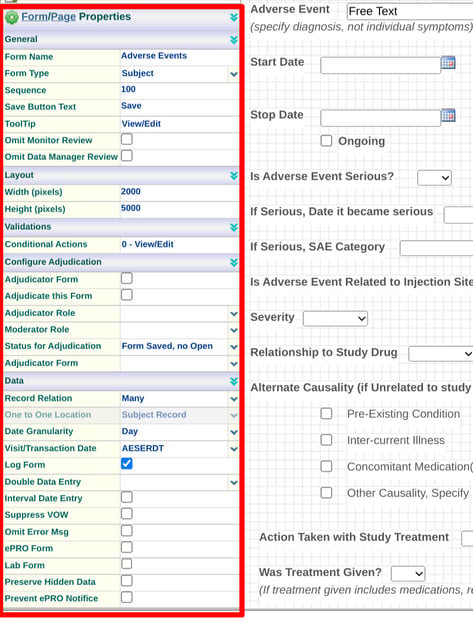
From the left side of an open form - when no fields are actively selected. Click anywhere outside of the fields on the form to get the form properties to display in the left panel.
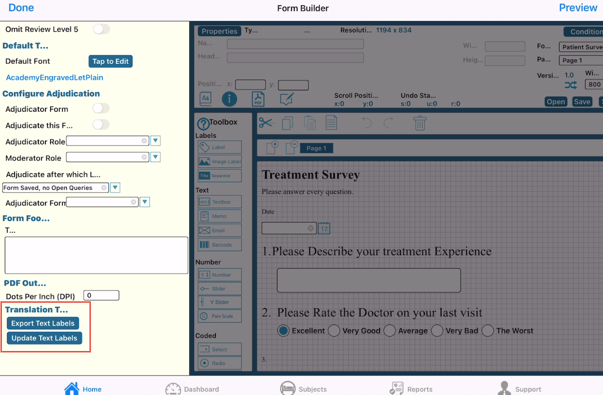
Mobile App:
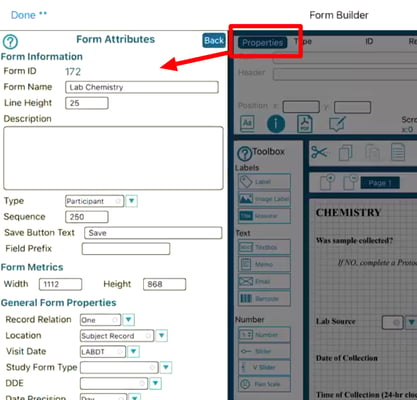
From the 'Properties' button at the top left corner.
The properties button displays the properties for the currently selected object on the form. If a field is actively selected, the field properties will open. To actively select the form, tap anywhere on the form outside of the fields.
Form ID
Displays in the form properties and on the form manager table. This is the system ID for a form that cannot be changed, unlike the form name which is user-defined.
Form Name
This is the title of the form that will appear throughout the system and data exports. It is okay to rename forms at any point in the study without impacting data.
Targeted/child forms cannot be renamed.
Line Height (Mobile App only)
This sets the default field height when new fields are added to the form, rather than needing to edit the size/height of each field individually after they’ve been added.
Description
This serves as an internal note for the form designer and is not displayed anywhere else.
Form Type
Read here to understand more about Study vs Host level forms.
Study Level Forms - The Form Type drop-down choices when the Form Builder application is used at the Study level are Subject, Site, and Study.
Forms designated as Site Forms appear in the Site Document Manager application accessed from the Study menu. Forms designated as Subject Forms appear in the Subject Manager application accessed from the Subject menu. Forms designated as Study Forms appear in the Study Documents application accessed from the Subject menu.
Host Level Forms - The Form Type drop-down choices when the Form Builder application is used at the Website Host level are User, Site, and Study.
Forms designated as User Forms populate the Current Users data table on the User Manager page. Forms designated as Site forms populate the Current Sites data table on the Site Manager page. Forms designated as Study forms populate the Current Studies data table on the Study Manager page. The User Manager, Site Manager, and Study Manager applications are all accessed from the Website Host menu.
Sequence
This is a number assigned to determine the order in which the forms will be listed visually in a subject's casebook, and the order that the data entry user will scroll through when viewing the form index list
Save Button Text (Web Browser Only)
This property allows the Form Designer to determine the text that appears on the Save button for each form. The text will display on the web browser only. On Mobile app forms the Save button will remain as "Save".
Field Prefix (Mobile App Form Building Only)
If a common field naming convention is being used on all fields of the form, a prefix can be set to make field naming easier as fields are added to the form. For example, AESTDT and AEENDT are fields collected on an Adverse Event form. They both start with the same prefix “AE”.
Width and Height
The width and height of the form area. This can be adjusted over time to fit the layout of the fields on the form.
ToolTip or "Hover Help" (Web Browser Only)
Only supported on Fields. This is used to enter help/guidance text into a dialogue box that will appear when the user hovers their mouse (web browser only) over a field where a tooltip has been defined. To configure, select a field and use the popup box to define the text that needs to be displayed. This is a good alternative to using long descriptive labels directly on the form which takes up more real estate.
Omit Review Levels
Forms created at the Study level can be set up to require up to five review levels (defined in the study configuration). Those levels will display as options in the form properties to omit the form from the corresponding review level(s).
For example, if a form is omitted from the first review level, once entered without any errors, it will immediately go to the second review level.
Conditional Actions ("CAs")
Tapping this opens the Conditional Action builder. This allows for creating edit checks and other business logic related to the form's behavior during data entry. There are three types of Conditional Actions, read about each one here: CA - Compute, CA - Populate, and CA-Hide.
Record Relation
This only applies if a form is a log form. It tells the system how many records should be allowed for entry within a given subject’s casebook.
One – A relationship of “One” means the form is not related to any other form in the system and can be completed only once throughout the Study. An example is a Study Exit form.
Many – A relationship of “Many” means the form can be completed multiple times throughout the Subject record. An example is an AE or Deviation Form. Many AE's can happen per subject.
Batch – A relationship of “Batch” means it can be filled out once as part of a group of forms. This group of forms (or batch) can be completed multiple times. For example, a batch form might be used if the research lab is conducting an animal study that involves receiving subjects in batches, rather than simply one at a time.
One-to-One Location (Web Browser Only)
This applies only to forms that will be displayed/accessed via the web and only applies to Log Forms.
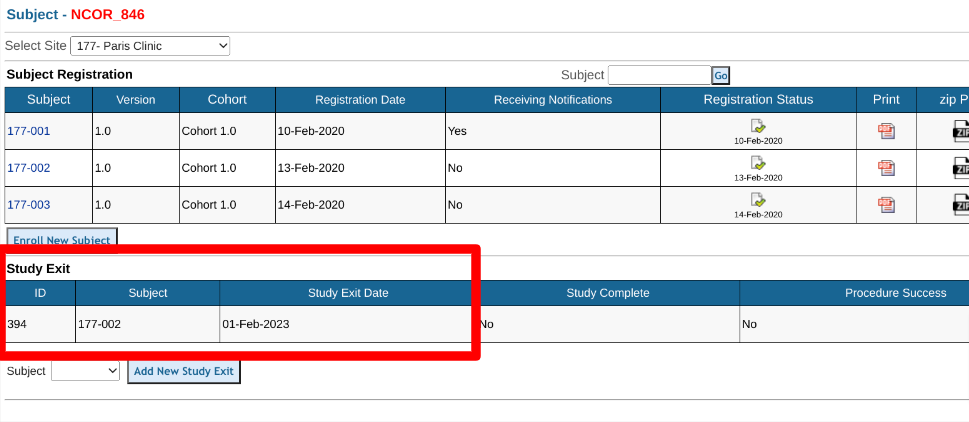
Registration - The log form will display for access on the main subject manager page for quick access. Only possible with log forms that have a relation of ONE. A common example used here is the Study Exit form since only one is entered per subject and it can be viewed on the main subject manager screen without opening each subject's casebook to see it.
Subject Record - The log form will be displayed within the log forms section of the subject’s casebook. Most log forms are placed in the log forms section. Common examples are Prior and Concomitant Medications, Adverse Events, and Protocol Deviations.
Study Form Type ("Key Forms")
This is used to define which key purpose a form will serve based on common milestones of data collection. Two of these are the form that registers a new subject and the form that determines the end of the subject's data collection.
Key forms can be defined within the form properties, or within the study configuration settings. Read more here.
DDE (Double Data Entry)
The number of data entry passes that will be taken on the form. This is only applicable if the study as a whole is set up to support double data entry.
Date Granularity/Precision
The Date Granularity selected from the dropdown list (Second, Minute, Hour, or Day) determines the extent to which dates and times on the form will be factored within potential computations. By default, this is set as Days.
Visit/Transaction Date
The Visit/Transaction date field is required only for Subject type forms created in the Form Builder due to the longitudinal nature of data collection. This lists all date fields from the form.
Normally this is best to configure based on the date which serves as the collection date for the form. For Example, an Adverse Events page might have "Date Reported" and "Date Event Started". The Date reported would be the Visit/transaction date for the form since that is when the source data was collected.
This date is also used by the system within visit intervals to determine if the form was entered in the required visit window.
Many study Builders will choose to auto-populate this field for data entry users. To do that, simply set a populate Conditional action on the field to populate the Current date/time. It can also be blinded if needed.
Log Form
Selecting the “Log Form” checkbox designates that a form can be completed anytime outside of the visit schedule. Common examples are Deviations or Adverse Events.
Subject Forms designated as Log Forms populate the Log Form section of a Subject's casebook. Site and Study forms can also be collected in a log rather than in single instances.

If a form is set as a log form, by default the record relation will be 'many' - meaning many forms can be entered for each subject.
If the record relation is set to 'One', this will limit each subject to only having one form entered. A common example of this is a study Exit or Withdrawal form. If the record relation is 'one', the "one-to-one location" can also be defined to display the log table either within the subject's records screen (along with other log form tables), or on the main registration (subject manager screen).
Be sure to set a few key fields on the log form, setting the "Show in Log" properties, and saving. These will show key fields in a listing of log forms.
Interval Date Entry
Select this checkbox to allow for multiple date entries when interval visits are required in the study. Interval Date Entry ("IDE") allows a Study Designer to enable Data Coordinators (or a similar role) to enter visit dates at the Visit Interval rather than on the actual form. IDE is designated on the Functionality tab in the Study Configuration application. Additional information about Interval Date Entry is available using the search help bar at the top of this page.
Suppress VOW
The Suppress Visit Outside Window checkbox can be selected to allow for visits outside the date window as specified in the Create Scheduled Visits application by the Study Designer. Many studies will have a scheduled subject visit table that defines specific visit intervals. Each of those intervals will have a window within which a visit must occur. If a subject visit falls outside the specified window, the system will deploy a Visit Outside Window query. Some studies will not require such queries to be produced. If that is the case for your study, then check this option.
Omit Error Msg
The Omit Error Msg checkbox can be selected to prevent an error message from displaying on the form, regardless of the reason the error message would have been fired.
ePRO Form
This defines the form as one which will be made accessible to a participant/patient user. Read more about the ePRO setup here.
Save as Draft and Next (Mobile App Only)
Save and Next will add a section at the top of the form during data entry if the form has more than one tab/page.
This allows the data-entry user to easily navigate forward or backward in the pages, as an alternative to tapping the tab/page at the top of the form. There is also a button in the middle of the window that allows the user to save the form in draft and advance to the next page. If the user is on the last page of the form and they arrived there by using the save and next button, then the button will say save and quit. Doing so will perform a final save, along with any edit checks on the form, similar to the save button at the top.
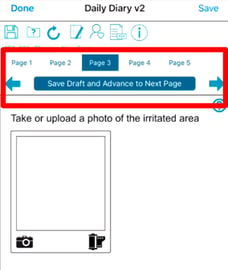
If Draft saving is not enabled in the study configuration settings, only the paging arrows will display without the button in the middle to save/advance.
Preserve Deleted
By default, fields that become hidden by a conditional action will get the data cleared - assuming the data has been previously saved. In some cases, it might be preferable to maintain or "preserve" data that is conditionally hidden. Use this option to enable that behavior.
For example, if Race is "Other", a Specify text field displays. If data is entered into that field, saved, and then later hidden again by changing Race to something else, the data in the specified field will be retained in the form's data.
Do Not Send ePRO Notifications
Only applicable to ePRO forms. Enabling this property will prevent the system from sending automated notifications when the form becomes due for completion. Read more about ePRO Notifications.
Prevent Form Editing
Only applicable to Participant data entry (ePRO studies)
Prevents Participants from editing any forms that are completed without errors. This is enforced anywhere that epro forms are accessible by the patient. The completed forms list will also indicate "read only" for any forms that do not have this property set.
Default Font (Mobile App Only)
Similar to Line Height, this sets a default on the font style for new text labels that are added to the form. This saves time in updating the label font properties individually after the labels have already been added. An alternative to this is to use the Select All icon on the form and edit the font property on everything at once.
Adjudication
Adjudicator Form - Select to define the form as one which Adjudicators will complete when applicable
Adjudicate this Form - Select to make the form one which will be adjudicated via the Adjudicator form above.
Adjudicator Role - Only applicable for the two selections above. This defines the role which will be serving as an Adjudicator.
Moderator Role - This defines which role will be serving as the Moderator
Adjudicate after which level - Applicable only on the form which will be adjudicated (#2). Define what the form status should be of the form before it becomes available to be adjudicated by the Adjudicator form.
Adjudicator Form - Applicable only on the form which will be adjudicated (#2). Define which form will adjudicate the current form. This dropdown of choices is populated based on other forms that have already been defined as Adjudicator forms (#1), so performing that step would be necessary first.
Device Size and Language Targeting (Mobile App Only)
Device Targeting takes a form and creates a “child” version of the same form for displaying in a different layout or language, based on the device settings of the user who is viewing the form.
For example, if a form needs to have a different layout for a phone than on a computer; or if a user in French language should get the French version of a form.
To create a targeted form, select a device and tap the button to build the targeted form. The system will automatically create a child version of the same form in the defined layout.
Device - Choose a device type to target the form to. This list is populated via the Device Dictionary.
Single Column - When creating a targeted form, the system can be forced to line all objects up in one column. Applicable for narrow form widths.
Targeted (or “Child”) forms should only be created once the parent form attributes (fields and conditional actions) are all in place. This ensures all data entry on the form resides in a single dataset.
Data entered on targeted/child forms will be saved to the same data table as the main form. Keep this in mind, particularly for multi-lingual forms. If you prefer to keep languages separated in the data exports, a different parent form will need to be created for each language. Read more here.
Form Footer (Mobile App Only)
Set a footer on the forms similar to setting a footer in a word processor. For example, if a licensed form is built, the copyright can be named.
Dots Per Inch (Mobile App Only)
Dots per inch (DPI) allows for defining a scale that the form will display on PDF outputs - applicable for annotating the form or exporting the PDF. The default value here is 100 to cover most form designs. Changing the value to something smaller will cause the form to scale larger on a PDF. If the DPI value is too small, some of the form may go off the page.
Translation Tools
The Mobile App and web page form builder provide a function for quickly updating all the text on a form to display a different language. This can be done on either the parent form or via device targeting discussed above.
Translation tools allow for easily exporting all the text from a form to validate or edit the previous system-provided translations. Then import the file back in to have all text instantly updated. This is a rapid alternative to manually updating all text within the form - particularly when the translator does not have access to the TrialKit form builder.
On App:
To export the text, open the form properties of the Child form, and tap the export button.
On the mobile app, the file will automatically export to the iCloud/Files folder on the device.
On the Web:
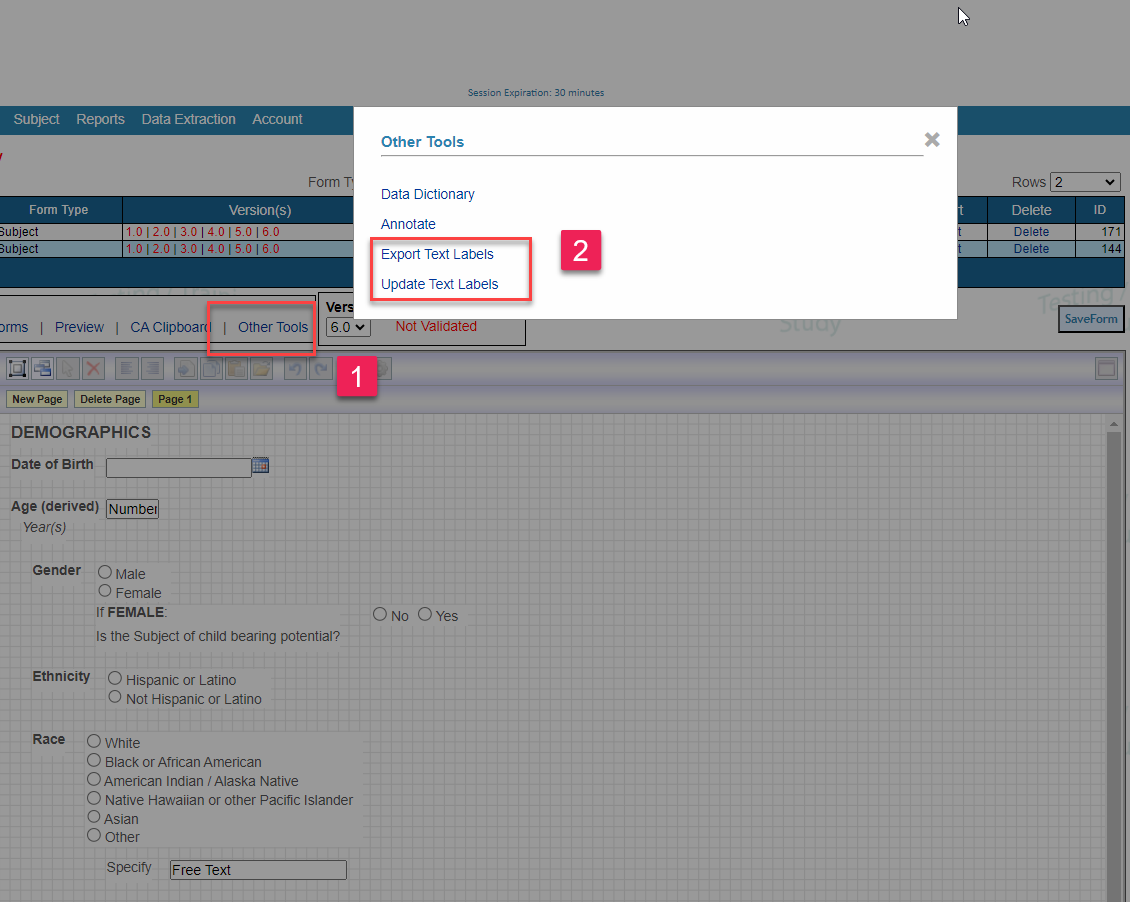
The translation file is exported with four columns as a .tsv file (to avoid issues with comma separation that can occur in text labels).
The following columns are exported:
- Label or Field ID - System ID for the text label or choice field text
- Original text - From the main parent form. The original language.
- Verified translated text - This is a blank column to be completed by a translator. If there are no changes, just copy the system text over to this column.
Translating text on this file is incredibly simple!
- Update the file's .TSV extension to .XLSX
- Open in Google Sheets
- Paste this formula into column C: =GOOGLETRANSLATE(B2,"en","es")
The language codes used in the formula above are for text being translated from English ("en") to Spanish ("es"). Get a full list of language codes here.
After completing the last column of the file (Translated text), it can be saved to the local device file system (or iCloud folder if using iOS mobile app) and accessed via the import option within the form properties tools.
Importing and saving the form will cause the text to update immediately. A confirmation popup will appear to indicate the number of updated text objects.
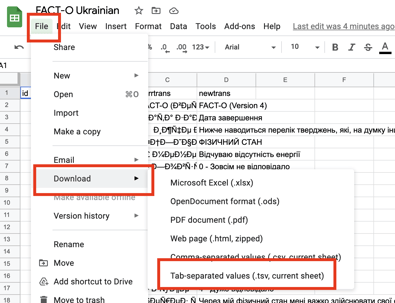
Be sure to save the final file version as a .tsv (tab separated). This is the format the file window will be looking for. The purpose of .tsv over .csv is that some text labels may include commas that could alter the file columns.
Here is one good way to save a file as .tsv using Google Sheets: Open the file in Google Sheets> Download the file as a TSV (shown below).