Setting up a Study to Collect Data From Participants at Defined Intervals, Frequencies, and Times of Day
This article covers the setup and configuration of studies that need to collect data directly from Participants. This is generically referred to in TrialKit as ePRO but also includes the collection of diaries.
Prerequisites:
- The study is enabled with ePRO functionality
- The user has access to the following permissions: Study Configuration, Form Builder, and Subject Record Page Design
Table of Contents:
Methods for deploying the forms:
- At a Defined Fixed Interval
- Specific Days and Times of Each Week
- A Triggered Event Schedule
- Within a Scheduled Visit Window
Change/Update an Existing Configuration
How Forms are Listed (ordered) For Participants
Allowing Participants to Access Past Forms
Giving Access to Historical Data
Enable ePRO for Study
Similar to other functions, the master control to enable ePRO must be turned on. This is done in Study Configuration / Functionality.
Many of the initial steps covered here may already be done within the study based on the template configuration but is good to run through each step to verify.
In the Role Security tab, add a new role for the Participant (can be named anything), like below. The subject must have a hierarchy value of zero (0) and a Role Type of 'Site'.
The new Participant role must also be given the following permissions:

Additionally, give this new role view/edit access to the forms they will be completing.
Setup the Registration Form to Collect the Participant's Email Address
The form that is serving as the study's registration form needs to collect the Participant's email address and timezone. To do this:
Add an email address field onto the form and set the special type field property to "Subject Email".
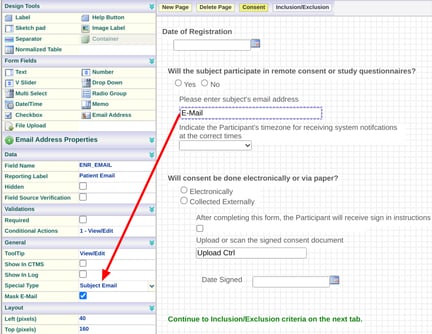
The patient's email address will NOT be included with other form data in the data exports or reports. It will be visible on the form for any users that are not blinded to it.
Setup the Registration Form to Define the Participant's Timezone
New Participants that get registered will need to sign in to set their own timezone. This step will allow Clinician's to set that timezone in the beginning to ensure notifications are received at precise times. This is not a required step - particularly if notifications will not apply to the Participants before they have a chance to sign in for the first time.
If timezone is not defined, the system will default Participant timezones to Pacific Standard (UTC -8). After a Participant signs in, it will then auto-update to the timezone of their device.
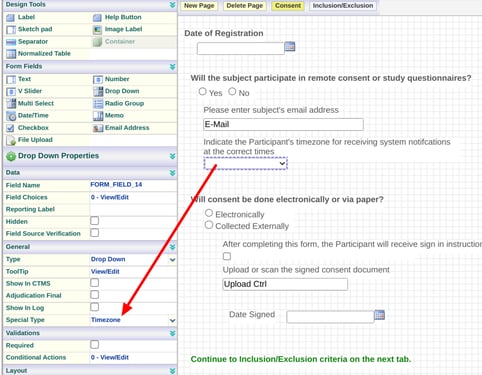
Add a dropdown field to the form and set the special type property to "Timezone". Do not add any choices to the dropdown field. It will be populated automatically during data entry.
Include an Email Conditional Action to notify the Participant of how to sign in
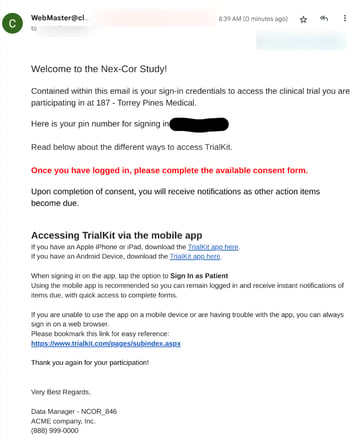
When a Participant is registered in the study, while not required, it usually makes sense to have the system also send an email to the Participant notifying them that they have been added to the study and include any instructions on how to access TrialKit. A template/example is shown below, but can be configured any way as discussed in Email Notifications for Conditional Actions.
Defining Which Forms Will be Completed by Participants
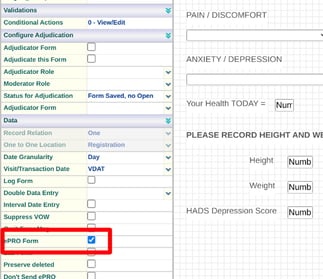
Any forms that need to be accessible to the Participants should contain the 'ePRO' form property.
If the form is collected repeatedly as a diary (not within a scheduled visit), it should be tagged as a log form with a relation of 'Many'. A consent form or a daily diary are two examples of this.
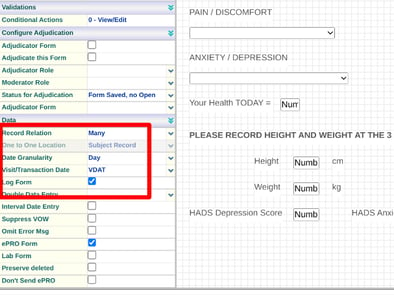
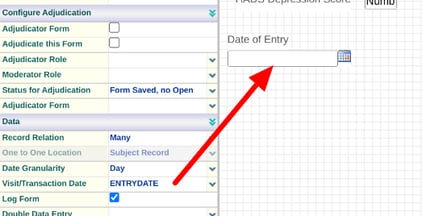
The Visit Date Field on ePRO Forms
Visit Dates are defined on any subject-type form. ePRO forms are no different, but the system will do something different with this date during data entry. When a Participant opens the form to complete, this date will auto-fill with the user’s current date/time (based on their timezone preference).
For this reason, it's normally advised to make the visit date field a date+time and label it as "Date Entered" or something similar, since the system will be auto-populating it.
Methods for Deploying Forms To Participants
There are four methods of providing forms to study Participants and making them available for the specified duration of time. The combination of these methods will cover most requirements that studies have for making sure forms get completed at precise time points in a given Participant's study involvement.
- On a defined fixed interval (in weeks, days, or hours).
- On specific days and times of the week, up to hourly at the top of the hour.
- Based on an event triggered by the Participant - One of the ePRO forms conditionally triggers a schedule of follow ups for that event. Triggered forms can be deployed up to every 5 minutes.
- Forms collected within the visit schedule
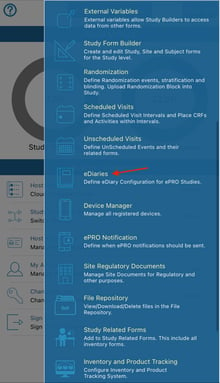
eDiary Configuration
The Diary Configuration screen is where you can define which ePRO forms to deploy at a specified frequency.
Access is based on access to eDiary configuration in the study role security
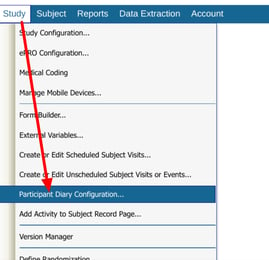
Web Browser:
Open the Participant Diary Configuration screen.
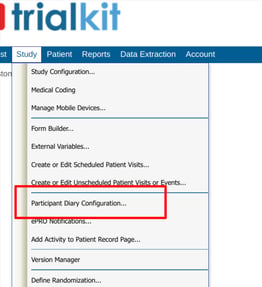
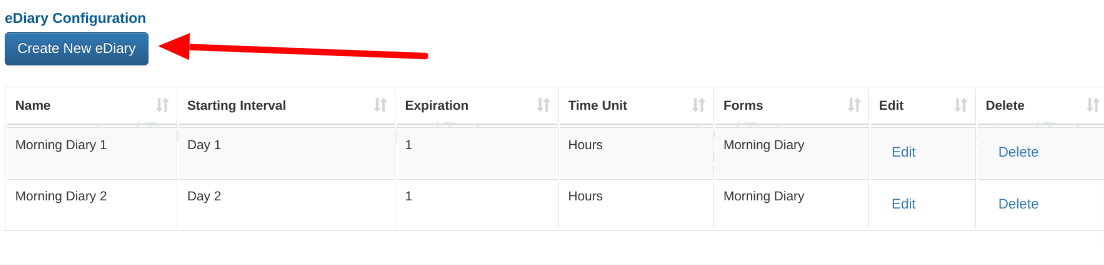
This will open a table of existing diaries and a button for adding new ones.
Mobile App:
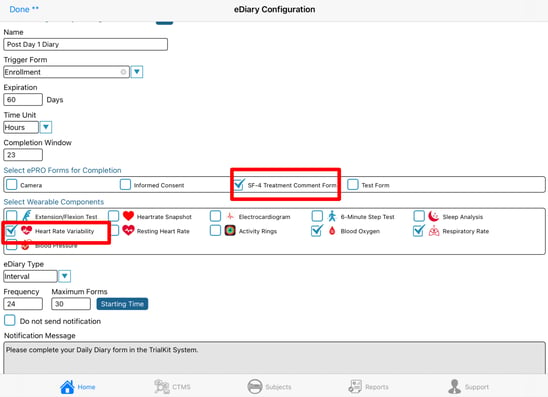
To create an eDiary/ePRO form, add a new configuration and fill out the form. Below is an example of some things that the Participant needs to complete every morning at a specific time, starting at some date entered on the Registration form. The Participant will then have 23 hours to complete it each time the form is deployed. After 60 days the diary will stop running.
To understand how diaries work and how their resulting schedules can be viewed, read this article: Diary Schedules
Definition of Terms in the Diary Configuration
- Diary name - Name of the diary that the Participant will see in their list of forms due.
- Always available - Checkbox to configure a diary/form that will be constantly available for the Participant to fill out. Checking this removes many of the other configuration options which do not apply to a form that is always available.
- Prefix - text to define the meaning of each sequential iteration of a deployed diary. For example, "Day" for a diary that is daily, or "Week" for a diary that is weekly, or "Interval" for a more generic prefix when a diary has sporadic timing. This prefix is only displayed in the subject's diary report.
- Trigger Form - When the diary as a whole will start running, based on the date field specified on that form. That is done within the form builder.
- Expiration in Days - The total overall duration in which the diary should run from the time it starts for a given Participant
- Time Unit - The value set for the Frequency and Completion window will be based on the time unit set here. Example: "5" for the completion window will mean 5 days if the time unit is set to days.
- Completion window - For each iteration of a form being deployed, how long should the Participant have to complete it before the next iteration comes due. Note, this should not overlap the time that the next interval starts.
- Forms to deploy - Select which form(s) apply to the diary deployment time points.
- Wearable components - Include specific wearables data to prompt the Participant to send for the diary time points.
- eDiary Type - The type of diary that is needed. These are described in the next section of this article.
- Frequency (Interval type diary only) - How often the form should be deployed based on the time unit? If the time unit is set to hours, a frequency of "3" would mean the form is getting deployed every 3 hours.
- Maximum Forms - How many forms can the Participant enter as a maximum. This will determine if the diary should be turned off before the expiration days that were defined.
- Starting Time - The time of day that each interval should begin. For example, if it's a daily diary like the example above, what time of day should users receive the notification to fill out the form.
- Notification Message - The message that Participants will receive each time a diary interval is due.
- Do not send notifications - This prevents the system from sending notifications for that particular diary
Changing an existing diary configuration
If a the diary rules need to be changed mid study, there is a means of forcing a re computation of already existing schedules on existing subjects. This will get the current trigger date for all subjects and rebuild their diary schedule according to the updated configuration.
Available via the web.

At a Defined Interval
Interval diaries deploy forms that need to be collected on a regular recurring interval. For example, every 1 day, every 7 days, or to make a form always available. The day that the schedule starts is dependent on the trigger form and the date defined within that form. The day the diary stops is also based on a date defined in the trigger form, or else the maximum forms or diary expiration.
To configure an interval. diary, within the Diary Configuration screen, choose the Diary Type "Interval", and fill out the parameters of the diary. Read above on how to configure an eDiary.
Notifications
Each time a form is made available, a notification will be sent to the Participant.
Exceptions:
- The Do Not Send Notifications option is not checked
- The diary is always available
How Long the Form will be Available
Each iteration of a form will be available until the defined completion window is reached or until the form is completed.
The Diary will expire (stop running) based on:
- The stop date defined in the trigger form
- The expiration period for the diary has been reached
- The study exit form is completed for the Participant
- The maximum number of forms has been met
Specific Days and Times of Each Week
Forms that need to be completed on specific days and times of the week. For example, every Monday and Friday at 7 am and 7 pm.
Within the diary configuration screen, choose the 'Specific Time' type. Then tap on any day of the week that the form needs to be available. A window will open to also select the time(s) for that day.
Include time in the visit field of the diary form.
Avoid overlapping other diaries or time windows. See the following examples.
Overlapping diary examples (to avoid):
- If a diary is set to go out at 6 p.m. and expire after 8 hours, there is an overlap into the next day. If the diary is completed at 1 a.m., then the system thinks the diary is complete for that next day.
- If the visit date defined on the diary form does not include time, the system will assume it was saved at midnight whenever the patient saves it, which may prevent it from not disappearing from the Participant’s list of forms due.
Notifications
Similar to Interval diaries, the Participant will receive a notification each time a form is deployed for delivery. The notification message is defined within the ePRO Notification settings.
A Triggered Event Schedule
A specific schedule of forms needs to start deploying at an unknown time point. Instead it needs to be triggered by a condition. To put it differently, it's a schedule of form(s) that need to be sent based on an event that occurs which can only be triggered by the Participant.
For example, a drug diary is needed for a Participant to indicate when the drug is used. Based on that "event", follow-up form(s) needs to be filled out every 2 hours for the next 6 hours and then every 12 hours for 3 days.
The most versatile way to set these up is through a conditional action on the form that should trigger the event (the 'Trigger form'). By using a conditional action, you can define exactly what is needed to trigger a preset schedule of intervals (the "Event Schedule" and form(s) that will be collected at those intervals within each event.
Configuring an Event Schedule
The Event Schedule option is available if the study is an ePRO study.
On a Web Browser, it is found within the Participant Diary Configuration screen:
Access to this next part is based on study level role permission "Event schedule configuration"

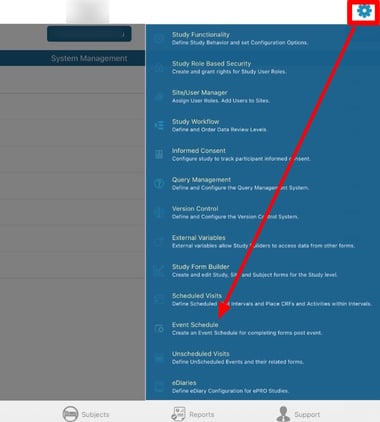
On the Mobile App, it is located under the study configuration menu:
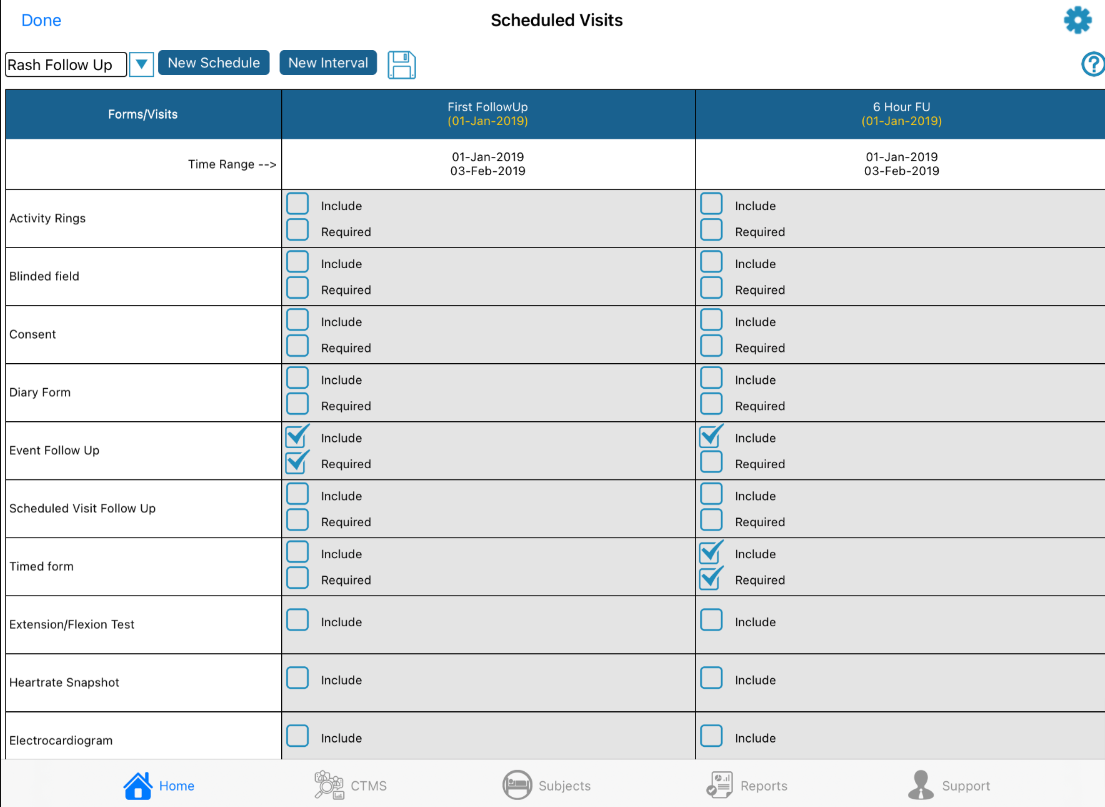
From the screen above tap the New Schedule button at the top to create a new schedule. Doing so will prompt for a schedule name and starting interval. The starting interval is the point at which the trigger condition can initiate the schedule. If a trigger condition is met for a given subject, but that subject's visit schedule is not yet at the starting point, the event schedule will not be triggered.
Any number of event schedules can be created to deploy a different schedule of ePRO forms or wearable device activities based on pre-defined criteria (conditional actions). Use the dropdown at the top of the screen to toggle between the events that have been configured.
To edit an event schedule name or starting interval, tap the first column header.
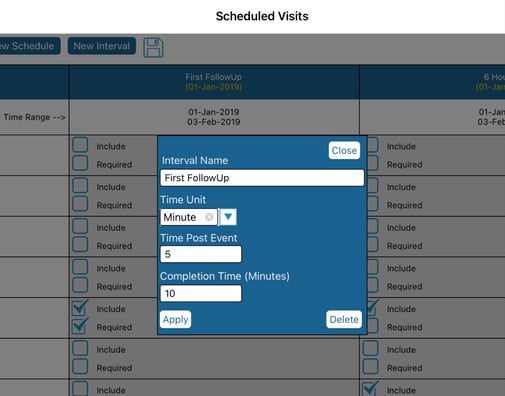
To edit any of the intervals within the schedule, tap the Interval's column header. From here you can then define the interval name and parameters:
- Time Unit - Unit of time for the value used in Time Post Event
- Time Post Event - How long after the trigger event (visit date field on the trigger form) will the interval begin
- Completion Time - The amount of time in minutes that the interval is available for the Participant to complete the form(s) in that interval
Lastly, include/require any forms or wearables data that must be collected at each of the intervals.
Wearable device data can include the following for Apple Watch-supported studies:
- Heart rate snapshot
- ECG
- 6-minute step test
- Sleep analysis
- HR Variability
- Resting HR
- Activity Rings
- Blood oxygen
- Blood Pressure
How Long the Triggered Form Will be Available
The form that gets triggered for a given event will be available for the duration specified within the event schedule, or until the event is terminated by terminate conditional action.
As events occur and forms get completed by the Participant, those can be tracked within the Events Report.
Important points:
- The trigger form (the form where the event trigger CA resides) must be completed (all edit checks satisfied) to trigger an event. The condition must also be met. If the condition is not met, but the trigger form is completed, and event will display in the subject's casebook, but no event intervals will be deployed to the Participant. This is so a Clinician can track saved events - including ones that did not warrant triggered follow up forms to the Participant.
- The trigger form will, by default, be always available to the Participant. If it only needs to become available at a certain point, it can be configured to be conditionally hidden.
- However, Forms within event intervals cannot be conditionally hidden. This is by design because it allows for real-time delivery of time-sensitive forms and notifications. If the system enforced hiding, the notifications would not be able to process fast enough to ensure timely delivery.
- Fields within event interval forms CAN be hidden. To hide fields within specific event intervals, write the CA on a field using the "Event Follow up" constant.
Within a Scheduled Visit Window
To collect forms within a scheduled visit, simply make the form part of a visit that has the required date/time window.
In the example below, a diary needs to be collected from the Participant during the same period of time that the 3-month follow-up visit occurs.

The form will be available for Clinicians to view within the subject's casebook, assuming they have view rights to that form, but it will be entered by the Participant.
The Participant will get access to the form at the low window date of the visit.
Important Notes:
- Scheduled visits are primarily intended for site visits or Clinician-entered data. It is not advised to configure an entire ePRO study via the visit schedule, particularly if forms are due at specific times of day, or at specific hours. Instead, consider using the Event Schedules.
- If any ePRO forms are collected in a "TBD" visit, the system will still deploy the forms to the Participant based on that default time range computation. To prevent that, use a hide conditional action on the ePRO form so it does not show until that dependency date exists.
Notifications
If the form is set to have notifications, a notification will be sent to the Participant at the low window date for the visit. This assumes the form is not set to have the notifications disabled.
This notification is configured in the ePRO Notification Configuration screen.
Notifications for scheduled visits have a limitation of running at the top of each hour and could be delayed past the top of the hour by the time the Participant receives it. If a visit is due at 9:08 a.m., the notifications will not run until 10:00 a.m. The participant may not receive it until 10:15 a.m.
For this reason, do not use visit schedules to deploy hour-specific forms. Instead, use time-specific diaries or an event-triggered schedule.
How long the form will be available
The form will be available for the Participant to complete until the high end of the visit window, or until the form is completed. If the study exit form is completed for the Participant, then the visit window will not apply.
Notifications To Participants
Participants will receive notifications anytime a form becomes due, based on how the Visit schedule or eDiary is configured. Here are a couple of examples:
- 6-month follow-up visit includes an ePRO form. The Participant will receive a notification on the low date of the visit window. The form will remain available for the duration of the visit window and may also receive reminder notifications depending on the Notification configuration.
- The Interval diary goes out at a frequency of once per day for 10 days after the 3-month follow-up visit. Starting on the 3-month follow-up visit, the Participant will begin receiving daily notifications until the diary expires in 10 days or the maximum number of forms have been entered.
If the Participant user role does not have view rights to a form that is being deployed, a notification will still be sent, but the form will not display in their list of forms due.
There are a few reasons notifications might not go out when a form becomes due:
- The form is collected in a visit schedule and notifications are not configured in the ePRO Notifications screen.
- The for is part of an eDiary and notifications have not been allowed in the eDiary configuration - as detailed in the section above.
- The form is collected in an hourly-based visit schedule. Visit schedule forms are limited to one notification per day. The first notification will go out based on the visit window, but if there is another visit in the following hours of the same day, a notification will not go out. Only the form will be due to be completed. For hourly notifications, use an eDiary rather than a visit schedule.
- The ePRO form is configured in the form builder to not send notifications.
- The visit window is not active or has already sent a notification for the current window.
- The study is set to a status of completed
- The Participant has exited the study (study exit form has been saved with any status)
- The Participant has disabled notifications to their preferences.
- The notification message contains HTML and cannot be sent via push notice or SMS.
How Forms are Listed (ordered) For Participants
Due to the many ways forms can be deployed to Participants and the number of forms that can potentially be deployed/available to the Participant at any given time, it could be important to understand how the system will organize, or order, the list of forms for the Participant when they open up their list of what is due.
This list of forms is based on the ascending form sequence value which is set in the form builder for each form.
Allowing Participants to Access Past/Completed Forms
Participants can optionally be given access to one or both of the following:
- Past forms that have been entered, but are not yet locked by a review level. These are called "Completed Forms", and are made available to Participants via the Study Functionality Settings. Access to completed forms can be even further controlled from being edited. Read more here.
- Forms collected within a visit schedule that were missed (visit window expired). These are called "Expired Forms", and are made available via the Study Functionality Settings.
Participants then access those forms via their Menu Options.
Controlling Which Completed Forms Can Be Edited
If Participants have access to Past or completed forms, the study Manager can prevent Participants from editing either all of the forms, or only some of them. This is done by the following two controls:
- Permission in subject record management to Allow Participants to Edit Existing Records - By default this is disabled and subjects will have access to completed forms, but not be able to edit any of them. If this is enabled, then the next control can be set to allow only certain forms.
- Form property to Prevent Form Editing - Prevents Participants from editing any forms that are completed without errors. This is enforced anywhere that epro forms are accessible by the patient. The completed forms list will also indicate "read only" for any forms that do not have this property set.
Giving Access to Historical Data
Participants can optionally be allowed to view past data that auto-filter the Participant's data. This is useful for Participants to see all the data they have entered without going through past completed forms. For example, the Participant can view a history of how well they have felt since being part of the study.
This is done via the Report Builder where a report can be targeted to the Participant's role.
Testing An ePRO Study
As a study gets configured with the Participant-facing forms needed, testing it out is an important step to verify the desired behavior. This can seem difficult since consenting may be involved and forms might only get deployed occasionally, such as a 1-month follow-up visit. It doesn't make sense to wait one month to see if the form becomes available to the test Participant. This section provides a step-by-step on how to efficiently test the consent and PRO portion of the study.
1. Register a subject with an email address that is owned by the person performing the testing. An alias address usually makes the most sense here so there are not multiple inboxes to monitor as the testing is done. Most email platforms, like Google Workspace, provide a method of quickly creating alias addresses. In Gmail, this is done by adding "+sometext" in the prefix. For example name+studyA@gmail.com.
To make the testing email addresses easy to track, use the study name and subject ID in the email. For example name+studyA_100002@gmail.com. Now when you get an email in your inbox, the email will show you the study and subject ID.
Do NOT use fake email addresses as this will impact the study's rating with the email servers and their ability to send any type of email in the future.
Each Tester only needs one or two test Participants for a given study. There is never a need to continually add more subjects to a test environment with several different email addresses involved. Doing this over time, especially on multiple studies will produce hundreds of 'junk' email addresses and cause potential issues down the road.
If forms or behavior needs to be re-tested, there are tools for deleting records and revoking consent to 'refresh' a given test Participant for using it again in the same study.
2. Verify the Participant received some sort of email notice on how to access TrialKit (discussed in the section above).
3. Sign in as a Participant on either the Mobile App or Web Browser.
If using the mobile app, and if possible, it's most realistic to use a dedicated device where only the Participant will be signed in. If the app is used to sign in with multiple user accounts on a single device, it will only receive push notifications for the user who was most recently signed in.
4. If consent is being enforced for the study, verify the consent form works as intended both in an incomplete state and a complete state.
To retest consent on a Participant, it can be manually revoked so the system will require that Participant to consent again.
5. Verify the correct form(s) are due for completion at the right time. This part can be tricky because it's not desirable to wait for forms to become due. The due periods can be manipulated by adjusting the dates for the subject, which drives the dependent forms. For example, if a daily diary is supposed to start one day after the registration date, the registration date for that subject can be adjusted to yesterday's date, so the system thinks it is now a day later.
To retest any ePRO forms or deployment dates, do not create a whole new test subject. Instead, simply delete the ePRO forms that were already entered for the existing test subject. This can be done within the subject's casebook.
6. Exit/Withdraw the subject from the study to verify the Participant no longer receives forms or notifications.